background image

Docking 

         Communicating & downloading data 
      

053-669, Rev A                                  eg5 

23 

Docking  

Communicating & downloading data  

By using your docking station, USB cable, software, and your 

dosimeter, you can quickly communicate between the software and the 

dosimeter.  There are two methods for communicating which are: 


Send setup data:  Enables you to configure your set-up 

parameters in QuestSuite Professional II (QSP-II) and download  

these parameters to the Edge.   


Retrieve data:  you have the capability to retrieve the data from 

the dosimeter into QSP-II in order to view and analyze your studies 

in QSP-II’s charts, graphs, and reporting functionality.   


How to connect your dosimeter to the computer


1.


Dock the dosimeter on the EdgeDock1 (or 5) and turn on the 

dosimeter by pressing the on/off enter button.  


✍  

NOTE:  See charging your dosimeter, on page 14. 


2.


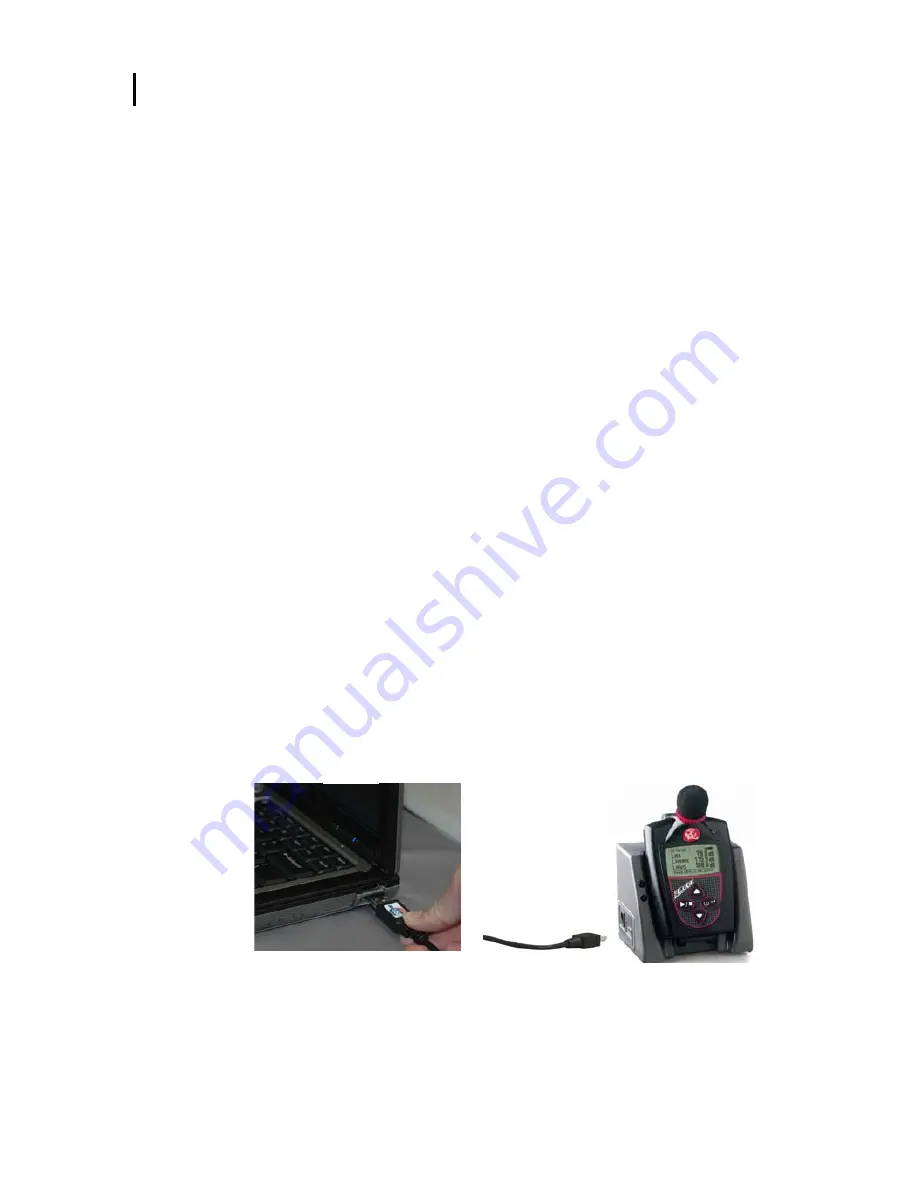
Plug the USB cable into the computer. (See “A” in Figure 3-4).


3.


Plug the opposite end into the docking station (See “B” and “C”).


✍  

NOTE:


The docking station will be powered through the 

computer; thus, you do not need to plug in the charger adapter.  If 

you wish to charge the dosimeter, plug in the charger adapter.


     Figure 3-4: Communicating - connecting a docked Edge to a pc

A

Содержание The EDGE eg5

Страница 1: ...est Technologies the Quest logo and QuestSuite Professional II are registered trademarks of Quest Technologies Incorporated All rights are reserved Microsoft and Windows are registered trademarks of M...

Страница 2: ...T4 IP65 Ambient temp range 10 C Tamb 40 C Certificate number IECEx SIM 08 0012 Maximum charge input voltage Um 5 6V Temperature Operating 14 F to 122 F 10 C to 50 C for 143 C I S rating 14 F to 104 F...

Страница 3: ...Use To improve accuracy of displayed battery life run down the battery until it is fully discharged then proceed with a full charge via the EdgeDock Repeat this procedure every few months of use to k...

Страница 4: ...eters 6 CHAPTER 2 GETTING STARTED 7 Checking the equipment 7 Turning on 8 LED indicator 8 Navigating 9 Turning off 9 Display and keypad 10 Diagram 10 QuestSuite Professional II software 11 Loading 11...

Страница 5: ...5 Dosimeter setting 25 Customizing your views Display setting 27 Auto On setting 28 Programming the Edge to auto start stop a study 28 Security Setting secure lock during your run 29 Clearing the dosi...

Страница 6: ...ored 49 Downloaded Node 49 Viewing your Edge data in QSP II 50 Adding panels charts graphs 53 Saving your customized layout charts graphs 53 Creating reports 54 Viewing and printing reports 55 CHAPTER...

Страница 7: ...n of how the dosimeter operates and processes 2 Figure 1 3 Parameter setup screen for eg5 6 Figure 2 1 Identifying your equipment 7 Figure 2 2 Powered on with measurement view displayed 8 Figure 2 3 E...

Страница 8: ...Securing run 46 Figure 5 1 Communicating between your pc and the Edge 47 Figure 5 2 Retrieve data screen in QSP II 48 Figure 5 3 Viewing your studies from QSP II 49 Figure 5 4 Downloaded studies 50 F...

Страница 9: ...This information can be used to ensure compliance with regulatory bodies or to ensure if hearing conservation programs are needed To get you started quickly with the Edge the first chapter is dedicate...

Страница 10: ...stem The next circuit is the response circuit which controls the dampening of the readout The response choices are typically Slow or Fast Finally the results will display on the dosimeter screen For c...

Страница 11: ...serious pain and permanent damage What do the standards say Many organizations have studied and analyzed the effects of high sound exposure on hearing As a result standards were developed to regulate...

Страница 12: ...to ensure compliance with OSHA MSHA ACGIH IEC or your own customized parameter settings to determine if your workers are over exposed to noise As a time history monitor Used to provide a worker s minu...

Страница 13: ...nning and operating the Edge 4 View your results via QSP II Working with Charts and Graphs Organizing and saving your studies See Chapter 5 to view measurements with QuestSuite Professional II 5 Devel...

Страница 14: ...reen circle with a checkmark indicating a docked powered on Edge with the serial name QSP II will also display a checkbox in front of applicable models that are selectable for setup parameters See Cus...

Страница 15: ...started with your noise studies NOTE Depending on the accessories you selected the dosimeter may have the following components For the docking stations you will either have an EdgeDock1 or an EdgeDock...

Страница 16: ...and firmware version The screen will be in the measurement view Figure 2 2 Powered on with measurement view displayed LED indicator There is a three color LED indicator on the Edge located to the rig...

Страница 17: ...the measurement values and battery run time Turning off 1 Press and hold the on off and enter button 3 2 and 1 countdown will appear as the dosimeter is powered off NOTE To halt the power off mode si...

Страница 18: ...w data and various indicators Up Arrow Used to scroll through display screen views On Off and Enter Used to power On Off the meter Used to switch between toggle dosimeter one and dosimeter two measure...

Страница 19: ...geDock5 If loading from Quest Technologies Internet site please follow the directions online http questtechnologies com Docking station functionality Depending on the kit you purchased you may have an...

Страница 20: ...ent than the one you are using Mechanically it will function similarly Figure 2 5 Attaching the charger adapter with the plug adapter Docking station components Explanation Charging indicator Identifi...

Страница 21: ...strated in Figure 2 5 It will be the same process for an EdgeDock5 2 Plug the charger adapter directly into the wall electrical wall plate 3 Plug the opposite end into the power connector or jack of t...

Страница 22: ...e approximately 3 to 3 5 hours How to charge 1 Plug in the power adapter to the EdgeDock See Figure 2 6 page 13 When powered on the EdgeDock bottom LED indicator will appear solid amber 2 Slide the Ed...

Страница 23: ...of the single bay dock Figure 2 8 Backside of EdgeDock1 Storing the dosimeter To preserve the life of the battery it is suggested that the dosimeter is turned off when you are storing the dosimeter A...

Страница 24: ...053 669 Rev A eg5 16 This page left blank intentionally...

Страница 25: ...ring C A measuring an upper limit value and a criterion level This chapter explains data storage the pre set views on the dosimeter and explains how to customize the parameters and display of your Edg...

Страница 26: ...ed data Summary data Summary data represents values that occurred over the entire run of the study For an average value such as Lavg it represents the average decibel value over the entire run time Pe...

Страница 27: ...is the highest Peak value for that 1 minute and the Lavg value is the average dB value for that 1 minute Figure 3 3 Sample time history data or logged data chart Logging eg5 model only logs at one min...

Страница 28: ...s noted as SPL LASMX Maximum sound level is the highest sound level recorded during a measurement interval with a particular response setting Slow or Fast and weighting A or C LMax is the highest valu...

Страница 29: ...y equivalent exposure Please see Glossary of Terms for more details page 73 UL Upper Limit is the amount of time that the sound level exceeds a preset level the Upper Limit LC AAVG It is the result of...

Страница 30: ...ents for Lmax Lmin and Lpk Descriptors Variants LASMX Maximum sound level is the highest sound level recorded during a measurement interval with a particular response setting Slow or Fast and weightin...

Страница 31: ...from the dosimeter into QSP II in order to view and analyze your studies in QSP II s charts graphs and reporting functionality How to connect your dosimeter to the computer 1 Dock the dosimeter on th...

Страница 32: ...gure 2 8 Select No and press Next through the remaining wizard At the end of the wizard press Finish This will install the hardware components associated with your EdgeDock1 and or EdgeDock5 NOTE If y...

Страница 33: ...uttons or editable fields To save you some time and effort it is suggested to select one of the Saved As templates For example if you want to run a c a measurement study select the Saved setup titled...

Страница 34: ...s assigned i e 80 dB ER UL CL are selectable via up down arrows or type in a value Timed response select either Slow or Fast response RMS weighting with A or C to enable click on A or C weighting C A...

Страница 35: ...pc Turn on the Edge Ensure the Edge is powered on by pressing the on off enter button 2 From the welcome screen of QSP II select the Edge and click on the Setup tab see Figure 3 1 page 17 3 Click on...

Страница 36: ...e pc to the EdgeDock 2 From the welcome screen of QSP II select the Edge and click on the Setup tab see Figure 3 1 page 17 3 Click on eg5 if not selected then click on the Auto On tab located under th...

Страница 37: ...ing see Locking or Unlocking page 46 The following three lock settings are available in QSP II Unlocked o No security feature is enabled Locked secure with view o Noted in QSP II as Locked allow measu...

Страница 38: ...e Select All is checked and or the dosimeter is checked if using more than one bay click on the appropriate dosimeters 5 Select one of the secure lock settings by clicking in one of the checkboxes 6 T...

Страница 39: ...l appear in the Edge Dock section of QSP II and it will appear on the display of the Edge How to name your dosimeter 1 Ensure the Edge is turned on docked and the USB cable is connected from the pc to...

Страница 40: ...y be set with one instrument at a time To set up additional Edge s please repeat steps 1 6 7 To check the dosimeter for the new name undock the Edge and press the down arrow this will refresh the dosi...

Страница 41: ...r reset your data 1 From the setup button in QSP II s Edge screen click on eg5 and click on the Commands tab 2 Next select the Clear tab 3 Ensure Select All is checked and or the dosimeter is checked...

Страница 42: ...elected click on the Commands tab and click Set Time tab Figure 3 13 Setting date and time in QSP II 4 Click on the Select All button under Edge Units if using one dosimeter Or select by expanding the...

Страница 43: ...urned on docked in bay 1 and the USB cable is connected from the pc to the EdgeDock 2 From the welcome screen of QSP II select the Edge and click on the Setup button see Figure 3 1 page 17 3 Next clic...

Страница 44: ...053 669 Rev A eg5 36 This page left blank intentionally...

Страница 45: ...for running a study CHAPTER 4 Quick Help List typical dosimetry session 1 Turn the dosimeter on and check your battery power 2 Reset the dosimeter o This will clear out all of the data history before...

Страница 46: ...refer to Appendix A Contacting Quest page 68 How to attach the dosimeter 1 Clip the dosimeter on your shirt and ensure the microphone is positioned as high on your shoulder as possible and away from...

Страница 47: ...power 1 The battery indicator icon located at the top right of your screen gives an approximation of battery life and is always present If the battery indicator is half shaded this illustrates you ha...

Страница 48: ...you slide the Edge into the cavity 4 Turn on the calibrator and ensure parameters are set to 114 dB and 1000 Hz See calibration manual for operation details Figure 4 4 Calibrating 5 CAL will flash on...

Страница 49: ...s press and hold the run stop and on off enter buttons until the splash disappears Figure 4 5 Splash screen 4 The Setup menu appears on the Edge Press the up or down arrow to select the reset icon sym...

Страница 50: ...er buttons See figure 4 5 for splash screen 4 The Setup menu appears on the Edge Repeatedly press the arrow key until the Contrast symbol is selected NOTE Setup menu is used to reset the dosimeter cha...

Страница 51: ...un a noise study 1 If your dosimeter is turned off press the on off enter button to power on 2 Press and hold the run stop button A 3 2 1 countdown will appear 3 When running the following will appear...

Страница 52: ...y you of operational status updates These indicators or alert notices are located on the top right hand side of the screen Table 2 2 explains the function of each indicator Indicator Icon Explanation...

Страница 53: ...down arrow This will move you through the views on the display NOTE If you enabled only one measurement to appear on the display when you press the up down arrows it will not show any other measureme...

Страница 54: ...for further details Unlocking How to unlock 1 To unlock press run stop button 3 consecutive times within one second intervals and then press the on off enter button a If the padlock icon and the key...

Страница 55: ...o QSP II Loading your studies entails loading the software docking the Edge and navigating to retrieve data button in QSP II The software will then automatically pull your noise studies from the dosim...

Страница 56: ...d on you pc click on Change location button Navigate to the appropriate directory or folder or click on create new folder and create a new folder then click Ok 8 Click on Download button In the status...

Страница 57: ...inbox and it is up to you to organize your mail into subfolders Likewise with QSP II once the files are imported they are stored in a general inbox called Downloaded node With a simple right click yo...

Страница 58: ...rieved study see next section Downloaded Node Viewing your Edge data in QSP II How to view studies in QSP II 1 Expand My Data node by clicking on the sign 2 On the Downloaded node click on the sign to...

Страница 59: ...of studies Run Stops that are stored in the dosimeter when you retrieve data The data will stay on the dosimeter until you clear it A session folder will list group summaries of the study data For ex...

Страница 60: ...d graphs You can add charts and or graphs move them in the appropriate position and or customize the data values B Panel For the Edge the standard layout has three panels The panels can be moved edite...

Страница 61: ...rt heading and drag and drop to a specific spot and or editing the logged data values With the save template button you can save your customized layout so every time you open a study the appropriate c...

Страница 62: ...s charts graphs appear on your computer screen To rearrange click on the title of a chart or table drag and drop a chart table on the title bar of a panel If your cursor displays this icon it indicate...

Страница 63: ...k the report and click Delete Report To save the report in an alternative folder directory i e on your desktop and then you can email it and share the information select Save As and add it to a direct...

Страница 64: ...56 053 669 Rev A eg5 This page left blank intentionally...

Страница 65: ...isplay screen For details on Dosimeter setup see page 25 or for details on Customizing your views see page 27 Your setup parameters should look similar to the figure below Figure 6 1 C A measurement s...

Страница 66: ...wnloaded node expand the Edge files to view the study data Three panels will appear as your default view which includes the information panel general data panel and logged data chart Figure 6 2 Select...

Страница 67: ...em tab and click in the c a checkbox Click Ok Figure 6 4 Adding C A to view in logged data chart 4 The C A measurement will appear in the selected panel you selected An example is displayed below Figu...

Страница 68: ...ter tab under Dose indicator LED uncheck the following Alarm enable Will disable the flashing red LED when the threshold entered exceeds the designated value during run mode If checked red LED will fl...

Страница 69: ...screen by turning the red ring not the foam in a counterclockwise direction If you are replacing the windscreen screw on a new windscreen in a clockwise direction until it fits firmly 2 To unscrew the...

Страница 70: ...Technical Support 053 669 Rev A eg5 62 This page left blank intentionally...

Страница 71: ...nologies a 3M company Equipment model eg5 Dosimeter Code Ex ia I IIC 143 C IP65 Ambient temp range 10 C Tamb 50 C Alternate Code Ex ia I IIC T4 IP65 Ambient temp range 10 C Tamb 40 C Certificate numbe...

Страница 72: ...maximum efficiency Type Lithium Polymer Flat cell Memory capacity 120 hours Environmental effects The typical time interval needed to stabilize after changes in environmental conditions is 5 minutes f...

Страница 73: ...EdgeDock1 or EdgeDock5 are equipped with two single screw slots for wall mounting purposes Physical attributes of EdgeDock1 and EdgeDock5 LED amber indicator Indicates EdgeDock1 or EdgeDock5 is power...

Страница 74: ...eters Dosimeters Up to two dosimeters at once eg5 each with its own assignable profile via QSP II only RMS Range 70 to 140 dB RMS Weighting A or C weighting RMS Time Response Fast or Slow Exchange Rat...

Страница 75: ...he related study file Calibrator requirement Calibrations should be performed at 114 dB at 1kHz Communications The Edge communicates via the EdgeDock1 and or the EdgeDock5 Communications is supported...

Страница 76: ...ervice Department and Technical Support 1 800 245 0779 Fax 1 262 567 4047 Office hours are 8 00 a m to 5 00 p m United States Central E mail at mailto sales questtechnologies com Internet at www quest...

Страница 77: ...ve shorter or longer warranty periods This warranty states our total obligation in place of any other warranties expresses or implied Our warranty does not include any liability or obligation directly...

Страница 78: ...70 Appendix A 053 669 Rev A eg5 This page left blank intentionally...

Страница 79: ...e contribution of the noise source of interest the combined measurement 2 Make a second measurement under exactly the same conditions as in Step 1 but without the presence of the noise source of inter...

Страница 80: ...r mathematically determining a combined level of sound from independent measurements made for two noise sources is given below 1 Make independent measurements for both noise sources where each exists...

Страница 81: ...as Sound Pressure Level SPL SPL uses the ratio between a reference level of 20 microPascals 00002 Pascals and the level being measured SPL 20 log measured level reference level Example the SPL for 1 P...

Страница 82: ...libration the dosimeter level may be adjusted to match the calibrator output level Post calibration is a simple verification that the instrument has remained in calibration throughout the measurement...

Страница 83: ...d level during the instrument s run time allowing for the unit s Response Time setting Fast or Slow Measurement Range The decibel range within which the unit s measurements are valid Minimum Level Lmi...

Страница 84: ...e actual level would be extremely difficult Using a response of slow or fast simply smoothes the noise fluctuation and makes the sound level easier to work with While the terms slow and fast have very...

Страница 85: ...lly 1 minute or other specified increment averages are printed Because real noise fluctuates it is quite possible to have an average level below the threshold This also applies for the overall Lavg TW...

Страница 86: ...AR is not available C weighted measurements are often reported as dBC Z is zero weighting with no weighting across the frequency range of human hearing LINEAR is thought of as having a flat frequency...

Страница 87: ...Communicating Edge Dock 11 Crest Factor Defined 73 Criterion Level 26 Criterion Level CL Defined 73 Criterion Time Defined 73 D Date Setting 34 Decibel dB Defined 73 Docking station 23 Components 12...

Страница 88: ...g 30 Logging 67 Defined 75 M Maximum Level Defined 75 Measurement Range Defined 75 Memory storage symbol 22 Mount the docking station 15 N Naming setup 26 Naming your dosimeter 31 Noise Floor Defined...

Страница 89: ...t 26 Settings Named Setup 26 c a measurement 25 Sound pressure 3 Splash screen 8 Standards 3 Stop a noise study 44 Stop mode 44 Storing files 49 Studies Viewing in QSP II 50 Symbol Battery power clock...

Отзывы: