background image


                                                                                                                            GNSS  Module  Series 

LG69T(AA,AD)_EVB_User_Guide                                                                                                            19  / 31 


5


Communication via QCOM Tool 

 
This  chapter  explains  how  to  use  the  QCOM  tool to  communicate  with  the module  via  the  Micro-USB 
interface. For more information, see 

document [2]

. 

 
Download the QCOM tool from our website Download Zone or request it from Quectel Technical Support. 
 

5.1. 

Communication via Micro-USB Interface 


Step 1:


Connect the EVB and the PC with a Micro-USB cable. 


Step 2:


Connect the EVB and the PC with a Micro-USB cable. Flip the Power switch (S101) to 

ON

 position 

to power on the EVB. 


Step 3: 

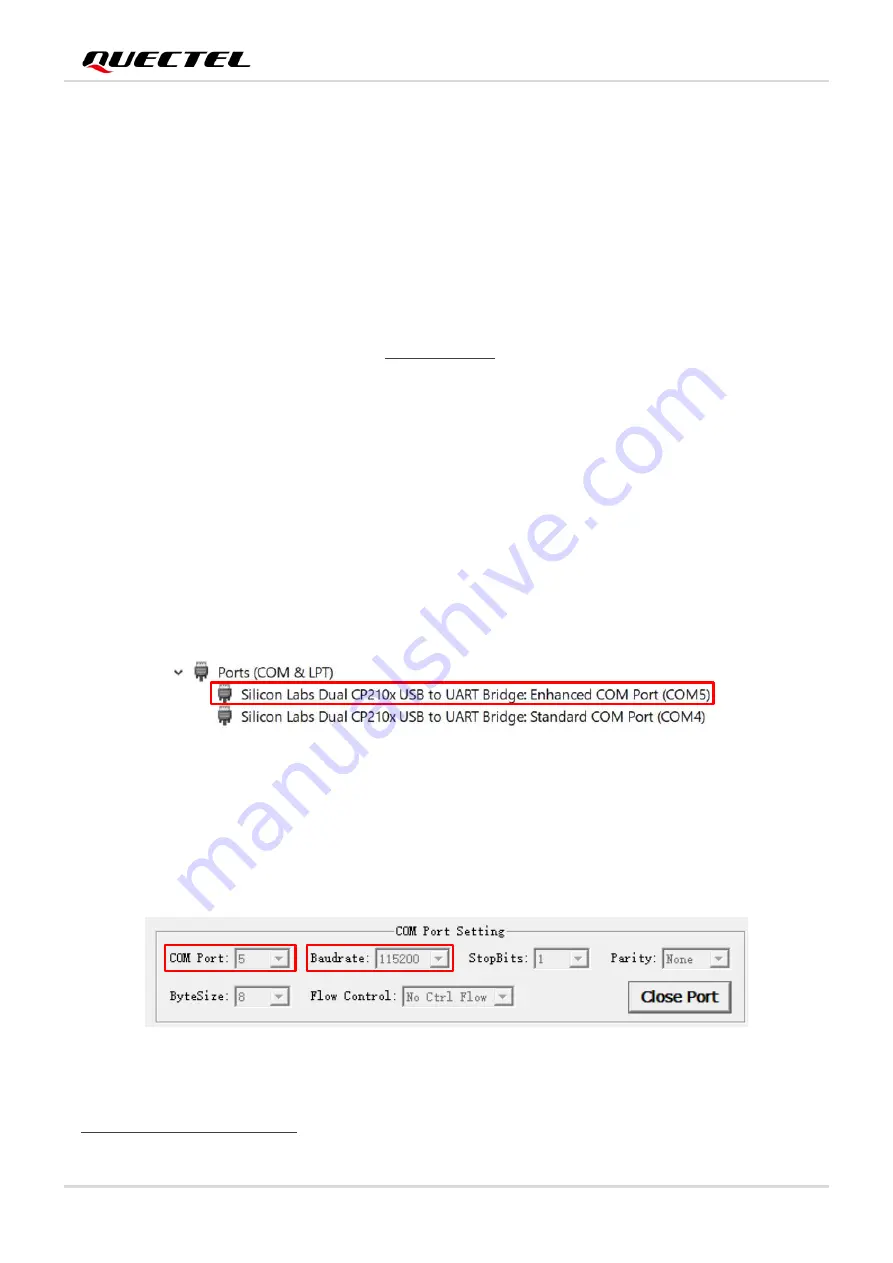
View the USB port numbers in the Device Manager.


Figure 7: USB Ports 


Step

 4

:

  Install the QCOM tool provided by Quectel. The 

COM interface for QCOM port setting i

s shown 

in the figure below (the LG69T (AA) module supports 460800 bps 

2

  and LG69T (AD) module 

supports 115200 bp

2

 by default).


Figure 8: COM Port Setting Interface of QCOM 


2

  UART interface default settings vary depending on software versions. 

Содержание LG69T AA

Страница 1: ...LG69T AA AD EVB User Guide GNSS Module Series Version 1 0 Date 2022 06 20 Status Released ...

Страница 2: ...e employ commercially reasonable efforts to provide the best possible experience you hereby acknowledge and agree that this document and related services hereunder are provided to you on an as available basis We may revise or restate this document from time to time at our sole discretion without any prior notice to you Use and Disclosure Restrictions License Agreements Documents and information pr...

Страница 3: ...o implement module functionality certain device data are uploaded to Quectel s or third party s servers including carriers chipset suppliers or customer designated servers Quectel strictly abiding by the relevant laws and regulations shall retain use disclose or otherwise process relevant data for the purpose of performing the service only or as permitted by applicable laws Before data interaction...

Страница 4: ...these precautions Ensure that the product may be used in the country and the required environment as well as that it conforms to the local safety and environmental regulations Keep away from explosive and flammable materials The use of electronic products in extreme power supply conditions and locations with potentially explosive atmospheres may cause fire and explosion accidents The product must ...

Страница 5: ...e Document Revision History Document Information Title LG69T AA AD EVB User Guide Subtitle GNSS Module Series Document Type EVB User Guide Document Status Released Version Date Description 2020 04 23 Creation of the document 1 0 2022 06 20 First official release ...

Страница 6: ...aces 12 4 DR Application 15 4 1 Installation 15 4 2 Calibration Procedure 16 4 2 1 EVB Installation Angle Confirmation 17 4 2 2 Yaw Rate Calibration 17 4 3 Calibration Result Monitoring 18 5 Communication via QCOM Tool 19 5 1 Communication via Micro USB Interface 19 6 Test via QGNSS Tool 21 6 1 QGNSS Setting 21 6 1 1 QGNSS Interface Explanation 23 7 Firmware Download and Upgrade via GNSSFlashTool ...

Страница 7: ...e 1 Special Mark 8 Table 2 List of Kit Components 9 Table 3 Detailed EVB Interfaces 12 Table 4 J501 Pin Detailed Description 13 Table 5 J302 Pin Detailed Description 14 Table 6 QGNSS Interface Explanation 23 Table 7 Related Document 30 Table 8 Terms and Abbreviations 30 ...

Страница 8: ...yed on QCOM Tool Interface 20 Figure 10 COM Port Setting Interface of QGNSS 21 Figure 11 QGNSS Interface Connected LG69T AA 22 Figure 12 QGNSS Interface Connected LG69T AD 22 Figure 13 Firmware Download Step 1 25 Figure 14 Firmware Download Step 2 26 Figure 15 Firmware Download Step 3 26 Figure 16 Firmware Download Step 4 26 Figure 17 Successful Firmware Download Step 5 27 Figure 18 Firmware Upgra...

Страница 9: ... Chapter 6 describes how to test the modules via QGNSS tool Chapter 7 describes how to download and upgrade the module firmware via the GNSSFlashTool Chapter 8 is an appendix which summarizes the relevant documents terms and abbreviations appearing herein For EVB schematic and PCB layout design files contact Quectel Technical Support support quectel com 1 1 Special Mark Table 1 Special Mark Mark D...

Страница 10: ...re tools QCOM QGNSS and GNSSFlashTool from our website Download Zone or request them from Quectel Technical Support The EVB Kit contents are shown in the figure below Check Table 2 for details Active GNSS antenna Micro USB cable EVB Bolts and coupling nuts Type B USB Cable Figure 1 EVB Kit Accessories Table 2 List of Kit Components Items Description Quantity EVB Evaluation Board Size 100 mm 175 mm...

Страница 11: ... sheet inside the EVB Kit Figure 2 EVB and Components Assembly Make sure that the Active GNSS Antenna is placed with a clear line of sight to the sky Type B USB Cable 1 GNSS Antenna Quectel Active GNSS antenna YEGM011BA Request the Antenna Datasheet from Quectel Technical Support 1 Instruction Sheet Sheet providing instructions on how to connect the EVB and its components detailed information on E...

Страница 12: ...w is shown in the figure below J401 LG69T_ANT D309 TXD 1PPS indication LED D310 GEO_F indication LED D109 5V 3 3V indication LED S101 Power switch S201 RESET_GNSS S202 BOOT_GNSS U301 GNSS module J302 Test points J201 USB_UART EVB version J501 OBD Supported by LG69T AA J101 POWER_5V Figure 3 EVB Top View ...

Страница 13: ...it supports GPS QZSS L1 C A and L5 Galileo E1 and E5a BDS B1I and B2a SBAS L1 Signal Indication D309 TXD 1PPS indication LED 1PPS Red LED Flash Outputs pulse signal of 1 Hz Extinct 1PPS is unavailable TXD Green LED Flash Message output from UART1 TXD Extinct Bright No message output from UART1 TXD D109 5 V 3 3 V Indication LED 3 3 V Red LED EVB 3 3 V power indicator 5 V Green LED EVB 5 V power ind...

Страница 14: ...escription J302 Pin Assignment SPI_MOSI SPI_SCK TXD1 RXD1 1PPS SPI_CS SPI_MISO TXD2 RXD2 GND 1 The LG69T AA module supports the OBD interface whereas LG69T AD module does not OBD 1 J302 Test Points Pins are detailed in Table 5 below Pin Name I O Description NC NC NC NC NC WHEELTICK DI Odometer wheel tick input FWD DI Forward Backward signal input Low level Forward GND Ground ...

Страница 15: ...5 J302 Pin Detailed Description Pin Name I O Description SPI_MOSI NC Not connected SPI_SCK NC TXD1 DO TXD1 Transmit data RXD1 DI RXD1 Receive data 1PPS DO One pulse per second SPI_CS NC SPI_MISO NC TXD2 DO TXD2 Transmit data RXD2 DI RXD2 Receive data GND Ground ...

Страница 16: ...ement turn or tilt of the device however small will cause performance issues and or void calibration The IMU axis direction inside the module is presented below for your reference Z X Y Figure 4 IMU Axis Direction 4 1 Installation Installation of LG69T AA EVB allows for flexibility since it is not dependent on angle or direction The module can automatically identify the installation angle deviatio...

Страница 17: ...ation angle The calibration procedure is based on the premise that the user has fixed the EVB on the car frame No displacement or rotation of the EVB should occur after calibration as described in the following chapters The calibration procedure needs to be repeated only in the following cases The EVB has been moved and reinstalled During a DR cold start and when the NVM is blank or invalid Please...

Страница 18: ...able value After it is initialized drive in a straight road speed 30 km h for at least 5 minutes Step 2 Drive in areas rich in curved roads speed 30 km h This is required for calibrating the yaw rate gain It is important to make tight turns with narrow curvature radius Typical scenarios that allow proper performance of this step involve roundabouts tight turns and sharp bends greater than 90 degre...

Страница 19: ...ring The calibration result will be reported in an NMEA message The following figure illustrates how to check the calibration status message Step 1 Enter the related software command in the Text Console to filter out the NMEA message as shown in the figure below For more information on the command see document 1 Step 2 When the fifth parameter becomes 1 it means that the whole calibration procedur...

Страница 20: ... 1 Connect the EVB and the PC with a Micro USB cable Step 2 Connect the EVB and the PC with a Micro USB cable Flip the Power switch S101 to ON position to power on the EVB Step 3 View the USB port numbers in the Device Manager Figure 7 USB Ports Step 4 Install the QCOM tool provided by Quectel The COM interface for QCOM port setting is shown in the figure below the LG69T AA module supports 460800 ...

Страница 21: ...rrect COM Port shown in Figure 7 above and the Baudrate Step 6 Click Open Port to establish communication with the EVB The NMEA message output by the module will be displayed in the receiving bar of the QCOM tool Figure 9 NMEA Sentence Output Displayed on QCOM Tool Interface ...

Страница 22: ... 1 QGNSS Setting Step 1 Assemble the EVB components Step 2 Flip the Power Switch S101 to ON position to power on the EVB Step 3 Start the QGNSS and click Setting and Serial Port Configuration In the Model list LG69T AA module select LG69T and LG69T AD module select None the LG69T AA module supports 460800 bps 3 and LG69T AD module supports 115200 bps 3 by default Figure 10 COM Port Setting Interfa...

Страница 23: ...Guide 22 31 Step 4 Click the Connect or disconnect button Depending on the module version the interface shown below appears once the module is connected Figure 11 QGNSS Interface Connected LG69T AA Figure 12 QGNSS Interface Connected LG69T AD ...

Страница 24: ...ition of the satellites in use 1 The left column icon shows the satellites in use and their number BDS 4 GLO GLONASS 0 GPS 11 GAL Galileo 0 QZSS 0 NavIC IRNSS SBAS 0 2 The grid map on the right shows the position of the satellites in use GPS satellite BDS satellite GLONASS satellite Galileo satellite QZSS satellite NavIC IRNSS satellite PRN 30 C N0 is 39 dB Hz Column in bright red means that the n...

Страница 25: ...ree Latitude unit degree Altitude MSL unit m Altitude EPH unit m Receiver speed unit km h Horizontal dilution of precision Position dilution of precision Fix Mode 2D 3D Quality Indicator GPS SPS mode UTC date and time Time of day 4 unit second Age of differential GPS data Last TTFF s unit second Total Times Fixed Points RTK Float RTK Fixed ...

Страница 26: ...re information about GNSSFlashTool use see document 4 7 1 Firmware Download in Boot Download Mode Before you start the module firmware download process First Connect the EVB to a PC with a Micro USB cable Second Flip the Power Switch S101 to OFF position before powering on the EVB Firmware download steps in Boot download mode Step 1 Open GNSSFlashTool or click Tools and select Firmware Download in...

Страница 27: ...g LG69TAANR01A01V01_4WDR_ST_BETA0810A_BOOT bin for LG69T AA module LG69TADNR01A01V01_BOOT bin for LG69T AD Figure 15 Firmware Download Step 3 Step 4 Confirm the Port and Baud Rate as the enhanced COM Port and then click Start button Press and hold the BOOT_GNSS button before flipping the power switch to ON position and then release the BOOT_GNSS button to enter Boot download mode Figure 16 Firmwar...

Страница 28: ...load Step 5 7 2 Firmware Upgrade in Normal Operating Mode Before you start the firmware upgrade process connect the EVB to a PC with a Micro USB Cable First Connect the EVB to a PC with a Micro USB Cable Second Flip the Power Switch S101 to OFF position before powering on the EVB Step 1 Open GNSSFlashTool or click Tools and select Firmware Download in QGNSS tool Figure 18 Firmware Upgrade Step 1 ...

Страница 29: ...4WDR_ST_BETA0810A_UPG bin for LG69T AA and LG69TADNR01A01V01_UPG bin for LG69T AD Figure 20 Firmware Upgrade Step 3 Step 4 Confirm the Port and Baud Rate as the enhanced COM Port Click Start button and then flip the power switch to ON position Press and release RESET_GNSS button on the EVB when the progress bar becomes 98 46 If the operation is not performed the firmware download will fail Figure ...

Страница 30: ...S Module Series LG69T AA AD _EVB_User_Guide 29 31 Step 5 Upon successful firmware upgrade the GNSSFlashTool green progress bar on the screen will indicate PASS Figure 22 Successful Firmware Upgrade Step 5 ...

Страница 31: ...de 4 Quectel_GNSSFlashTool_User_Guide Abbreviation Description BDS BeiDou Navigation Satellite System CEP Circular Error Probable C N0 Carrier to Noise Ratio COM Port Communication Port DI Digital Input DO Digital Output DR Dead Reckoning ESD Electrostatic Discharge EVB Evaluation Board Galileo Galileo Satellite Navigation System EU GLONASS Global Navigation Satellite System Russia GNSS Global Nav...

Страница 32: ...tronics Association PC Personal Computer PCB Printed Circuit Board 1PPS One Pulse Per Second PRN Pseudorandom Noise QZSS Quasi Zenith Satellite System RTCM Radio Technical Commission for Maritime services RTK Real Time Kinematic RXD Receive Data Pin SBAS Satellite Based Augmentation System TTFF Time to First Fix TXD Transmit Data Pin USB Universal Serial Bus UTC Coordinated Universal Time ...

Отзывы: