Quantum TRU-BALANCE 3 Скачать руководство пользователя страница 8

8

BASIC OPERATION INSTRUCTIONS

To activate the iLevel using a single switch:
1.  Press and hold the single switch once to raise the seat 

and activate iLevel.

2.  Press and hold the single switch once to lower the seat.

Do not operate the iLevel or change the seat height in 

any way while your power chair is positioned under a 

fixed object, such as a table or a desk. Keep area clear 

prior to and during movement.

The iLevel feature should be used only on flat, level, indoor 
surfaces, such as in malls, offices, and/or medical facilities, 
and only on limited, flat, level, hardscape, outdoor surfaces.

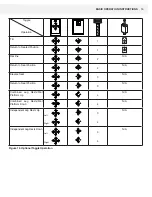
While the iLevel feature is in use, the power chair can drive at 
a predetermined, safe speed. Refer to the specifications table 
for more information on reduction of the maximum speed.

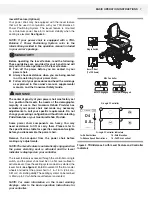
The iLevel feature should only be used on flat, level, 

indoor surface, such as in malls, offices, and/or medical 

facilities. Never raise the seat from its lowest position 

on an inclined surface. Failure to heed this warning can 

result in the power chair tipping over.

The iLevel feature is intended for limited outdoor use on 

only flat, level, hardscape surfaces. If you are unsure of 

your environment, do not use iLevel outdoors.

Never raise the seat into iLevel when operating your 

power chair on bumpy or uneven surfaces. Failure to 

heed this warning can result in the power chair tipping 

over.

Always fasten the positioning belt when operating the 

power chair.

Never use the iLevel feature outdoors on uneven terrain 

(gravel, hills or other uneven, noncompact terrain) or in 

fields.

NOTE: The iLevel feature is equipped with a system that 
allows the power chair to drive at a predetermined, safe 
speed when the seat is elevated. Always check to be 
sure this system is operating properly before using your 
power chair.

NOTE: If a warning or visual indicator appears on your 
controller stating that iLevel is not engaged, the power 
chair’s speed will be reduced to 25% when elevated. 
If this warning appears while on level ground, please 
discontinue use of iLevel feature and consult your 
Quantum Rehab Provider for assistance.

WARNING!

WARNING!

PROHIBITED!

Содержание TRU-BALANCE 3

Страница 1: ...Zealand 1007 www pridemobility co nz UK 32 Wedgwood Road Bicester Oxfordshire OX26 4UL www quantumrehab co uk B V Authorised EU Representative De Zwaan 3 1601 MS Enkhuizen The Netherlands www quantum...

Страница 2: ...ed circle and red slash Copyright 2019 INFMANU4800 Rev D October 2019 SAFETY GUIDELINES MANDATORY PROHIBITED WARNING WARNING WARNING Intended Use A wheelchair component is a device intended for medica...

Страница 3: ...for distribution in all English speaking countries where our Power Chairs are sold We have chosen to compose this manual using language and spellings common to the USA Since we recognize that not all...

Страница 4: ...itioning System NOTE This manual will discuss toggle operations only Refertothemanualthatwassuppliedwithyourcontroller for information on joystick and attendant control operation If your TRU Balance 3...

Страница 5: ...vehicle Quantum Rehab strongly recommends that you do not smoke cigarettes while seated in your seating system although the seating system has passed the necessary testing requirements for cigarette s...

Страница 6: ...ory programmed tilt angle See figure 3 Do not attempt to bypass remove reprogram and or adjust the full or partial inhibits that are programmed at factory settings Failure to heed this warning may res...

Страница 7: ...rationwithoutfirstcontacting Pride Quantum or your Quantum Rehab Provider Some power chair components are heavy You may need assistance to lift or carry them Please refer to the specifications table f...

Страница 8: ...rface Failure to heed this warning can result in the power chair tipping over The iLevel feature is intended for limited outdoor use on only flat level hardscape surfaces If you are unsure of your env...

Страница 9: ...e seatback down To return the seatback to an upright position 1 Lift the seatback up and place in the upright position 2 Reinstall the detent pin and ensure all components are secure see figure 6 OR r...

Страница 10: ...g configuration without contacting your Quantum Rehab Provider Youmayneedthefollowingtomakecomfortadjustments BASIC OPERATION INSTRUCTIONS 8 Raise or lower the armrest to set armrest to the desired he...

Страница 11: ...ht and Angle Adjustments 8 10 in 20 3 25 4 cm 11 13 in 27 9 33 cm 14 16 in 35 6 40 6 cm Top Screw Bottom Screw Seatback Seatback Side Rail Rear Armrest Support Joint Rear Screw Setscrews Front Armrest...

Страница 12: ...y 1 Set the rear of the armrest into the rear seat receiver and install the detent pin See figure 9 2 Rotate the armrest assembly down 3 Push the front of the armrest into the front seat receiver and...

Страница 13: ...rmrest from the armrest block See figure 11 2 Loosen screws 1 and 2 See figure 12 3 Slide the armrest block to the desired position 4 Tighten screws 1 and 2 5 Install the armrest in the armrest block...

Страница 14: ...1 in 2 54 cm in 3 8 in 0 95 cm increments The bottom height adjustment range is 2 in 5 08 cm in 1 in 2 54 cm increments To adjust the top height 1 If present remove the optional locking pin See figure...

Страница 15: ...ilt 1 Return to Seated Position 1 Recline 2 N A Return to Seat Position 2 N A Elevate Seat 3 N A Return to Seat Position 3 N A Combined Leg Rests Foot Platform Up 4 N A Combined Leg Rests Foot Platfor...

Страница 16: ...nsion of the controller from the armrest and the height of the controller Use correct tie down points for controller harness to prevent the harness from getting caught in the drive tires pinched in th...

Страница 17: ...into or out of the armrest to the desired position 5 Rotate and flip the release lever to tighten the clamp 6 Route the controller harness to the back of the power base and secure it with clips See fi...

Страница 18: ...ts and lateral wings as needed and attach with hardware See figure 22 2 Position the seatback cushion so that the reusable hook and loop fastener straps face the seatback Place the cushion over any lu...

Страница 19: ...5 Allow the cover to air dry Do not use bleach when washing the outer cover Doing so may cause damage to the cover Never submerge the seatback cushion in water Doing so may cause damage to the cushio...

Страница 20: ...ight and width See figure 24 4 Tighten the screws inserted into the lateral track 5 Repeat for other side if necessary To adjust the laterals 1 Loosen the attachment screws in the lateral track 2 Slid...

Страница 21: ...al extrusion 3 Install the lateral support into the lateral extrusion See figure 25 4 Insert the spacer and the two 2 bolts through the lateral support and the square slab nut Do not tighten completel...

Страница 22: ...ur power chair are susceptible to extreme changes in temperature Always keep your power chair between the temperatures of 18 F 8 C and 122 F 50 C It should be stored at room temperature in a clean and...

Страница 23: ...eturn faulty parts to Quantum without prior consent All transportation costs and shipping damage incurred while submitting parts for repair or replacement are the responsibility of the original purcha...

Страница 24: ...24 BASIC OPERATION INSTRUCTIONS...

Страница 25: ...25 BASIC OPERATION INSTRUCTIONS...

Страница 26: ...26 BASIC OPERATION INSTRUCTIONS...

Страница 27: ...d circle and red slash Copyright 2019 INFMANU4800 Rev 50D October 2019 SAFETY GUIDELINES MANDATORY PROHIBITED WARNING WARNING WARNING Intended Use A wheelchair component is a device intended for medic...

Страница 28: ...Zealand 1007 www pridemobility co nz UK 32 Wedgwood Road Bicester Oxfordshire OX26 4UL www quantumrehab co uk B V Authorised EU Representative De Zwaan 3 1601 MS Enkhuizen The Netherlands www quantum...

Отзывы: