background image


7


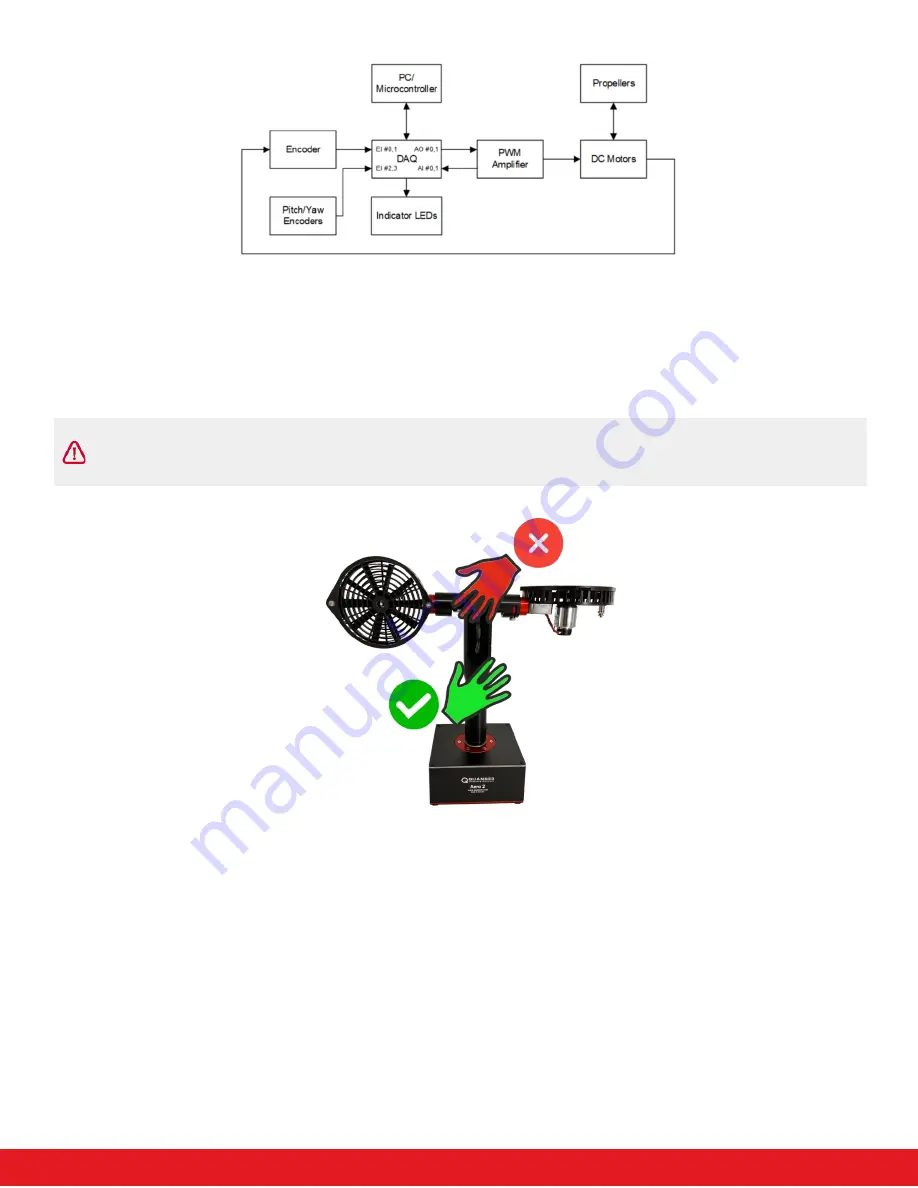
Figure 4. Interaction between Quanser Aero 2 system components 

Handling and Setup 

When moving the Quanser Aero 2, lift it by gripping the support yolk just above the yaw pivot. Support the base with 
your other hand. 


Warning 

Do not lift the Aero 2 by the Aero body. 


Figure 5. Correct and incorrect locations to lift Quanser Aero 2 

To operate your Quanser Aero 2, follow these steps,  

1.


Ensure that the power switch is OFF and connect the Aero 2 to a power supply. 

2.


Connect the Aero 2 to the PC via USB or to the microcontroller via SPI connection. 

3.


Ensure that a volume of space around the manipulator is dedicated as a work zone that users must stay clear 
of. The radius of this area should be at least 0.5 m. 

4.


Check that the thrusters are oriented as required and locked firmly in position using the thumbscrews. 

5.


Check that the pitch and yaw locking screws are engaged or disengaged as required for your task. 

6.


Switch on the power switch and ensure that the status LED on the QFLEX 2 panel is green. 

7.


The Aero 2 is ready for use. 


Содержание Aero 2

Страница 1: ...User Manual V2 1 Dec 12th 2022 Aero 2...

Страница 2: ...or the Work and provide the name Quanser Inc for attribution These restrictions may not be waved without express prior written permission of Quanser Inc FCC Notice This device complies with Part 15 of...

Страница 3: ...r use by the public The user is responsible to ensure that the equipment will be used by technically qualified personnel only While the end effector board provides connections for external user device...

Страница 4: ...4 Configuration 6 System Schematic 6 Handling and Setup 7 Hardware Components 8 i DC Motors 8 ii Propellers 8 iii Encoders 8 iv Inertial Measurement Unit IMU 8 v Power Supply 8 Specifications 9 Balanc...

Страница 5: ...or control by a microcontroller device such as an Arduino via a 4 wire SPI interface For all versions the system is driven using two direct drive 18V brushed DC motors The motors are powered by a buil...

Страница 6: ...3 Support yolk 12 IMU on Aero 2 core board 4 Aero 2 body 13 Interface power LED 5 Pitch pivot 14 Data connector USB version shown 6 Pitch lock 15 Power connector 7 Yaw lock 16 Power switch 8 Thruster...

Страница 7: ...USB and the QFLEX 2 Embedded The QFLEX 2 USB provides a USB interface for use with a computer The QFLEX 2 Embedded provides a 4 wire SPI interface for use with an external microcontroller board The i...

Страница 8: ...FF and connect the Aero 2 to a power supply 2 Connect the Aero 2 to the PC via USB or to the microcontroller via SPI connection 3 Ensure that a volume of space around the manipulator is dedicated as a...

Страница 9: ...The encoders used to measure the pitch of the Aero body and the angular position of the DC motors on the Quanser Aero 2 are single ended optical shaft encoders The motor encoders output 2048 counts pe...

Страница 10: ...Torque constant 0 042 N m A Motor back EMF constant 0 042 V rad s Rotor inertia 4 0 10 6 kg 2 Rotor inductance 1 16 mH Aero Body Mass of body 1 07 kg Displacement of Center of Mass z axis 2 42 mm Pitc...

Страница 11: ...s not balanced identify the rotor that is leaning downwards Move the mass slider on this rotor inwards until the system is balanced Environmental The Quanser Aero 2 is designed to function under the f...

Страница 12: ...at you have been properly grounded Caution Always monitor the current draw and motor temperature to ensure that you do not exceed the maximum current draw or 50 Caution Do not allow conductive materia...

Отзывы: