


November 10, 2015
7061-197H
9
Explorer II Medium Wood Stove
Recommended
Location
Marginal
Location
Location
Not
Recommended
Recommended
Location
Location NOT
Recommended
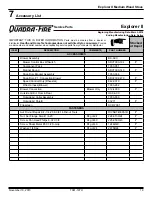
Multi-level Roofs
Windward
Leeward
Outside Air Kit Termination Cap
Figure.9.1
D...Chimney.Termination.Requirements
Follow manufacturer’s instructions for clearance, securing
flashing and terminating the chimney.
Fig..10.1.&.10.2
•
Must have an approved and Listed cap
•
Must not be located where it will become plugged by
snow or other material
• Must terminate at least 3 feet (91cm) above the roof
and
at least 2 feet (61cm) above any portion of the
roof within 10 feet (305cm).
• Must be located away from trees or other structures
C...Locating.Your.Stove.&.Chimney
Location of the appliance and chimney will affect perfor-
mance. As shown in
Figure.9.1
the chimney should:
• Install through the warm space enclosed by the build-
ing envelope. This helps to produce more draft, espe-
cially during lighting and die down of the fire.
• Penetrate the highest part of the roof. This minimizes
the affects of wind turbulence and down drafts.
• Consider the appliance location in order to avoid floor
and ceiling attic joists and rafters.
• Locate termination cap away from trees, adjacent
structures, uneven roof lines and other obstructions.
Your local dealer is the expert in your geographic area and
can usually make suggestions or discover solutions that will
easily correct your flue problem.
NOTICE:
• Chimney performance may vary.
• Trees, buildings, roof lines and wind conditions affect
performance.
• Chimney height may need adjustment if smoking or
overdraft occurs.
NOTICE:
Locating the appliance in a basement or in a
location of considerable air movement can cause intermittent
smoke spillage from appliance. Do not locate appliance near
• Frequently open doors
• Central heat outlets or returns


