background image

September 1, 2008

7037-135E

Page  7

4300 Wood Stove Series (ACC)

R

Exterior  conditions  such  as  roof  line,  surrounding  trees, 

prevailing  winds  and  nearby  hills  can  influence  stove 

performance.  Your local dealer is the expert in your geographic 

area and can usually make suggestions or discover solutions 

that will easily correct your flue problem.

D.  Flue Draft Considerations

Location  of  the  appliance  and  chimney  will  affect  perfor

-

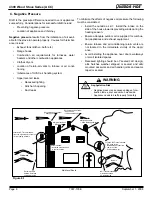
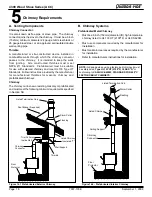
mance.   As  shown  in 

Figure  6.1


on  page  6

  the  chimney 

should:
  •  Be installed through the warm space enclosed by the 

building envelope.  This helps to produce more draft, 

especially during lighting and die down of the fire.

  •  Penetrate the highest part of the roof.  This minimizes 

the affects of wind turbulence and down drafts.

  •  Consider  the  appliance  location  in  order  to  avoid 

floor and ceiling attic joists and rafters.

E.  Venting Systems

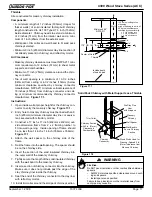
The venting system consists of a chimney connector (also 

known as stove pipe) and a chimney.  These get extremely 

hot during use.  Temperatures inside the chimney may exceed 

2000

°

F (1100

°

C) in the event of a creosote fire.  To protect 

against the possibility of a house fire, the chimney connector 

and chimney 

must be properly installed and maintained.


An approved thimble must be used when a connection is 

made through a combustible wall to a chimney.
A chimney support package must be used when a connection 

is  made  through  the  ceiling  to  a  prefabricated  chimney.  

These accessories are 

absolutely necessary

 to provide 

safe  clearances  to  combustible  wall  and


ceiling  material.  

Follow  venting  manufacturer’s clearances  when  installing 

venting system.

To be sure that your appliance burns properly, the chimney 

draft (static pressure) should be approximately -.04 inch water 

column (W.C.) during a low burn and -.10 inch W.C. during a 

high burn, measured 6 inches (152mm) above the top of the 

appliance after one hour of operation at each burn setting.

NOTE

:  These are guidelines only, and may vary somewhat 

for individual installations.

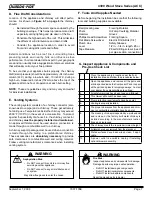
F.  Tools And Supplies Needed

Before beginning the installation be sure that the following 

tools and building supplies are available.

Reciprocating saw

Pliers

Hammer

Phillips Head Screwdriver

Flat Blade Screwdriver

Plumb Line

Level

Tape Measure

Framing Material

Hi-Temp Caulking Material

Gloves

Framing Square

Electric Drill & Bits (1/4”)

Safety Glasses

1/2 in. - /4 in. length, #6 or 

#8 self drilling screws (need  

per pipe section connection)

G. Inspect Appliance & Components and 

Pre-Use Check List

1.

Place the appliance in a location near the final 

installation area and follow the procedures below:

2.

Open the appliance and remove all the parts and 

articles packed inside the Component Pack.  Inspect 

all the parts and glass for shipping damage.  Contact 

your dealer if any irregularities are noticed.

3.

All safety warnings have been read and followed.

4.

This Owner’s Manual has been read.

5.

Floor protection requirements have been met.

6.

Venting is properly installed.

7.

The proper clearances from the appliance and chim

-

ney to combustible materials have been met.

8.

The masonry chimney is inspected by a professional 

and is clean, or the factory built metal chimney is 

installed  according  to  the  manufacturer’s  instruc

-

tions and clearances.

9.

The chimney meets the required minimum height.

10.

All labels have been removed from the glass door.

11.

Plated  surfaces  have  been  wiped  clean,  if  appli

-

cable.

12.

A  power  outlet  is  available  nearby  if  installing 

optional blower assembly.

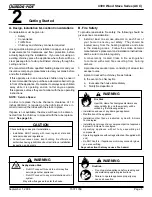
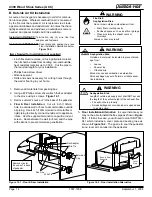
WARNING

•  Do NOT connect this unit to a chimney flue 

servicing another appliance.

•  Do NOT connect to any air distributon duct 

or system.

May allow flue gases to enter the house.

Asphyxiation Risk.

Inspect appliance and components for damage. 

Damaged parts may impair safe operation.

WARNING

•  Do NOT install damaged components.

•  Do NOT install incomplete components.

•  Do NOT install substitute components.

Report damaged parts to dealer.

Fire Risk.

Содержание Quadra-Fire 43M-ACC-MBK

Страница 1: ...ood fuel only Other fuels may overfire and generate poisonous gases i e carbon monoxide Installation and service of this appliance should be performed by qualified personnel Hearth Home Technologies r...

Страница 2: ...our dealer Do not use grate or elevate fire Build wood fire directly on hearth Do not overfire if heater or chimney connector glows you are overfiring Operate only with the fuel loading door closed Op...

Страница 3: ...ction 6 Mobile Home 20 Section 7 Appliance Set Up A Pedestal Ash Removal System ARS Installation 21 22 B Leg Kit Ash Removal System ARS Installation 23 C Door Handle Assembly 24 D Blower Speed Adjustm...

Страница 4: ...ide Air Kit part OAK ACC must be installed in a mobile home installation B Mobile Home Approved EPA Certified 1 1 grams per hour EPA Certificate Number and Date Number 656 Issued 02 05 2007 Efficiency...

Страница 5: ...sisting of at least two escape routes 4 A plan to deal with a chimney fire as follows In the event of a chimney fire a Evacuate the house immediately b Notify fire department WARNING Do NOT connect th...

Страница 6: ...include Exhaust fans kitchen bath etc Range hoods Combustion air requirements for furnaces water heaters and other combustion appliances Clothes dryers Location of return air vents to furnace or air c...

Страница 7: ...ce after one hour of operation at each burn setting NOTE These are guidelines only and may vary somewhat for individual installations F Tools And Supplies Needed Before beginning the installation be s...

Страница 8: ...ermination Cap Outside Air Rear Vent Spark Arrestor Cap Floor Protector Chimney Connector Ceiling Support Listed Chimney Listed Termination Cap Storm Collar Flashing Figure 8 3 Interior Prefabricated...

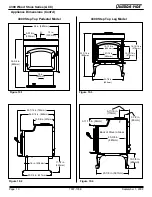
Страница 9: ...2 in 292mm 16 in 406mm 20 3 4 in 527mm C L 4 1 2 in 108mm Outside Air Connection A Appliance Dimensions Figure 9 1 Front View Figure 9 2 Side View NOTE Flue Collar size is 6 inch 152mm diameter ID Mi...

Страница 10: ...Top Leg Model 2 7 8 in 606mm 7 16 in 849mm 15 1 16 in 8 mm 19 1 16 in 484mm 10 15 16 in 278mm 14 15 16 in 79mm 3 11 16 in 94mm 2 1 8 in 587mm 10 8 in 264mm Back of Stove to Glass 25 8 in 645mm 6 11 16...

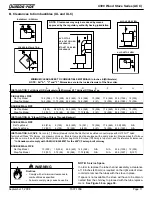
Страница 11: ...75 95 22 559 11 75 298 2 51 12 305 49 5 1283 5 127 INSTALLATION 90 Elbow Off Top of Stove Through Backwall DOUBLE WALL PIPE Flat Top Model 8 5 216 6 152 24 5 622 15 381 10 254 17 5 445 53 5 1359 N A S...

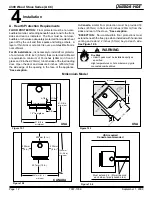
Страница 12: ...pening in the face of the appliance See exception 16 from glass 8 in Fuel loading door 4 7 8 in 3 1 8 in 31 5 8 in minimum 41 3 8 in minimum 1 5 8 i n 2 7 8 i n 7 in 4 0 1 5 1 6 i n 1 1 6 i n 135 o p...

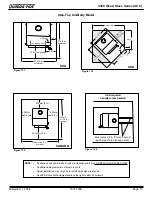
Страница 13: ...to individual design preference Hearth Home Technologies reserves the right to alter its products 16 in from glass 8 in Fuel loading door 4 3 4 in 3 1 4 in 1 5 8 in minimum 41 8 in minimum 20 mm 8 in...

Страница 14: ...mes that have tightly sealed doors and windows an outside air source is needed An optional Outside Air Kit is available Flex Line Wire Tie Wire Tie Flex Adapter Termination Cap Remove circular knock o...

Страница 15: ...appliance 4 Place the bracket containing the snap disc and magnet under the bottom left rear corner as shown in Figure 15 1 See page 30 for detailed operating instructions for the blower and snap disc...

Страница 16: ...ld steel black or 26 gauge blued steel or an approved air insulated double wall venting pipe Thimble A manufactured or site constructed device installed in combustible walls through which the chimney...

Страница 17: ...framing lumber to fit into wall opening Inside opening of frame should be no less than 14 inch x 14 inch 356mm x 356mm Figure 17 1 4 Attach the wall spacer to the chimney side of the frame 5 Nail the...

Страница 18: ...nectors must conform to each other to ensure a proper fit and seal Flue Gas Direction Crimped End Toward Stove Secure pipe sections with a minimum of screws Figure 18 2 Chimney Connector Stove Pipe WA...

Страница 19: ...of the roof within 10 feet 305cm Must be located away from trees or other struc tures These are safety requirements and are not meant to assure proper flue draft Figure 19 1 E 2 10 3 Rule Figure 19 2...

Страница 20: ...onnector manufacturer s instructions when installing the flue system for use in a mobile home 7 Maintain clearance to combustibles 8 Floor protection requirements must be followed precisely 9 Use sili...

Страница 21: ...ed Phillips head screwdriver 7 16 socket wrench 3 32 and 5 36 Allen wrench Begin installing the ARS System 1 Remove 2 front bricks as shown in Figure 21 1 2 Lay body of stove on its back on a protecti...

Страница 22: ...Carefully stand stove up and place in desired location 5 Slip wooden decorative strips onto pedestal edges Finishing the ARS Installation 1 Re install the ARS channel that was removed in Step 3 on pag...

Страница 23: ...he bottom of the stove with 1 4 20 Phillips head screws These screws are located in the component pack Leave the bottom 2 screws loose so you can slide the ash pan assembly bottom slots over the screw...

Страница 24: ...to slow the blower and counterclockwise to increase the speed The blower speed control for this unit is adjusted at the factory and normally does not require further adjustment D Adjusting The Blower...

Страница 25: ...d establishing the flue draft not evaporating the moisture out of wet unseasoned wood resulting in wasted heat Do not over fire Over firing may ignite creosote or will damage the stove and chimney To...

Страница 26: ...his function is performed by sliding the con trol all the way back until it stops at the HI indicator on the label and then pulling forward to the front of the stove until it stops This activates the...

Страница 27: ...This air is regulated by the Burn RateAir Control There are four settings High Medium High Medium Low and Low When the control is raised all the way up it is on the High setting and when pushed all th...

Страница 28: ...102mm in diameter Be careful not to smother the fire Stack the pieces of wood carefully near enough to keep each other hot but far enough away from each other to allow adequate air flow between them 7...

Страница 29: ...e 29 2 Ceramic Blanket and Baffle Board MUST be in contact with the back of the firebox and even with each other in the front Ceramic Blanket Back of Firebox Baffle Board Figure 29 1 H Correct Baffle...

Страница 30: ...e is a manual over ride switch to deactivate the snap disc if necessary See page 15 I Blower Operating Instructions Fire Risk Keep combustible materials gasoline and other flammable vapors and liquids...

Страница 31: ...It is also recommended that before each heating season the entire system be professionally inspected cleaned and repaired if necessary a The stove and ashes must be completely cooled down before using...

Страница 32: ...cially available oven cleaner After using an oven cleaner it is advisable to remove any residue with a glass cleaner or soap and water Oven cleaner left on during the next firing can permanently stain...

Страница 33: ...ach retainer just a few turns until each is secured Check again for centering of glass in door frame Continue to tighten each retainer alternately a few turns at a time until the glass is secure DO NO...

Страница 34: ...ks Slide top of brick under clips on side of firebox and push the bottom of the brick until it is flush with the side of the appliance C Firebrick Replacement Use Part 832 0550 when ordering individua...

Страница 35: ...lace on top of baffle board open up and flatten and smooth out the blanket Re check the baffle board for correct positioning Figure 35 2 Figure 35 1 Baffle Figure 35 2 Ceramic Blanket E Snap Disc Repl...

Страница 36: ...he tube channel assembly into side of firebox and insert each tube into the corresponding hole in the tube channel rack starting with the back hole first 3 Make sure tube channel assembly is flush aga...

Страница 37: ...e appliance towards the wind Wood condition is too wet too large Use dry seasoned wood refer to wood fuel sec tion Bed of coals not established before adding wood Start with paper kindling to establis...

Страница 38: ...oor Assembly only Gold 430 2682 Nickel 430 5340 43 Glass Replacement 7000 012 44 Cam Latch 430 1141 45 Nut Locking 24 226 0100 24 46 Key Cam Latch 430 1151 47 Screws Glass Frame 10 1 220 0490 10 832 0...

Страница 39: ...t Up Air Control 23 Air Supply Back 5 Magnet for Air Control 24 Flue Collar 6 Air Control Rod Guide Start Up 25 Panel Assembly Side Left 7 Control Arm Assembly Rear Air 26 Rear Air Channel Assembly 9...

Страница 40: ...sembly Rear Air 31 Door Cast not sold separately 9 Timer Mechanical 32 Spring Handle 1 2 inch 10 Timer Arm Assembly 33 Baffle Fiberboard 2 pc 12 Gasket Front Rear Air Doors 34 Brick Retainer 13 Burn R...

Страница 41: ...llennium SRV7037 003 50 Brick Set Step Top Model SRV7037 012 Brick Uncut Set of 6 832 3040 13 Burn Rate Air Control Assembly 7037 004 44 Cam Latch Door Handle 430 1141 Channel Ash Removal System Step...

Страница 42: ...ue Collar Millennium Model SRV7000 302 Gasket Ash Removal Step Top Model 7033 185 Gasket Tape Glass 5 ft 832 0460 12 Gasket Front Rear Air Timer Doors 7033 282 43 Glass Assembly 15 1 2 W x 13 3 8 H 70...

Страница 43: ...4 inch Gold 832 0630 14 Spring Handle Burn Rate Control 1 4 inch Nickel 250 8340 32 Spring Handle Door 1 2 inch Gold 832 0620 32 Spring Handle Door 1 2 inch Nickel 250 8330 49 Timer Air Control Assem...

Страница 44: ...Page 44 7037 135E September 1 2008 R 4300 Wood Stove Series ACC Date of Service Performed By Description of Service C Service And Maintenance Log...

Страница 45: ...September 1 2008 7037 135E Page 45 4300 Wood Stove Series ACC R D Homeowner s Notes...

Страница 46: ...onditions Exclusions and limitations 9 01 08 CONDITIONS EXCLUSIONS LIMITATION OF LIABILITY This warranty applies to the original owner and is transferable up to two years from date of purchase to the...

Страница 47: ...chlorine fluorine or other damaging chemicals the appliance is subject to prolonged periods of dampness or condensation or there is any damage to the appliance or other components due to water or wea...

Страница 48: ...95 6053165 6145502 6170481 6237588 6296474 6374822 6413079 6439226 6484712 6543698 6550687 6601579 6672860 6688302B2 6715724B2 6729551 6736133 6748940 6748942 6769426 6774802 6796302 6840261 6848441 6...

Отзывы: