quadient IS-420 Скачать руководство пользователя страница 84

Accounting and Assigning Rights Overview

5.1

Postage Tracking and Access Control

Your Mailing System allows you to track postage by account/department and to add

security to prevent unauthorized use of a variety of functions.

• Track postage expenditures: the

Accounts

function

• Control user access with PIN code to the machine: the

Access Control

function.

You can activate these two functions independently. If both are activated, the user will

login with a secure PIN code and only have access to assigned accounts.

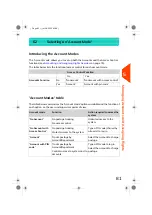
The Accounts Function

Activating the Accounts Function in the Mailing System is a convenient way to monitor,

track and control postage expenses by, for example, associating accounts to

departments in your organization (Marketing, Sales, etc.) or to different companies, if

the Mailing System is shared.
When the Accounts Function is activated, the currently selected account is charged

each time the user applies postage to mail.
You can then issue reports on each account (for information about reports, see

Reports

on page 95).

Accounts from the User's Perspective

If the Accounts Function is activated, users of the Mailing System must select an account

when starting their work session.
Afterwards, users can change accounts to allocate postal expenditures as needed.

79

| Page 79 | | Jul-24-2023 01:59 |

5

Managing

Accounts

and

Assigning

Rights

Содержание IS-420

Страница 1: ...User Guide IS 420 Mailing Systems...

Страница 2: ...mal Mail 38 3 4 Printing Incoming Mail with Received Mode 46 3 5 Running Pass through Mail 49 3 6 Settings Details 52 3 7 Advanced Operations 64 Money Operations 67 4 4 1 Overview 69 4 2 Managing Cred...

Страница 3: ...Settings 140 8 6 System Timeouts and Settings 142 8 7 High Value and Low Credit Warnings 145 8 8 Weighing Settings 146 8 9 Postage Imprint Default Settings 152 8 10 Job Memories 156 8 11 Connection Se...

Страница 4: ...ming 197 11 2 Label Jamming 198 11 3 Weighing Problems 200 11 4 Diagnostics and System Data 201 Specifications 205 12 12 1 Mail Specifications 207 12 2 Recommended Operating Conditions 210 12 3 Genera...

Страница 5: ...Page 4 TOC Jul 24 2023 01 59...

Страница 6: ...out safety precautions and environmental recommendations to operate your equipment in the best possible conditions 1 1 What you will find in this Manual 3 1 2 Safety Requirements 5 How to Disconnect y...

Страница 7: ......

Страница 8: ...s as a user or set up accounts and control access to the Mailing System as the supervisor Section 6 Reports How you can generate and print out reports for the Mailing System usage credit usage account...

Страница 9: ...om an action you may perform NOTE remark that explains different scenarios or situations TIP advice to help save you time when processing your mail Glossary This manual uses the acronyms listed below...

Страница 10: ...se of liquid spillage disconnect the power cord from the outlet and proceed with cleaning Use an outlet located near the system that is easily accessible Do not route the power cord between pieces of...

Страница 11: ...tion and treatment processes of these machines CE compliance Products presented in this guide conform to requirements of applicable directives For more details refer to Declaration Of Conformity avail...

Страница 12: ...onal injury and damaging components When lifting covers wait for all parts to stop moving before placing hands near the feeder path or printhead To prevent overheating do not block the ventilation ope...

Страница 13: ...ere may be a risk of electrical shock from lightning Do not install telephone jacks or LAN connectors in a wet location Disconnect the telephone or LAN cable from the wall before moving your system To...

Страница 14: ...5 Only unplug the power cord when the Mailing System is in OFF mode or Sleep mode to avoid keeping the ink cartridge in an unprotected position where the ink may dry out and become unusable 2 Unplug t...

Страница 15: ......

Страница 16: ...ection 2 1 System Layout 13 2 2 Accessories 16 2 3 Control Panel Features 19 2 4 Connections 22 2 5 Power Management 24 How to Turn the Mailing System to Sleep Mode 25 How to Turn the Mailing System t...

Страница 17: ......

Страница 18: ...ols the Mailing System System Base Allows you to control the Mailing System Control Panel Use this slot to store extra labels horizontally Label Storage User Guide Receptacle Receives mail pieces afte...

Страница 19: ...l dispenser Automatically feeds the system with envelopes optional Auto feeder Holds large envelopes in place for feeding Side guide Inside the system base Automatically seals mail when the function i...

Страница 20: ...Prints the postal imprint on envelopes Ink Cartridge Postage meter Stores postage credit and tracks postage usage Postal Security Device PSD 2 Meet Your Mailing System 15 Page 15 Jul 24 2023 01 59...

Страница 21: ...table below Keyboard use NAVIGATION KEYS Validates the current screen Enter OK Deletes the last character or digit in an entry field Backspace Clear Deletes the next character or digit in an entry fie...

Страница 22: ...lows you to Exactly position the cursor in an entry field Select a part of the content of an entry field Report Printer option A USB printer can be directly connected to the mailing system for printin...

Страница 23: ...Barcode Scanner option This scanner is used To identify accounts through barcodes 18 Page 18 Jul 24 2023 01 59 2 Meet Your Mailing System...

Страница 24: ...hat a text will be printed on the envelope Text Displays selected job memory when applicable Job memory Indicates unread messages in message box Mailbox Indicates the amount to be printed on the envel...

Страница 25: ...n screen Rate Selection Accesses imprint selection and imprint set up screens Imprint Configuration Opens the weighing type selection menu Standard Weighing Differential Weighing Weighing Type KEYPAD...

Страница 26: ...ou may obtain by pressing keys several times in a row Modem settings Custom text Alpha numeric Key 1 1 1 1 2ABC 2ABC 2ABCabc 2 3D 3DEF 3DEFdef 3 4 4GHI 4GHIghi 4 5 5JKL 5JKLjkl 5 6 6MNO 6MNOmno 6 7 7P...

Страница 27: ...inter or a USB memory key Connectors To wall socket Power Connector To Weighing Platform s COM2 3 To Auto Feeder COM1 For connecting to customer network for loading credit and Online Services LAN Port...

Страница 28: ...To connect to the phone network with the phone cable USB Modem To connect to a phone wall socket analog telephone line Telephone cable To connect to online service source Phone wall socket Power conn...

Страница 29: ...is an Energy Star qualified Mailing System that automatically goes into a low power Sleep mode after a period of inactivity Spending a large portion of time in low power mode not only saves energy bu...

Страница 30: ...machine OFF Mode To turn OFF your system you can use the ON OFF button located on the right side of the Base How to Turn the Mailing System to OFF Mode 1 Turn your system to Sleep Mode see How to Turn...

Страница 31: ......

Страница 32: ...3 3 4 Printing Incoming Mail with Received Mode 46 How to Set Received Mode printing 46 How to Process Received Mail 48 3 5 Running Pass through Mail 49 How to Set Pass through Mail processing 49 How...

Страница 33: ......

Страница 34: ...Imprint Configuration Menu that allows you to set imprint parameters To directly gain access to the Configuration Menu of the Type of imprint press Shortcut Key on the Control Panel Your system has si...

Страница 35: ...te received Slogan Received Text optional Slogan optional Print offset optional Print counter optional Pass through Running Pass through Mail on page 50 Counting by feeding using optional feeder Count...

Страница 36: ...Using the Feeder on page 36 Sorting Mail by Type and Task To save time sort your mail in groups that have similar characteristics This will prevent you from changing imprint settings too often and all...

Страница 37: ...Your System and Starting a Work Session Turning the system on automatically starts a work session on the Mailing System At start up depending on specific supervisor settings The access to the system...

Страница 38: ...ed to navigate through the system Login Screen If the Login Screen is displayed enter your PIN code Account Screen If the Account Screen is displayed select your account as follows Use up and down arr...

Страница 39: ...on page 52 To choose security level for accounts and access control as the Supervisor see Managing Accounts and Assigning Rights on page 77 To turn your system on Sleep mode see How to Turn the Mailin...

Страница 40: ...if you intend to issue a report on the mail run you are about to start see Batch Data Report on page 102 Select Reset counter on the home screen or see How to Reset Batch Counters on page 64 Do I nee...

Страница 41: ...The procedure below describes how to place a stack of mail pieces in the Hopper Depending on the weighing method you choose to run mail you may have to insert the envelopes one by one or place a stack...

Страница 42: ...rocess Use this setting if several thin envelopes pass at one time through the feeder or if thick envelopes are blocked at the entrance of the mail path 1 Open Feeder Cover 2 Change lever position 1 f...

Страница 43: ...to process your mail As mail requirements quickly vary some settings may not be necessary or their order may vary You must begin with selecting the Type of imprint to gain access to the additional op...

Страница 44: ...indicated on line 2 of the screen To change the type of imprint select the Type line press OK and then select Normal in the Type of imprint screen and press OK To select an option in the screen Highl...

Страница 45: ...ect Text and then select a text or None in the Text list screen For more details see How to Add or Cancel a Text on the Imprint on page 59 Press or to return to the home screen 4 Select a rate Press t...

Страница 46: ...etting s 1 Move the stimprint away from the envelope edge for thick envelopes see How to Move the Imprint Print Offset on page 61 You are now ready to print Printing Zero The Printing Zero allows you...

Страница 47: ...il To set the imprint quickly consider using job memories The memories store imprint characteristics together with rates and if activated charged account See Using Job Memories on page 61 Processing N...

Страница 48: ...nto the mail path against the rear guide wall with the side to be printed facing upwards If you want to seal the envelope first engage the flap into the moistener option Do not try to moisten self adh...

Страница 49: ...em displays weight and postage on the home screen and starts motors automatically 3 To print the imprint insert the mail piece into the base against the rear guide wall with the side to be printed fac...

Страница 50: ...of the stack The Mailing System displays weight and postage on the home screen starts motors and prints the label automatically If you inadvertently remove more than one item from the WP replace remo...

Страница 51: ...below outlines steps required to imprint incoming mail You must begin with selecting the Type of imprint to gain access to the corresponding parameters and be able to run mail Make sure you have comp...

Страница 52: ...e printing Received Add slogan custom text to the imprint Active the Print counter Select the option to change and press OK The screen indicates the current status of the options Press or to return to...

Страница 53: ...page 46 How to Process Received Mail On the Received home screen 1 Press System motors start running 2 Insert the mail piece into the mail path against the rear guide wall side to be printed facing u...

Страница 54: ...processing The procedure below outlines steps required to process mail You must begin with selecting the Type of imprint to gain access to the corresponding parameters and be able to run mail Make sur...

Страница 55: ...hrough in the Type of imprint screen and press OK To select an option in the screen Highlight the option using the arrow keys and Then press to validate your selection 3 Press or to return to the home...

Страница 56: ...path against the rear guide wall side to be printed facing upwards If you want to seal the envelope first engage the flap into the moistener Do not try to moisten self adhesive envelopes 3 Processing...

Страница 57: ...ounts 1 As a user Press and select the path Account The list of accounts that are available is displayed 2 Select the account you want to use and press OK 3 Press to return to the home screen The curr...

Страница 58: ...lete lists of options On the home screen press to select the default rate and refresh weight How to Select a Rate To select a rate 1 Either Press and select the path Rate selection Press or The Rate S...

Страница 59: ...sses loaded in the system are displayed in the list Selecting a Destination Rate Destination loaded in the system is displayed in the list Selecting a Format Formats describe the mail piece types for...

Страница 60: ...mmendations in the table below Select the method For weighing Standard Weighing Items one by one Differential Weighing Items stacked on the Weighing Platform The recommendations in the table only appl...

Страница 61: ...ath The Mailing System calculates the postage and prints the mail piece automatically You can leave all the mail pieces in a tray on the Weighing Platform the Mailing System will ask you to confirm pr...

Страница 62: ...s actually displayed in the screen depend on the weighing devices that are connected to your Mailing System and on features that are activated 2 Select the weighing type If you select the option Diffe...

Страница 63: ...ay from the right edge of the envelope See also How to Change the Current Type of Imprint on page 34 Type of Process and Type of Imprint on page 29 Navigating in the Imprint Settings When you have sel...

Страница 64: ...ct the desired text in the list or select None for printing no text The icon indicates the current selection 4 Press OK to validate your selection The Imprint screen is displayed with updated paramete...

Страница 65: ...indicates the current selection 4 Press OK to validate your selection The Imprint screen is displayed with updated parameters home screen press See also Managing Slogans on page 168 Moving the Imprint...

Страница 66: ...rate custom text slogan for the Type of imprint you would like to use In account activated configurations Job Memories allow you assign postage costs to pre selected accounts If your mail requires dif...

Страница 67: ...memory zone Mem of the home screen displays the current job memory name Using the Sealing Function Hand Feed Table Moistener If your hand feed table is equipped with a moistener you can close the enve...

Страница 68: ...or seal only usage Move the selector at the front of the Feeder right or left to change the sealing mode Sealer OFF Sealer ON Do not insert envelopes already sealed in the Feeder when the Sealing Func...

Страница 69: ...tch Counters Batch counters allow you to track and report pieces items and postage value since the last counter reset To produce reports associated to counters see Reports on page 95 How to Reset Batc...

Страница 70: ...s on the Weigh Platform and press OK 4 The total number of items is displayed You must first weigh 10 ten items in order to get the count of the total number of items Filling the Label Dispenser How t...

Страница 71: ...The Label Dispenser can hold up to 40 labels 66 Page 66 Jul 24 2023 01 59 3 Processing Mail...

Страница 72: ...em to allow postage operations 4 1 Overview 69 4 2 Managing Credit 70 How to Check the Meter Credit 70 How to Add Credit to the Meter 71 4 3 Unlocking the Meter Postal Inspection 74 How to Unlock the...

Страница 73: ......

Страница 74: ...ed see Connection Settings on page 158 Managing Credit As a user you can carry out the following operations dealing with credit in your Mailing System Check the available credit in the Meter Add credi...

Страница 75: ...lete your current task Use the following steps to display your available postage credit How to Check the Meter Credit To check available credit 1 Either Press and select the path Credit Press or The C...

Страница 76: ...d below The Mailing System then connects to the Postal Services and validates the operation How to Add Credit to the Meter To add credit to the Meter 1 Either Press and select the path Credit Press or...

Страница 77: ...rm Add Credit is displayed 5 Press OK to start the connection to the Postal Server If the crediting process is successful the system displays a successful message If crediting fails the system display...

Страница 78: ...Or press to go back to the menu screen 7 You can open the Credit information screen to check your account balance once the transaction is complete see How to Check the Meter Credit on page 70 4 Money...

Страница 79: ...e you begin Either a LAN cable or modem and phone line must be plugged in to your mailing system for the lockout to be successfully cleared To unlock the Meter and manually connect to the Postal Servi...

Страница 80: ...hat the network will be available at this time How to Check the Date of the Next Call To display the date of the next server call 1 Either Press and select the path Credit Press or 2 Select Date of ne...

Страница 81: ......

Страница 82: ...lecting an Account Mode 81 5 3 Guidelines to Setup an Account 82 How to Change a Shared PIN Code 83 5 4 Selecting an Account Mode 86 How to Display and Change the Account Mode 86 5 5 Managing Accounts...

Страница 83: ......

Страница 84: ...n the Mailing System is a convenient way to monitor track and control postage expenses by for example associating accounts to departments in your organization Marketing Sales etc or to different compa...

Страница 85: ...tect the system and restrict the usage of your credit The different access control policies you can implement as the supervisor are No PIN code unlimited access Unique System PIN Code users enter a PI...

Страница 86: ...ptions available and the function of each option on the user and supervisor points of view Action required to access the system Function Account mode Unlimited access to the system No postage tracking...

Страница 87: ...to Display and Change the Account Mode on page 86 and select the No Account mode No Account Management Menu In No Account mode No other setting is necessary for the No Account mode Setting up No Acco...

Страница 88: ...log in No Account with Access Control Management Menu In No Account with Access Control mode the menu allows you to change the shared PIN code How to Change a Shared PIN Code 1 As the supervisor see...

Страница 89: ...low the steps outlined in How to Display and Change the Account Mode on page 86 and select the Account Mode 2 Create account as indicated in How to Create an Account on page 89 When you activate the A...

Страница 90: ...le the Mailing System automatically selects it at start up Implementing Account with PIN Code 1 Select the Accounts with PIN Codes mode see How to Display and Change the Account Mode on page 86 2 Crea...

Страница 91: ...sor on page 134 Press and select the path Account Management Account Mode Selection The Account Mode Selection screen is displayed with the current Account Mode shown 2 Select another Account Mode 3 P...

Страница 92: ...and can be increased to 100 if required Every account includes the following information which is displayed on the Add account screen Account summary Description Format Account Item Number of the acco...

Страница 93: ...f accounts see Account level on page 129 Printing the current account list Account Report on page 112 Account Management Follow the steps below to create modify activate deactivate or delete accounts...

Страница 94: ...path Account management Manage Account Account list The Account list screen is displayed 2 Select Add Account 3 Using the keypad Enter the Account Number and press OK Enter the Account Name and press...

Страница 95: ...lect the path Account management Manage Account Account list The Account list screen is displayed 2 Select the account or type the account number and press OK 3 Select Edit Modify The Edit Modify scre...

Страница 96: ...3 Accept the changes by pressing OK on the Account modification summary Deleting Accounts You may need to delete an account How to Delete an Account To delete an Account 1 Perform procedure How to Vie...

Страница 97: ...You can export an account list as a CSV file for use as back up or to modify it to create new accounts How to Export an Account List To export an account list on a USB memory key 1 As supervisor see...

Страница 98: ...before re importing it into the Mailing System See also Maximum number of accounts Account Information on page 87 How to Import Accounts To import accounts from a CSV file 1 As supervisor see How to L...

Страница 99: ......

Страница 100: ...eport as Supervisor 101 6 3 Counter Data 102 6 4 Postage Data 104 How to Begin a new Statement of Mailing Report 107 6 5 Credit Data 108 6 6 Account Data 112 How to Generate the Account Report 112 6 7...

Страница 101: ......

Страница 102: ...reports List of Reports Output on L label or envelope S screen P USB printer F USB memory key Page Output Devices Report description Report name COUNTER DATA Batch Data Report on page 102 SP Batch Co...

Страница 103: ...eport includes License Identifier Date time Descending Register value Ascending Register value Control Total value Item Counter value ITEMS REGISTER is only non zero items Registers Report ACCOUNT DAT...

Страница 104: ...ion Report on page 118 L IP configuration settings IP Configuration Report Proxy Configuration Report on page 119 L Proxy configuration settings Proxy Configuration Report Server connection history on...

Страница 105: ...is displayed 3 Select the report type and press OK 4 Depending on the report type the system may ask for preferences such as Period of time targeted begin date end date Desired account etc Select or t...

Страница 106: ...To generate a Report 1 As supervisor see How to Log in as Supervisor on page 134 Press and select the path Reports 2 Resume with the steps outlined in How to Generate a Report as a User on page 100 6...

Страница 107: ...going mail batch counter Output Screen USB printer Content Comments Fields Begin Date of last reset End Current date Period On printed report only Die number Number of items without 0 00 items Total v...

Страница 108: ...view incoming mail batch counter Output Screen USB printer Content Comments Fields Begin Date of the last reset End Current date Period Number of items Incoming Mail After issuing reports like Batch D...

Страница 109: ...nd date of the report The default End date is then 31 days later You can specify another End date but maximum is Begin date 31 days Default period Begin 1st day of the current month End Current day Ou...

Страница 110: ...e and year Total number of items processed Total postage value for the month Statement of Mailing Report This report displays the mailing Summary Number the mailing Date the mailing Postcode the machi...

Страница 111: ...mmary Number The date on which the report is generated Mailing Date The postcode of the post office Mailing Postcode Only if printed on label Die Number Total postage printed by the system Total amoun...

Страница 112: ...begin a new one and end the current one or just continue building the current one 2 If you select Print report The current Statement of Mailing report is printed normally 3 If you select New report A...

Страница 113: ...elds Printed report only Current date and time Printed report only Meter status Printed report only Die number Total postage printed by the system Credit used ascending Postage available in the system...

Страница 114: ...od Begin Current date 6 months End Current date On printed report only Die number Represents the new total amount available in the machine For each postage download performed Download date time Credit...

Страница 115: ...Content 110 Page 110 Jul 24 2023 01 59 6 Reports...

Страница 116: ...te time Descending Register value Ascending Register value Control Total value Item Counter value ITEMS REGISTER is only non zero items Requirements This report is available as a user or supervisor Ou...

Страница 117: ...Printer USB memory key Content Data For each account Account number Account name Pin Code if Account with pin code is activated Status How to Generate the Account Report To generate the Account Repor...

Страница 118: ...mode has to be Account or Account with PIN code You have to select an account in the list of accounts then the Begin date and the End date of the report Default period Begin 1st day of the current mo...

Страница 119: ...or Account with PIN code You have to specify the period for the report Begin and End dates Default period Begin 1st day of current month End Current date Output USB printer USB memory key Content Comm...

Страница 120: ...Imprint default settings Default Text Default Slogan Default Rate Date advance parameters Credit settings High value Low Credit Connections settings System settings including for example MMI settings...

Страница 121: ...If you use screen to see this report Scroll the errors using the arrow keys and Press if you want to go back to the selection of the output Content Comments Fields Reference code of the base error BA...

Страница 122: ...y If you use screen to see this report Scroll the errors using the arrow keys and Press if you want to go back to the selection of the output Content Comments Fields Reference code of the meter error...

Страница 123: ...s Supervisor The mailing machine must be connected to the network with LAN Output The IP Configuration Report output is Label How to Generate a IP Configuration Report To generate a IP Configuration R...

Страница 124: ...on Report 1 See Generating a Report on page 100 Server Connection History Report Provides a list of the Server Connection History where failed and successful connections appears The Server Connection...

Страница 125: ...rs occurring during the connection including Error code Error description Connection status Date and time of the end of the connection See also How to Display the Error Lists on page 204 How to Genera...

Страница 126: ...up online 7 1 Online Services Overview 123 7 2 Connecting to Online Services 124 How to Call Online Services Manually as a User 125 How to Call Online Services Manually as Supervisor 125 How to Test t...

Страница 127: ......

Страница 128: ...to your Mailing System see Options and Updates on page 163 Ink alerts never run out of ink again The online server monitors your mailing machine ink supply and e mails an alert notification when it is...

Страница 129: ...en it s time to re order ink supplies It is strongly recommended that you leave the Mailing System turned on in sleep mode and connected to live analog telephone line or network during the night to al...

Страница 130: ...er a generic call 1 As supervisor see How to Log in as Supervisor on page 134 Press and select the path Online services Generic call The Mailing System connects to the server and downloads the availab...

Страница 131: ...can be contacted Test server Establishes a connection and tests the communication dialog with the server This test indicates that transactions can be held normally Test server is a bandwidth test and...

Страница 132: ...est server 2 Or as supervisor see How to Log in as Supervisor on page 134 Press and select the path Online Services Test server The call process starts and displays its sequence of operations on the s...

Страница 133: ...m uploads basic statistic data for basic postal expense management reporting Enhanced reporting is optional See Activating New Options on page 169 How to Upload Report Data to the Online Services Serv...

Страница 134: ...ction ensures that the latest postal rates are installed on your Mailing System When the Postal Service announce changes in their rate and fee schedule the Online Services server downloads the new rat...

Страница 135: ......

Страница 136: ...ow to Change the Beeps by Default 139 8 5 Display Settings 140 How to Adjust the Display Contrast 140 How to Change the Display Contrast by Default 141 8 6 System Timeouts and Settings 142 How to Adju...

Страница 137: ...emory 156 How to Edit Modify a Job Memory 157 How to Delete a Job Memory 157 8 11 Connection Settings 158 How to Set the Postal Online Services Connection 158 How to Set the Analog Modem Parameters 15...

Страница 138: ...key beeps and warning error beeps Supervisor Settings Your Mailing System has one supervisor PIN code that allows you to configure the default settings and perform other functions such as managing ac...

Страница 139: ...t possible while logged in as supervisor How to Log in as Supervisor To log in as Supervisor when you are already logged in as a user 1 As a user Press and select the path Supervisor The Login screen...

Страница 140: ...u must exit the supervisor Mode before you can begin to print postage How to Exit the Supervisor Mode To exit the supervisor mode 1 As supervisor Press The system will go into Sleep mode and superviso...

Страница 141: ...w to Change the Display Language To change the current display language 1 As a user Press and select the path Preferences Language 2 Select the language you want to use 3 Press OK to validate This use...

Страница 142: ...by Default To change the user language by default 1 As supervisor see How to Log in as Supervisor on page 134 Press and select the path Default User Settings Default User Preferences Language 2 Select...

Страница 143: ...able the Beeps To enable or disable the beeps 1 As a user Press and select the path Preferences Sounds 2 Select Key beep on ON OFF and or Beep on error ON OFF to enable disable the sounds 3 Press OK t...

Страница 144: ...e the sounds by default 1 As supervisor see How to Log in as Supervisor on page 134 Press and select the path Default user settings Default user preferences Sounds 2 Check Key beep ON OFF and or Beep...

Страница 145: ...t To adjust the display contrast 1 As a user Press and select the path Preferences Contrast 2 Use Up and Down button to increase or decrease the contrast The screen updates immediately 3 Press OK to e...

Страница 146: ...w to Log in as Supervisor on page 134 Press and select the path Default user settings Default user preferences Contrast 2 Use the Up or Down button to increase or decrease the contrast The screen upda...

Страница 147: ...e next envelope after printing Once this timeout is reached the system will stop Stop Period of inactivity after which the system automatically switches to Sleep mode see Power Management on page 24 S...

Страница 148: ...t Timeouts How to Change System TimeOuts To change the system timeouts 1 As Supervisor see How to Log in as Supervisor on page 134 Press and select the path Default user settings Timeout settings The...

Страница 149: ...3 Press OK to validate 144 Page 144 Jul 24 2023 01 59 8 Configuring your Mailing System...

Страница 150: ...rvisor see How to Log in as Supervisor on page 134 Press and select the path Default user settings Base settings High value 2 Enter the high value warning amount or press C and enter 0 to disable the...

Страница 151: ...s setting defines both the weighing device and the weighing type that are selected by default when a user starts the mailing process see Choosing a Weighing Type on page 55 To change the default weigh...

Страница 152: ...tform as a user 1 As a user Press and select the path Batch Settings Reset WP 2 Remove all items from the Weighing Platform 3 Press OK to reset the Weighing Platform 4 Press OK when Weighing Platform...

Страница 153: ...hing Platform 4 Press OK when Weighing Platform reset successful How to Tare the Weighing Platform as Supervisor To tare the Weighing Platform 1 As supervisor see How to Log in as Supervisor on page 1...

Страница 154: ...GEO code modifies the weight values the Mailing System calculates Make sure you enter the correct GEO Code to ensure your weights are accurate How to Change the GEO Code To change the GEO code 1 As su...

Страница 155: ...Geodesic map 150 Page 150 Jul 24 2023 01 59 8 Configuring your Mailing System...

Страница 156: ...Geodesic codes 8 Configuring your Mailing System 151 Page 151 Jul 24 2023 01 59...

Страница 157: ...e up to nine custom text messages On list screens a mark indicates the default parameter Changing the Default Rate Use the procedure below to change the rate the machine activates at start up How to C...

Страница 158: ...ee How to Log in as Supervisor on page 134 Press and select the path Default user settings Default imprint parameters Text 2 Select the Default text from the list 3 Press OK to validate See also Manag...

Страница 159: ...logan 2 Select the default slogan from the list or None for no slogan 3 Press OK to validate See also Managing Slogans on page 172 You can order custom Slogans Please contact Quadient Customer Service...

Страница 160: ...offset 1 As supervisor see How to Log in as Supervisor on page 134 Press and select the path Default user settings Base settings Print offset 2 Set the Default from a position list 3 Press OK to vali...

Страница 161: ...of a Normal imprint job memory Text Slogan Rate Imprint settings Account number if any Account setting Managing Job Memories How to Create a Job Memory To create a job memory 1 As supervisor see How t...

Страница 162: ...list displayed on the screen 3 Press OK to validate 4 Select the menu path Edit The Job memory modification screen is displayed 5 Use the arrows to select the preferences then press OK to modify the...

Страница 163: ...ctually connected to the LAN at power up See also To physically connect a modem or the LAN to the base see Connection Diagram on page 23 How to Set the Postal Online Services Connection To set the pos...

Страница 164: ...t the meter or connect to Online Services see Money Operations on page 67 Make sure the telephone line is selected see How to Set the Postal Online Services Connection on page 158 How to Set the Analo...

Страница 165: ...g in as Supervisor on page 134 Press and select the path Communication settings LAN settings The LAN configuration menu is displayed 2 Select Auto to automatically configure the LAN recommended Otherw...

Страница 166: ...e 158 How to Check the Machine Time and Date To check the current time and date 1 As supervisor see How to Log in as Supervisor on page 134 Press and select the path Machine settings Date and Time The...

Страница 167: ......

Страница 168: ...ges as a User 167 How to Delete Messages as Supervisor 167 9 3 Managing Options 168 How to Display the Options 168 How to Load New Options 169 9 4 Managing Custom Text Messages 170 How to Display the...

Страница 169: ......

Страница 170: ...nloading custom Slogans To update your Mailing System s operating system see Online Services on page 121 The operations above are available through the supervisor menu Options and Updates How to Acces...

Страница 171: ...a User 1 As a user Press and select the path Mailbox The Mailbox screen is displayed 2 Select the message to read and press OK 3 Select Delete message to erase the message after you have read it How...

Страница 172: ...OK 3 Select Delete message to erase the message How to Delete Messages as Supervisor 1 As supervisor see How to Log in as Supervisor on page 134 Press and select the path Mailbox The Mailbox screen is...

Страница 173: ...mation about the options you can add to your Mailing System please contact customer service How to Display the Options To display the option list 1 As supervisor see How to Log in as Supervisor on pag...

Страница 174: ...New Options To activate an option that is ready for downloading on the Online Services server 1 Check that your Mailing System is connected to a telephone line or network see Connections on page 22 a...

Страница 175: ...w to Change the Default Text on page 153 The List of Custom Text Messages The list of text displays the messages you have created and indicates with a check mark the default text if any How to Display...

Страница 176: ...ge To modify or delete text 1 Display the list of text See How to Display the List of Text Messages on page 170 2 Select a message and press OK The Text setting screen is displayed To edit the content...

Страница 177: ...isplaying the List of Slogans The list of slogans displays all slogans that are installed in the Mailing System and indicates with a check mark the active slogan See also How to Change the Default Slo...

Страница 178: ...lay the List of Slogans on page 172 2 Select the slogan and select Edit Del The Slogan setting menu is displayed To change the name of the slogan 1 Select Edit 2 Change the slogan name using the keypa...

Страница 179: ...w Slogans To download new slogans 1 Display the list of slogans see How to Display the List of Slogans on page 172 2 Select Check for updates and press OK The Mailing System connects to the Online Ser...

Страница 180: ...rate tables display all available rate tables that are currently installed in your Mailing System and indicates with a check mark the active rate table Rate tables will automatically become active on...

Страница 181: ...ew Postal Rates To download new rates 1 Display the list of rate tables see How to Check your Rate Updates on page 175 above 2 Select Check for updates and press OK The Mailing System connects to the...

Страница 182: ...to Clean the Print Heads Automatically as Supervisor 183 How to Implement Wiper Process 184 How to Clean the Print Heads Manually 184 How to Change the Ink Cartridge 185 10 2 Filling the Moistener Opt...

Страница 183: ......

Страница 184: ...manually if the automatic cleaning is not sufficient The ink cartridge also contains two print heads that have to be aligned If you observe poor print quality streaked too light blurred etc see Clean...

Страница 185: ...t First used date Also check the Best before date on the cartridge box After this date the cartridge warranty is void How to Display Ink Level and Cartridge Data as a User To display the ink cartridge...

Страница 186: ...nce Cartridge Ink information The Ink information screen is displayed Setting the Headset Alignment Aligning the print heads is required if there is an between the top and the bottom of the imprints Y...

Страница 187: ...se the up down keys to select the letter that corresponds to the straightest and complete vertical line 4 Press OK to validate 5 Repeat the previous step until lines F are aligned 6 Press to exit Clea...

Страница 188: ...o Clean the Print Heads Automatically as Supervisor To clean the print heads automatically 1 As supervisor see How to Log in as Supervisor on page 134 Press and select the path Maintenance Cartridge C...

Страница 189: ...essary then press OK 5 Check headset is back in replacement position and press OK to end test Manual Cleaning If automatic cleaning is not sufficient you can clean the printing heads manually How to C...

Страница 190: ...position How to Change the Ink Cartridge 1 Open the cover the ink cartridge moves to the replacement position Keep fingers away from the ink cartridge while it is moving to the replacement position 2...

Страница 191: ...ink cartridge 5 Insert the new ink cartridge and then push it forward until you hear the click 6 Close the cover The alignment process of the printing heads starts automatically 186 Page 186 Jul 24 20...

Страница 192: ...t of water the mailing process can continue but the envelopes are not sealed properly How to Fill the Moistener To add water to the moistener 1 Remove the moistener from the table 2 Fill the moistener...

Страница 193: ...continues but the envelopes will not sealed properly How to Fill the Sealer Bottle To add water or sealing solution to the bottle 1 Remove the bottle from its base and turn it over 2 Unscrew the cap...

Страница 194: ...ter flow 1 Set the water flow using the back lever When standing in front of the feeder Push the lever towards the left hand side to increase the water level Push the lever towards the right hand side...

Страница 195: ...stener MAKE SURE YOUR SYSTEM IS DISCONNECTED FROM POWER SOURCE BEFORE CLEANING How to Clean the Brushes and Sponge Moistener To clean the brushes and sponge of the feed table moistener 1 Remove the mo...

Страница 196: ...ensitive devices successively covered by the envelopes during their travel along the mail path How to Clean the Mail Path Sensors To clean the mail path sensors 1 Use a damp cloth or 70 alcohol on a c...

Страница 197: ...B key 2 Withdraw the Meter Remove Meter from service Requires a password from Customer Services to perform 3 Update Registration This procedure is used if you have changed your address Contact your Cu...

Страница 198: ...Update registration 4 Press OK to begin the procedure update registration postal services 5 Press OK to start the connection to postal services The Transaction successful message is displayed 6 Press...

Страница 199: ......

Страница 200: ...Base 197 11 2 Label Jamming 198 How to Clear a Label Jammed in the Base 198 11 3 Weighing Problems 200 11 4 Diagnostics and System Data 201 How to Access Diagnostic Data 202 How to Display Software D...

Страница 201: ......

Страница 202: ...ions on page 207 Mail piece is too thick Mail size is incorrect How to Clear Mail Jammed in the Base To clear mail jammed in the Base 1 Pull the release handle located underneath the base to lower the...

Страница 203: ...stem base How to Clear a Label Jammed in the Base To clear a label jammed in the Base 1 Remove all labels from the dispenser Check that there is not label stuck in the bottom of the dispenser 2 Pull t...

Страница 204: ...4 Release the jam release handle to put the transport belt and wheels back into position 11 Troubleshooting 199 Page 199 Jul 24 2023 01 59...

Страница 205: ...zero the Weighing Platform see Weighing Settings on page 146 Something is touching or laying on the Weighing Platform See the weighing platform zeroing procedures in Weighing Settings on page 146 The...

Страница 206: ...sted below Comments Diagnostic No Sends a message to a server if connected to check the line Ping Server 1 Reports the status 0 or 1 of the sensors below Top doc Start print Cover Carriage Top Seal Ba...

Страница 207: ...w to Log in as Supervisor on page 134 Press and select the path Maintenance Diagnostics 2 The system requires you press OK to start the diagnostic tests then displays the list of tests 3 Select a test...

Страница 208: ...o Display Software Data To display Software Data 1 As supervisor see How to Log in as Supervisor on page 134 Press and select the path Maintenance System info Software information 2 The system softwar...

Страница 209: ...d list in a table with for each error The Code of the event The Date where appends the event The Cycles count when the event occurred The Description The Category 5 Note the Code and refer to your cus...

Страница 210: ...e main specifications of your Mailing System 12 1 Mail Specifications 207 12 2 Recommended Operating Conditions 210 12 3 General Mailing Systems Specifications 211 12 4 Operating Specifications 212 20...

Страница 211: ......

Страница 212: ...Specifications 12 1 Envelope Dimensions Your Mailing System can handle the envelope flap sizes as illustrated below note the illustration is not on scale 207 Page 207 Jul 24 2023 01 59 12 Specificati...

Страница 213: ...mm Min length 150 mm We advised you to store labels in a room with less than 50 relative humidity With the Feeder The feeder cannot process nested envelopes Weight range These weights apply to a singl...

Страница 214: ...Max weight Envelope Thickness Max 12 mm One piece at a time In a stack 8 mm Max with sealing optional 8 mm Additional information See also How to Use the Feeder on page 36 12 Specifications 209 Page 2...

Страница 215: ...be operated in the following conditions Ambient temperature 10 C 40 C Temperature range 80 max without condensation Relative humidity Weighing accuracy To obtain the best weighing results use a solid...

Страница 216: ...ht Base 283 x 378 x 300 Feed Table 152 x 278 x 118 Weight Base 10 kg Catch tray 1 4 Kg Power Frequency 50 Hz Max current rating full configuration 0 2 A Power supply 230 V 10 2 poles with EARTHED circ...

Страница 217: ...Operating Specifications 12 4 Accounts The number of accounts you can create is set to 50 by default and can be raised optionally to 100 212 Page 212 Jul 24 2023 01 59 12 Specifications...

Страница 218: ...er 14 201 credit 3 20 22 23 35 69 70 80 97 105 108 115 133 158 D Date 19 29 46 69 97 102 103 104 105 108 109 111 113 114 116 117 119 129 175 180 Date Advance 115 Diagnostics 97 201 Differential Weighi...

Страница 219: ...e tables 175 176 Rate Updates 123 Rate Wizard 53 54 Rear guide wall 14 Received 29 46 48 97 102 103 reports 3 64 69 79 97 102 103 124 201 Rezero 35 Re zero 200 S Scale 207 Sealer Bottle 14 35 Sensors...

Страница 220: ...A0154024 A 24 07 2023...

Отзывы: