39
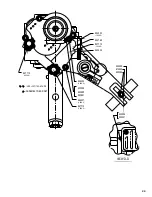
382370
622849
623014
623015
623334
623515
623520
623647
632424
624759
624760
624761
624762
624763
624764
624765
624766
624767
624768
629251
629252
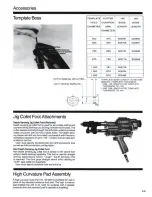
Tool box
Assembly tool
Assembly tool, press. Foot nut
Assembly tool, trigger lock
Assembly tool, pressure hydraulic & front enclosure
Assembly tool, pressure foot nut
Assembly tool, bulkhead removal
Assembly tool, depth stop
Removal tool, valve
Slide hammer puller
Assembly fixture
Wrench, spindle bearing locknut
Bearing installer
Removal tool, feed control valve
Removal tool, pilot valve
Arbor press fixture
Valve installation tool
Wrench, feed control valve
Tee wrench, foot body
Tool, 136SC pull rod bushing
Tool, 15/120SC pull rod bushing
1
1
1
1
1
1
1
1
1
1
1
1
1
1
1
1
1
1
1
1
1
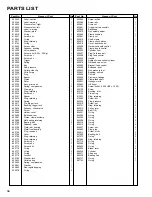
QTY.
NAME OF PART
PART NO.
MAINTENANCE KIT - 621953
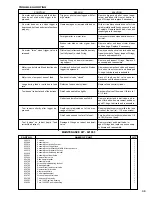
SYMPTOM
Air motor and/or clamp and feed func-
tions do not start when trigger is de-
pressed.
Air motor does not run when trigger is
depressed, but feed and clamp functions
properly.
Air motor “idles” when trigger valve is
released.
Motor runs, but clamp & feed functions do
not start.
Motor runs, clamps but doesn’t feed.
Lunge during feed or variation in feed
rate.
Tool doesn’t retract at end of feed stroke.
Tool retracts shortly after trigger de-
pressed.
Tool “pulses” on retract (rapid ‘’feed
retract-feed retract”).
REASON
Trigger or pilot valves clogged with for-
eign matter.
Gears damaged or jammed with debris.
Foreign matter in motor inlet.
Broken rotor blades, rotor or gear bear-
ings.
Pilot valve or retract and dwell valve sticky
(not fully reset), or bad O-ring.
Leaking O-ring on air motor rear bear-
-ing support.
Unclamp check valve doesn’t shift when
trigger is depressed.
Feed control valve “closed”
Defective feed control cylinder.
Dwell valve seated too tightly.
Retract and dwell valve doesn’t shift.
Depth control adjusted out of the max.
range of the tool.
Dwell valve opened too far off of seat.
Damaged O-rings on retract and dwell
valve.
SOLUTION
Remove trigger and pilot valves (sepa-
rately) and inspect for rust or debris. In-
spect O-rings and replace if necessary,
With air line disconnected check for free
spindle rotation with hex key wrench in end
of spindle. Remove backhead, clean and
inspect gears for damage.
Remove motor and clean debris from mo-
tor inlet.
Remove motor and inspect rotor blades
and bearings. Replace if necessary.
Remove and check valves for debris and
free movement of spool. Inspect O-rings,
lubricate and reassemble.
Remove and inspect O-rings. Replace if
necessary and reassemble.
Remove unclamp check valve and inspect
for debris, free movement and damaged
O-rings. Lubricate and reassemble.
Back off feed control valve counter-
clockwise until feed commences.
Replace feed control cylinder.
Back dwell valve off from seat 1/8 turn to 1
& 1/2 turn.
Remove retract and dwell valve and in-
spect for debris, free movement and dam-
aged O-rings. Lubricate and reassemble.
Readjust depth control nut within the feed
stroke of the tool (ref.: 1.10 max. stroke).
Turn dwell valve clockwise (should be 1/8
to 1&1/2 turns of seat).
Remove retract and dwell valve, in-
spect O-rings and replace as necessary.
Lubricate and reassemble.
TROUBLE SHOOTING
Содержание 120SC - 225
Страница 2: ...2 ...
Страница 8: ...8 ...
Страница 9: ...9 ...
Страница 10: ...10 ...
Страница 11: ...11 ...
Страница 12: ...12 ...
Страница 13: ...13 ...
Страница 14: ...14 ...
Страница 15: ...15 ...
Страница 16: ...16 ...
Страница 17: ...17 ...
Страница 18: ...18 ...
Страница 19: ...19 ...
Страница 20: ...20 ...
Страница 21: ...21 ...
Страница 22: ...22 ...
Страница 23: ...23 ...
Страница 24: ...24 ...
Страница 33: ...33 ...
Страница 34: ...34 ...
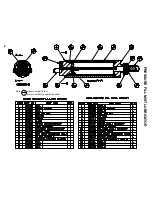
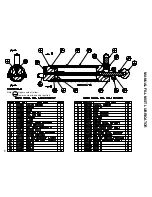
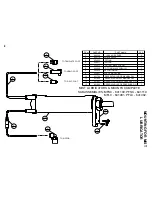
Страница 36: ...36 PRESSURE FILL MIST LUBRICATOR Note x Upper number is item x Lower number is quantity required ...
Страница 37: ...37 MANUAL FILL MIST LUBRICATOR Note x Upper number is item x Lower number is quantity required ...
Страница 40: ...40 CooperTools 7007 Pinemont Houston Texas 77040 Phone 713 462 4521 Fax 713 460 7008 www cooperindustries com ...

