manualshive.com logo in svg
background image


www.avsl.com

                                                                                            154.105UK User Manual 

•For optimum results of the col

or effects triggered by buttons 15 and 16, the operation with a least 8 

devices is recommended. 

4. The parameters of the movement patterns and color effects can be edited and adapted to your 
application.  


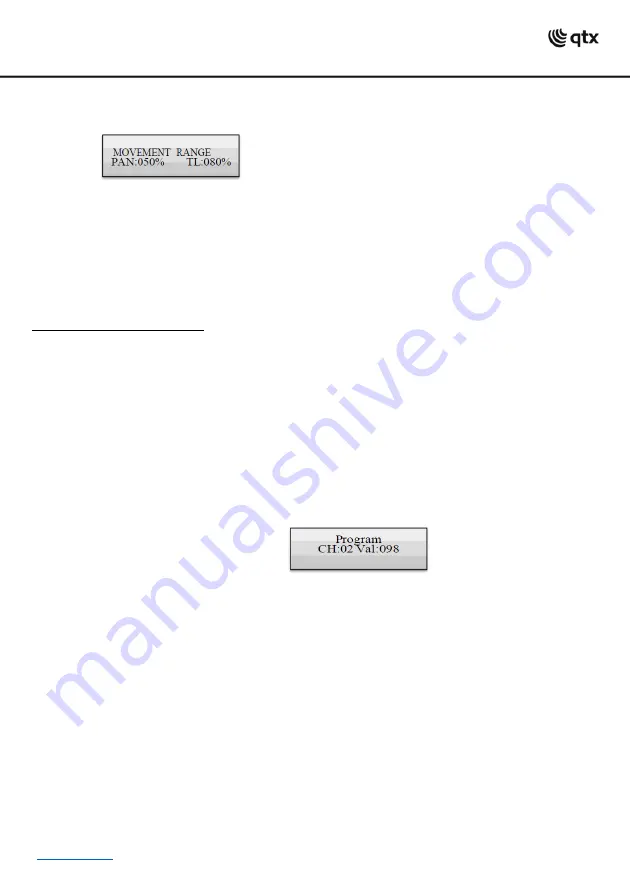
•Movement patterns 1

-9: Press the SWAP button to switch between the parameters and adjust the values 

with the Pan/Tilt wheels. 
-MOVEMENT RANGE: The pan/tilt movement can be adjusted between 1 and 100 %. 

-MOVEMENT OFFSET: Correction values can be adjusted for fine adjustment of the pan/tilt movement. 
-MOVEMENT SPEED: The running speed can be adjusted between 1 and 100 %. 

-DELAY LEVEL: The delay time for the operation with several devices can be adjusted between 0 and 30 
seconds. 

•Color effects 10

-16: The running speed can be adjusted between 1 and 100 %. 


Memorizing Illumination Scenes: 
32 memory banks are available for illumination scenes. Each scene contains the values of all control 

channels including the pan and tilt settings of the connected light effect units as well as movement 

patterns or color effects at the time of storage. 
1. Call the programming mode. For this, keep the REC button pressed until the LED above the button 

lights up. 
2. Press the FIXTURE button. 

•The control LED lights

 up. 

3. Use the number buttons 1-16 to select the devices to be controlled. 

•The corresponding LEDs of the buttons 

illuminate. 

•If a number button is pressed once aga

in, the corresponding device is deselected. 

4. Adjust the desired DMX values (0-255) for the DMX channels using the sliding controls and, if 
necessary, the pan and tilt wheels. 

•As soon as a fader is moved, the display indicates the number of the control 

channel in the lower line 

and the current output value as a DMX value. 


5. If necessary, movement patterns or color effects can be integrated in the scene. For this, call the effect 
mode with the MOVEMENT button and select the desired effect with the number buttons 1-16. Exit the 

effect mode again by pressing the FIXTURE button. 
6. If necessary, use the PAGE button to switch between the two channel groups 1-16 (LED A lights up) 

and 17-32 (LED B lights up) and repeat steps 3 and 5, until the desired values are assigned to all 
channels. 

7. Deselect the adjusted devices with the corresponding number button 1-16. 
8. Repeat the steps 3 to 5 for all further devices to be adjusted. 

9. Press the SCENE button and then the REC button to memorize the scene. 
10. Select the desired memory bank with one of the number buttons 1-16. 

•If necessary, use the 

PAGE button to switch between the two channel groups 1-16 (LED A lights up) and 

17-32 (LED B lights up). 

•To confirm the memory procedure, all LEDs of the controller flash three time

s. 

11. Repeat the steps 2 to 10 to memorize further scenes. 

12. After all desired scenes have been memorized, switch off the programming mode. For this, keep the 
button REC pressed until the LED above the button goes out. 


Содержание 154.105UK

Страница 1: ...port provides back up of up to 16 banks of DMX settings scenes and chases on an attached USB storage device The hardwearing metal chassis can be used standalone or 3U rackmount if preferred and the d...

Страница 2: ...with LED With the button active Blue LED the number buttons allow activation and deactivation of chases 8 Data wheel PAN For controlling the pan movement of moving heads or scanners and for programmin...

Страница 3: ...ossible to deselect all the devices again 3 Adjust the desired DMX values 0 255 for the DMX channels using the sliding controls and if necessary the pan and tilt wheels As soon as a fader is moved the...

Страница 4: ...LEDs of the buttons illuminate If a number button is pressed once again the corresponding device is deselected 4 Adjust the desired DMX values 0 255 for the DMX channels using the sliding controls and...

Страница 5: ...rol LED lights up 3 Keep the DEL button pressed and select the scene to be deleted with the number buttons 1 16 The control LEDs of the memory banks containing data light If necessary use the PAGE but...

Страница 6: ...s of the number buttons 1 16 is lit press the corresponding button for deselection 2 Press the CHASE button The control LED lights up 3 Use the number buttons 1 16 to select the desired chase The cont...

Страница 7: ...s up and 17 32 LED B lights up and repeat steps 1 and 2 until the desired values are assigned to all channels Deleting a Chase 1 Call the programming mode For this keep the REC button pressed until th...

Страница 8: ...nual Assignment of DMX Channels It is possible to individually assign the DMX channels of the connected light effect units to the control elements of the controller softpatch However some DMX channels...

Страница 9: ...peat steps 5 and 6 to invert further control channels 8 Repeat steps 3 5 and 6 to adjust further units 9 After your settings exit the system settings For this keep the MENU button pressed for 2 second...

Страница 10: ...ilable 09 Blackout mode Blackout function Reset factory Reset the controller to factory settings 1 Keep the MENU button pressed for 2 seconds to call the system settings 2 Call the menu item 02 Reset...

Страница 11: ...sed they must support RDM Data backup Data backup All settings of a light show i e DMX settings illumination scenes and chases can be stored on a USB memory device and recalled later 16 memory banks a...

Страница 12: ...ol channels react to the button i e in the blackout state the control channels have the value zero Only dimmer Only the dimmer control channel reacts on the button BLACK OUT i e in the blackout state...

Отзывы: