background image


12 


Connecting and Setting 

For safety, please do not connect any power supply before the external devices setup.  

1.


External Computer and Touch Connecting 


1)


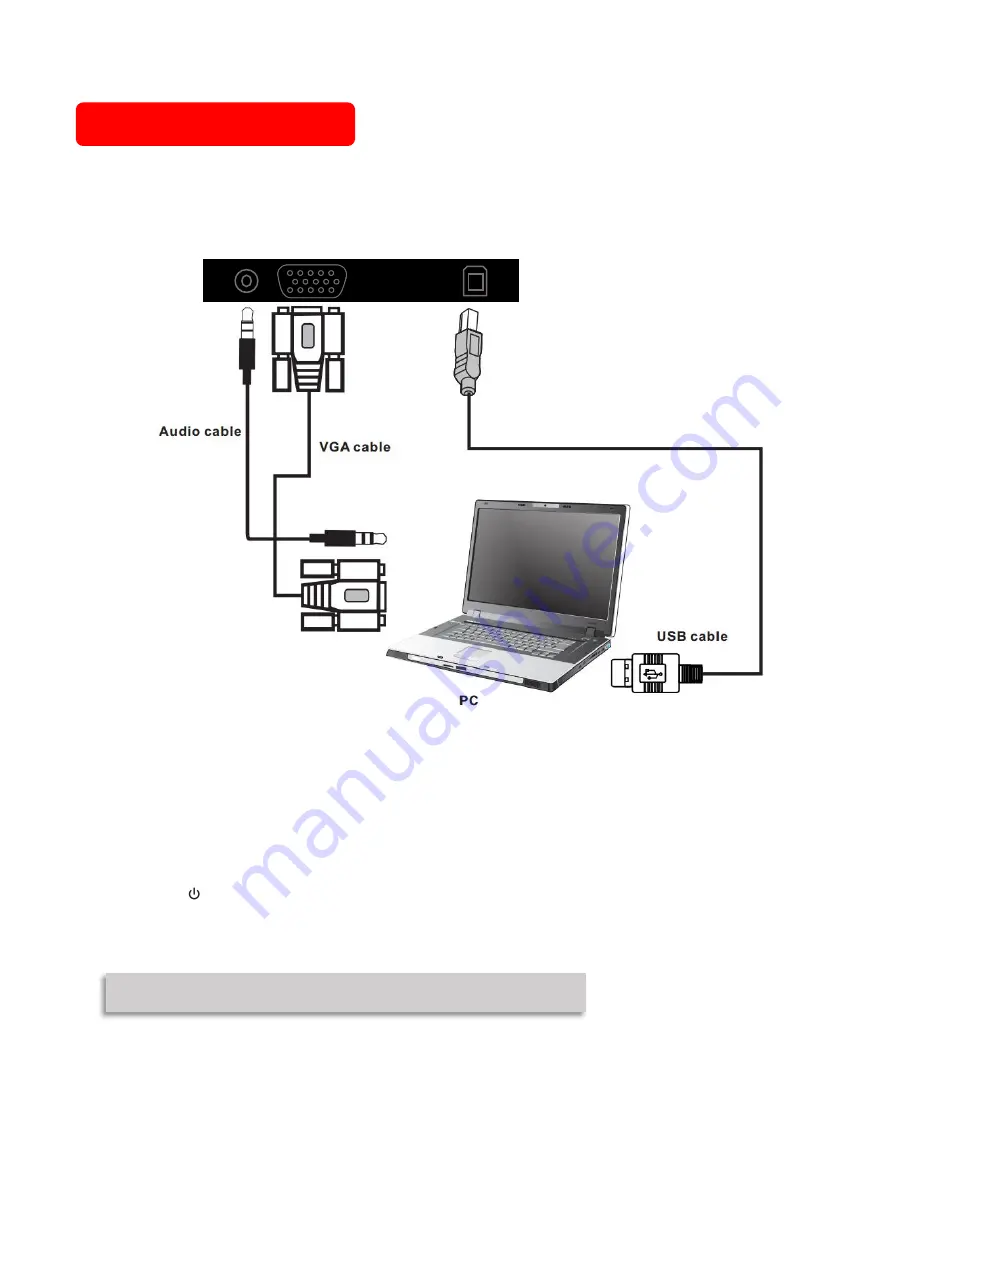
Connect a VGA cable (15 pin) between the VGA and external PC. Connect an earphone cable between the       

PC and audio at the same time. 

2)


Connect a USB cable between the external PC and USB terminal. 

3)


Plug the POWER cord and switch it on from the rear panel. 

4)


Start up the external computer. 

5)


Press   to turn on the panel. 

6)


Select Signal source to VGA source according to the one you connected. 


Note: The panel can connect with the external PC via HDMI. 


Audio IN          VGA IN                           USB-Touch        

Содержание QIT1455

Страница 1: ...Interactive Touch Screen User Manual V1 0 www qomo com...

Страница 2: ...nd Setting 12 1 External Computer and Touch Connecting 12 2 AV Connecting 13 3 Video OUT 13 4 RS232 14 Android Home Page 17 Bottom up Toolbar 18 Signal Source Selection 19 Android Settings 20 Common S...

Страница 3: ...echanical damage Please use exclusive power cord don t modify or lengthen it Please check and ensure AC source is connected with the ground A sudden power failure may damage the panel Frequent power o...

Страница 4: ...the unit has enough space for ventilation around left right and back 10cm top 20cm Earphone It will affect the hearing if you listen to noisy sound for a long time Before using earphone please turn d...

Страница 5: ...layer take necessary consolidating measures to ensure that the product is stably installed Note When the product is installed in a wall mounted way the screws need to be installed deeper than 10 mm i...

Страница 6: ...the back of screen must be within the required distance of bracket Attach the mounting arms to the back of screen with the screws Insert wall plugs into the mounting holes Push the self tapping screw...

Страница 7: ...insert the plug of the OPS after the interactive panel is disconnected from the power Install the OPS by the following steps 1 Insert the OPS into the special slot on the rear of the interactive pane...

Страница 8: ...red Press power button on the control panel or Power button on the remote control to turn on the display and built in PC simultaneously The power indicator turns green Power off Press ECO on the cont...

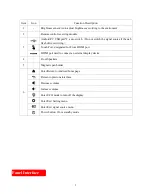
Страница 9: ...if the usb flash drive is writing Touch Port designated for Front HDMI port HDMI port used to connect an external display device 4 Front Speakers 5 Magnetic pen holder 6 Enter Return to Android home...

Страница 10: ...8...

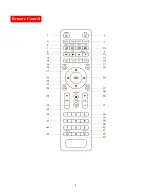
Страница 11: ...9 Remote Control...

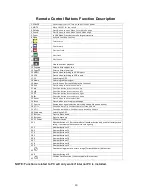
Страница 12: ...left 23 Direction button press to move right 24 Direction button press to move down 25 Enter Press button to enter select item 26 Back Press button return to previous page 27 Source Source input sign...

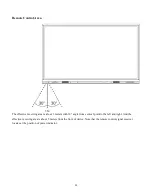
Страница 13: ...area is about 3 meters with 30 angle from vertical point to the left and right And the effective receiving area is about 5 meters from the front of device Note that the remote control signal receiver...

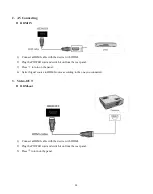
Страница 14: ...PC Connect an earphone cable between the PC and audio at the same time 2 Connect a USB cable between the external PC and USB terminal 3 Plug the POWER cord and switch it on from the rear panel 4 Start...

Страница 15: ...and switch it on from the rear panel 3 Press to turn on the panel 4 Select Signal source to HDMI source according to the one you connected 3 Video OUT HDMI out 1 Connect a HDMI cable with the device...

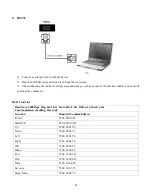
Страница 16: ...the volume etc RS232 code list Baud rate 38400bps Stop bit 1 bit Data bits 8 bit Odd even check none Communication encoding Hex code Function Required Commands Hex Power 55 00 8E 00 E3 SOURCE 55 00 8...

Страница 17: ...R 2 55 00 80 10 E5 Switch to VGA 1 55 00 80 05 DA Switch to VGA 2 55 00 80 06 DB Switch to VGA 3 55 00 80 07 DC Switch to HDMI 1 55 00 80 08 DD Switch to HDMI 2 55 00 80 09 DE Switch to HDMI 3 55 00 8...

Страница 18: ...e 55 00 3E 00 93 Set Language 0 1 2 3 55 00 42 00 97 Enter factory Menu 55 00 82 00 D7 Factory Reset 55 00 84 00 D9 Burning 55 00 86 00 DB Backlight mode 55 00 88 00 DD Screen shot 55 00 8A 00 DF VGA...

Страница 19: ...ask column Ending task System Help Tap the circle to move or hide it Click the center of System Help to unfold 5 shortcuts Home Return to Android home page Mem Clear Clear memory to speed up memory Ch...

Страница 20: ...rom the bottom of screen and it will appear Buttons Functions Return to Android home page Return to previous interface Screen Shot Built in browser All applications interface Quick to annotate Change...

Страница 21: ...from the bottom edge to bring up a toolbar then click Press SOURCE button on the remote control Press button on the front control panel Signal Source Interface Select a source and press OK or click t...

Страница 22: ...ce Common function Click Common function to set Sound Brightness Eye Protection Startup and Shutdown Screen Lock setting Multi user Wake On Lan WOL HDMI output format Wallpaper and Screen Saver Sound...

Страница 23: ...rmat Set HDMI output to be 1920 1080 or 3840 2160 Wallpaper Set dynamic or static wallpaper Screen Saver Set screen saver Multi user Account Setting Journey 14 provides Multi user Account Switch funct...

Страница 24: ...ninstall it Note that you can t uninstall apps burnt into the firmware Storage Setting Click Storage to check internal storage and USB storage Click eject icon to safely remove the USB flash drive Dat...

Страница 25: ...uage Where you can change the system or keyboard language Factory Reset Reset Erase all information and downloaded apps You can t recover it About Device About Device Where you can check Android Firmw...

Страница 26: ...utton on the remote control Press button on the front control panel In the signal source page select a channel and press OK or click the channel icon directly to enter it 2 Operate the built in PC in...

Страница 27: ...25 Menu Click menu icon on the bottom up toolbar Menu pops up as follows Under menu you can set sound and etc Here provides some for quick access...

Страница 28: ...re pre installed in the Journey panels It features high speed annotation without any delay Whiteboard Main Interface Whiteboard Desktop Mode Switch between whiteboard main interface and desktop mode S...

Страница 29: ...27 0 Included Accessories Picture Name Quantity Remote control 1 Magnetic Pen 2 Pointer 1 Power cable 1 HDMI cable 1 USB cable A B 1 Bracket 1 WIFI Antenna 4 Warranty card 1 CD 1...

Страница 30: ...re obscured Remove the interference source or change the using environment No display or no sound No sound is played and no image is displayed Check whether the power plug is inserted into the power s...

Отзывы: