


16
UM Assembly Palletiser HR7 (partly completed) QS203263 v1.0
EN
Safety precautions
2.5.3
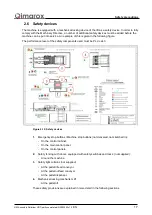
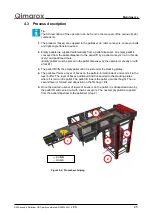
Hazardous areas
The completed machine can be divided into multiple hazardous areas
For example:
•
Zone 1: Supply conveyor.
•
Zone 2: Palletiser and PRmk10 lift (partly completed machine).
•
Zone 3: Pallet supply.
•
Zone 4: Pallet output.
An example of these hazardous zones is shown in the following figure.
Hazardous areas must be secured with emergency stop buttons and/or machine stop buttons.
Emergency stop buttons (red mushroom push button with yellow back plate) put all zones in-
side the machine into safe stop.
Machine stop buttons (black mushroom push button) only switch a corresponding zone into
safe stop.
Figure 2-11: Zone layout