


11
EN
5. USE
5.1 First use
Before using the appliance for the first time, wash the interior and all internal accessories
with lukewarm water and some neutral soap so as to remove the typical smell of a brand
new product, then dry thoroughly.
Important!
•
Do not use detergents or abrasive powders, as these will damage the finish.
•
After transport, unpacking and installation, let the appliance rest at least 2 hours in
vertical position before connecting to the power supply.
•
Let the appliance run for at least 2 hours before inserting fresh or frozen foods.
5.2 Functions
When the refrigerator is the first time connected to mains power, the display will show
all icons for 3 seconds and beep tones are emitted. The refrigerator goes into normal
mode with the temperature of the refrigerating compartment set to 5°C and the freezer
compartment set to -18°C.
In normal mode the display shows the lock icon (8), which turns off if for 30 seconds
no button is pressed.
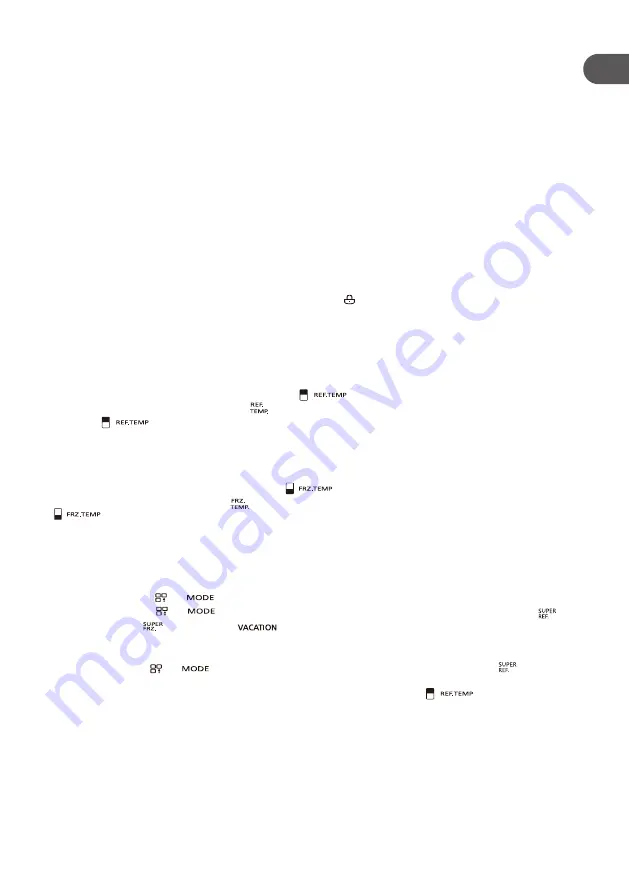
5.2.1 Temperature setting
All settings are done on the control panel on the front of the refrigerator.
5.2.1.1 Setting the temperature of the refrigerator compartment
Press the refrigerator temperature setting
(14) button until the display changes to
the refrigerator temperature icon (18). Repeatedly press the refrigerator temperature
setting
(14) button to decrease the temperature each time by 1°C. The
temperature of the refrigerator compartment cycles through the settings 4 → 3 → 2 →
1 → 8 → 7 → 6 → 5 °C, with 8°C being the highest and 2°C the lowest possible setting.
5.2.1.2 Setting the temperature of the freezer compartment
Press the freezer temperature setting
(13) button until the display changes to
the freezer temperature icon
(7). Repeatedly press the freezer temperature setting
(13) button to decrease the temperature each time by 1°C. The temperature of
the freezer compartment cycles through the settings -19 → -20 → -21 → -22 → -23 →
-24 → -16 → -17 → -18 °C, with -16°C being the highest and -24°C the lowest possible
setting.
5.2.1.3 Mode setting
Press the mode
(12) button to select one of the control modes. Repeatedly
press the mode
(12) button to cycle through the super refrigerating
→
super freezing
→ vacation
→ normal modes.
5.2.1.4 Super refrigerating mode
Press the mode
(12) button once to select the super refrigerating icon (15).
The refrigerating compartment is automatically set to 2°C.
Now press and hold the refrigerator temperature setting
(14) button for
3 seconds to set the duration of the super refrigerating mode. The display shows “2.5”,
which means that the duration is set to 2.5 hours.
The refrigerator compartment automatically exits the super refrigerating mode when the
set time has expired.
Содержание Q.6672
Страница 3: ...EN FR ES PT PL HU RO RU UA 1 2 3 4 5 6 EN...
Страница 4: ...EN FR FR FR ES FR PT FR PL FR HU FR RO FR RU FR UA 7 8 9 10 18 17 16 15 14 13 12 11 FR FR...
Страница 102: ...102 FR RU 1 1 8 2 3 4 1 C 102 2 C 107 3 C 107 4 C 107 5 C 109 6 C 113 7 C 115 8 C 116...
Страница 103: ...103 RU 5 6 7 8 9 16 A 10 11 R600a 12...
Страница 104: ...104 FR RU 13 14 15 16 17 18 19 20 21 22...
Страница 105: ...105 RU 23 24 25 26 27 28...
Страница 106: ...106 FR RU 48 5 29 3 8 30...
Страница 107: ...107 RU 2 Qilive 155485 HQ 627WEN I 220 240 50 0 85 24 467 97 3 1 2 3 4 5 6 7 8 9 10 11 12 13 14 15 16 17 18 4 4 1...
Страница 108: ...108 FR RU 4 2 50 5 1 2 10 30 3 4 3 4 4...
Страница 109: ...109 RU 4 4 SN 10 C 32 C 16 C 32 C ST 16 C 38 C T 16 C 43 C 4 5 5 5 1 2 2 5 2 3 5 C 18 C 8 30...
Страница 111: ...111 RU 5 2 1 7 11 3 8 11 3 8 5 2 2 2 5 2 3 5 2 4 E1 E7 EH E1 E6 E2 E7 E4 EH E5 5 3 24 24 5 4 2 5 5...
Страница 112: ...112 FR RU 5 6 24 24 5 7 1 2...
Страница 113: ...113 RU 6 6 1 1 2 3 6 2 6 3...
Страница 114: ...114 FR RU 6 4 45 6 5...
Страница 115: ...115 RU 7...
Страница 116: ...116 FR RU 8 36 6 SIM SD IMEI...
Страница 117: ...117 UA 1 1 8 2 3 4 1 C 117 2 C 122 3 C 122 4 C 122 5 C 124 6 C 127 7 C 129 8 C 130...
Страница 118: ...118 FR UA 5 6 7 8 9 16 A 10 11 R600a...
Страница 119: ...119 UA 12 13 14 15 16 17 18 19 20 21 22...
Страница 120: ...120 FR UA 23 24 25 26 27 28 48 5...
Страница 121: ...121 UA 29 3 8 30...
Страница 123: ...123 UA 1 2 10 30 3 4 3 4 4 4 4 SN 10 C 32 C 16 C 32 C ST 16 C 38 C T 16 C 43 C...
Страница 126: ...126 FR UA E1 E6 E2 E7 E4 EH E5 5 3 24 24 5 4 2 5 5 5 6 24 24...
Страница 127: ...127 UA 5 7 6 6 1 1...
Страница 128: ...128 FR UA 2 3 6 2 6 3 6 4 45...
Страница 129: ...129 UA 6 5...
Страница 130: ...130 FR UA 7...
Страница 131: ...131 UA 8 3 6 SIM SD IMEI...