background image


40cm  

Self-Propelled 

Petrol Lawnmower 


Model No: QG40-145SP 

Product No: 1938277001 


ASSEMBLY REQUIRED 

SAVE THESE INSTRUCTIONS 

SPARES & SUPPORT: 01793 333212


Please read & understand this manual, paying attention to the safety instructions, before use. 

Incorrect use of the product could put the operator or machine in danger. 

Whilst every effort has been made to ensure the accuracy of information contained in this 

manual, our policy of continuous improvement determines the right to make modifications 

without prior warning. 

Images used are for illustration purposes only. 

INSTRUCTION MANUAL 


Содержание QG40-145SP

Страница 1: ...ng attention to the safety instructions before use Incorrect use of the product could put the operator or machine in danger Whilst every effort has been made to ensure the accuracy of information cont...

Страница 2: ...rsonal educational use only Commercial copying redistribution hiring or lending is prohibited No part of this publication may be stored in a retrieval system or transmitted in any other form or means...

Страница 3: ...5 30pm November to January 8 30am 5 00pm Closed Bank Holidays SPECIFICATION The manufacturer reserves the right to change the product specification and livery according to continued product improvemen...

Страница 4: ...ance while the mower is in use Before mowing remove all foreign objects from the lawn which may be thrown by the machine stay alert for any foreign objects which may have been missed These operating i...

Страница 5: ...ngine parts especially the exhaust become extremely hot Severe thermal burns can occur on contact Moving Parts Rotating parts can contact or entangle hands feet hair clothing or accessories Traumatic...

Страница 6: ...dren or pets are nearby 5 The operator or user is responsible for accidents or hazards occurring to other people or their property SAFETY INSTRUCTIONS FOR WORKING WITH YOUR LAWNMOWER 1 Do not leave en...

Страница 7: ...ations 6 Remove any adjusting tools before turning the machine on A tool that is left attached to a rotating part of the machine may result in personal injury 7 Use safety equipment Always wear eye pr...

Страница 8: ...the working conditions and the work to be performed Use of the machine for operations different from intended could result in a hazardous situation PERSON PROTECTION 1 In case of any injury always pro...

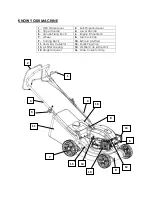
Страница 9: ...r Handle 5 Handle Fixing Knob 6 Engine Primer Bulb 7 Wheel 8 Fuel Tank Cap 9 Cutting Deck 10 Exhaust Muffler 11 45L Grass Collector 12 Spark Plug Cap 13 Air Filter Housing 14 Oil Filler Cap Dipstick 1...

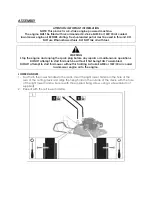
Страница 10: ...any repairs or maintenance operations DO NOT attempt to start this machine without it first being FULLY assembled DO NOT attempt to start this mower without first adding 4 stroke SAE30 or 10W 30 air...

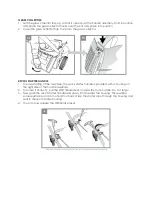
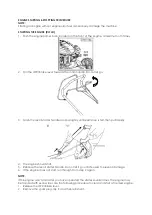
Страница 11: ...in the upper handle with those in the lower handles Insert the left fixing bolt from the inside of the handle assembly and secure with the fixing knob on the outside Insert the right fixing bolt and t...

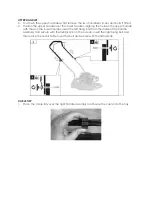
Страница 12: ...arter handle is provided with a housing on the right side of the handle assembly 2 To house it correctly pull the OPC Brake lever towards the main handle Do not let go 3 Now grab the recoil starter ha...

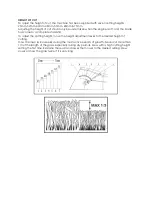
Страница 13: ...o a complete standstill To adjust the cutting height move the height adjustment lever to the desired height of cutting Mow the lawn twice weekly during the most active periods of growth Never cut more...

Страница 14: ...e SURE START FUEL ADDITIVE HP 199 from Handy Parts A fuel additive added to your fuel at the time of purchase will help make your machine easier to start extend the shelf life of your fuel mixture for...

Страница 15: ...thout screwing into the filler neck to ensure the oil level remains between the minimum and maximum marks on the dipstick 4 Replace and tighten the oil filler cap with built in dipstick NOTE Below 40F...

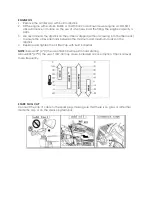
Страница 16: ...arter handle and pull lightly until resistance is felt then pull rapidly 4 The engine should start 5 Rehouse the recoil starter handle Do not let it go until housed to prevent damage 6 If the engine d...

Страница 17: ...oil starter handle Do not let it go until housed to prevent damage 5 If the engine does not start run through from step 1 again but press the primer bulb once only NOTE If the engine won t start after...

Страница 18: ...gine wait for the blade has come to a stop 1 To take off the grass collector use one hand to lift the rear collector cover and the other to grab onto the grass collector carry handle The rear collecto...

Страница 19: ...r while starting the engine Never place your hands and feet underneath the deck or into the rear discharge chute while the engine is running 15 Never change in any way the rated speed of the engine 16...

Страница 20: ...ble damage to the threads Clean or replace the plug if fouled with heavy oily deposits Recommended gap of the spark plug electrode is 0 70 0 80mm Replace the plug if the center electrode is worn or ro...

Страница 21: ...air filter or rapid engine wear will be the result SPARK PLUG Recommended spark plug BPR5ES NGK or F7RTC LG To ensure proper engine operation the spark plug must be properly gapped and free of deposi...

Страница 22: ...10W 30 4 Stroke Lawnmower Engine Oil Oil capacity ml 0 4L Dimension and mass Product Size 370 300 330 Net Weight 8 5kg CLEANING CAUTION Do not use a water hose or pressure washer to clean the engine W...

Страница 23: ...as been used up 3 Change the oil at the end of every season See removing oil within this manual 4 Clean the cooling fins of the cylinder and the housing 5 Be sure to clean the entire machine to protec...

Страница 24: ...d service dealer PROBLEM POSSIBLE CAUSES REMEDIAL ACTION Engine does not start Fuel tank is empty Fill tank with fuel Spark plug loose Tighten spark plug Spark plug wire loose or disconnected from plu...

Страница 25: ...PARTS DIAGRAM QG40 145SP 1938277001...

Страница 26: ...088 7 Front Wheel 2 14 QG127 10027357 M8 Flange Lock Nut 4 15 QG127 40033089 7 Wheel Trim 2 16 QG127 10000351 Washer 4 17 QG127 40033090 8 Drive Wheel 2 18 QG127 40033091 8 Wheel Trim 2 19 QG127 10006...

Страница 27: ...M6x35 1 46 QG127 10011223 Nut M6 1 47 QG127 10020482 Drive Lever 1 48 QG127 10033474 Cable Block 2 49 QG127 10033475 Insulated Cable 2 50 QG127 10034062 Recoil Holder 1 51 QG127 10020593 OPC Brake Lev...

Страница 28: ...PARTS DIAGRAM ENGINE 145cc...

Страница 29: ...79 Brake Assembly 1 14 QG128 10020975 Right Oil Seal Crankcase 1 15 QG128 10020926 Fuel Tank with Cap 1 16 QG128 30096469 Label 1 17 QG128 10015150 Filter Net 1 18 QG128 10015164 Pipe Clamp B 1 19 QG1...

Страница 30: ...0030867 Crankshaft Assembly 1 46 QG128 10030858 Connecting Rod Assembly 1 47 QG128 10030852 Piston Pin 1 48 QG128 10030853 Piston Pin Circlip 2 49 QG128 10033380 Piston 1 50 QG128 10015612 Expander 1...

Страница 31: ...10015146 Nut M8x50 4 78 QG128 10033001 Cylinder Head Assembly 1 79 QG128 10033131 Valve 2 80 QG128 10030865 Pusher 2 81 QG128 10030864 Tappet 2 82 QG128 10010155 Set Pin 2 83 QG128 10033147 Cylinder H...

Страница 32: ...bility Directive 2000 14 EC 2005 88 EC Outdoor Noise Directive The conformity assessment procedure followed was in accordance with EN ISO 5395 1 2013 A1 EN ISO 5395 2 2013 A1 A2 EN ISO 14982 2009 Guar...

Страница 33: ...ement Spare Parts unless normal wear tear component which are covered for 30 days g All machines must be serviced within the first 12 months from the original date of purchase to comply with the warra...

Страница 34: ...J Handy Co Ltd will never warranty in terms of the merchantability or the fitness for a particular purpose b No person is authorised to make any warranties representations or promises expressed or imp...

Страница 35: ......
Страница 36: ...us Tel 01793 333212 Email customerservice handydistribution co uk Opening hours weekdays February to October 8 30am 5 30pm November to January 8 30am 5 00pm Closed Bank Holidays Distributed by Handy...

Отзывы: