background image

SAFETY INSTRUCTIONS

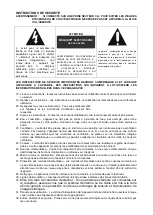
WARNING: IF CONNECTED TO AN AC OUTLET: TO PREVENT FIRE OR SHOCK HAZARD, DO 

NOT EXPOSE THIS APPLIANCE TO RAIN OR MOISTURE.

THE IMPORTANT SAFETY INSTRUCTIONS SHALL INCLUDE, IF AND AS APPLICABLE TO THE 

APPLIANCE, STATEMENTS THAT CONVEY TO THE USER THE INFORMATION ITEMIZED IN THIS 

PARAGRAPH:

1. Read instructions - All the safety and operating instructions should be read before the appliance is 

operated

2. Retain instructions - The safety and operating instructions should be retained for future reference.

3. Heed Warnings - All warnings on the appliance and in the 

operating instructions should be adhered to.

4. Follow instructions - All operation and use instructions should be followed.

5. Water and Moisture - The appliance should not be used near water; for example, near a bathtub, 

washbowl, kitchen sink, laundry tub, in a wet basement, or near a swimming pool, and the like. 

6. Ventilation - The appliance should be situated so that its location or position does not interfere with its 

proper ventilation. For example, the appliance should not be situated on a bed, sofa, rug, or similar 

surface that may block the ventilation openings; or placed in a built-in installation, such as a bookcase 

or cabinet that may impede the flow of air through the ventilation openings.

7. Heat - The appliance should be situated away from heat sources such as radiators, heat registers, 

stoves or other appliances (including amplifiers) that produce heat.

8. Power Sources - The appliance should be connected to a power supply only of the type described in 

the operating instructions or as marked on the appliance.

9. Grounding or Polarization - Precautions should be taken so that the grounding or polarization means 

of an appliance is not defeated.

10. Power-Cord Protection - Power supply cords should be routed so that they are not likely to be walked 

on or pinched by items placed upon or against them, paying particular attention to cords at plugs, 

convenience receptacles and the point where they exit from the appliance.

11. Cleaning - The appliance should be cleaned only as recommended by the manufacturer.

12. Power Lines - An outdoor antenna should be located away from power lines.

13.

Outdoor Antenna Grounding - If an outside antenna is connected to the receiver, be 

sure the antenna system is grounded so as to provide some protection against 

voltage surges and built up static charges. 

14. Nonuse Periods - The power cord of the appliance should be unplugged from the outlet when left

unused for a long period of time.

15. Object and Liquid Entry - Care should be taken so that objects do not fall and liquids are not spilled 

into the enclosure through openings.

16. Damage Requiring Service - The appliance should be serviced by qualified service personnel when:

A. The power supply cord or the plug has been damaged; or

B. Objects have fallen, or liquid has been spilled into the appliance; or

C. The appliance has been exposed to rain; or

D. The appliance does not appear to operate normally or exhibits a marked change in performance; 

or

E. The appliance has been dropped, or the enclosure damaged.

17. Servicing  - The user should not attempt to service the appliance beyond that described in the 

operating instructions. All other servicing should be referred to qualified service personnel.

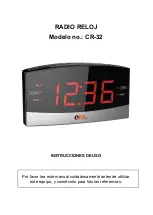
Содержание CR-32

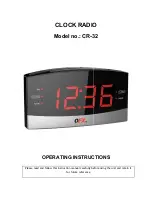
Страница 1: ...CLOCK RADIO Model no CR 32 OPERATING INSTRUCTIONS Please read and follow this instruction manual carefully before using the unit and retain it for future reference...

Страница 2: ...ed in the operating instructions or as marked on the appliance 9 Grounding or Polarization Precautions should be taken so that the grounding or polarization means of an appliance is not defeated 10 Po...

Страница 3: ...r in a particular installation If this equipment does cause harmful interference to radio or television reception which can be determined by turning the equipment off and on the user is encouraged to...

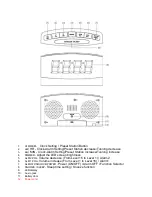
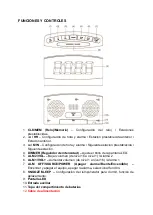
Страница 4: ...ease Tunning increase 4 DIMMER Adjust the LED screen brightness 5 ALM 2 VOL Volume decrease From Level 16 to Level 1 Alarm2 6 ALM 1 VOL Volume increase From Level 1 to Level 16 Alarm1 7 ALM OFF SOURCE...

Страница 5: ...will dis play the alarm time and alarm status 2 Under the state of power on you can check the alarm status without pressing any butt ons will only display the alarm status and no alarm time displayed...

Страница 6: ...y 28 first again press SLEEP button will display 15 minutes If you want to shut down the auto power off function without stopping playback then press the SLEEP button repeatedly until the power off ti...

Страница 7: ...RADIOR VEIL Mod le num ro CR 32 INSTRUCTIONS D UTILISATION Merci de lire attentivement et de respecter ce manuel d instruction avant d utiliser l unit et conservez le pour r f rence ult rieure...

Страница 8: ...L unit doit tre plac e dans un endroit ou une position qui n entravera pas sa ventilation correcte Par exemple l appareil ne doit pas tre plac e sur un lit un sofa un tapis ou une surface similaire q...

Страница 9: ...contre les interf rences nuisibles dans une installation r sidentielle Cet quipement g n re utilise et rayonne de l nergie de fr quence radio et peut nuire aux communications radio s il n est pas ins...

Страница 10: ...mentation de fr quence 16 DIMMER R glage de la luminosit de l cran DEL 17 ALM 2 VOL Diminution du volume depuis le niveau 16 au niveau 1 Alarme 2 18 ALM 1 VOL Augmentation du volume depuis le niveau 1...

Страница 11: ...ur l alarme 1 V rification de l alarme 1 En mode veille tenez la touche ALM1 ALM2 appuy e pendant 1 ou 2 secondes pour v rifier l alarme l heure et le statut de l alarme s afficheront 2 En mode allum...

Страница 12: ...n automatique en appuyant sur la touche SLEEP par exemple 30 a t r gl et 2 minutes plus tard l cran affichera 28 d abord puis si vous appuyez sur la touche SLEEP et l cran affichera 15 minutes Si vous...

Страница 13: ...RADIO RELOJ Modelo no CR 32 INSTRUCCIONES DE USO Por favor lea este manual cuidadosamente antes de utilizar este equipo y cons rvelo para futuras referencias...

Страница 14: ...d y de uso deber n leerse antes de usar el quipo 2 Conserve las instrucciones Las instrucciones de seguridad y de uso deber n conservarse para futuras referencias 3 Respete todas las advertencias Toda...

Страница 15: ...se cuente con protecci n contra picos de voltaje y cargas est ticas 14 Periodos sin usar Deber desconectar el cable de alimentaci n cuando no vaya a utilizar el equipo por un largo periodo de tiempo 1...

Страница 16: ...t a de que no vaya a existir interferencia en alguna instalaci n particular Si el equipo llegara a causar interferencia da ina a la recepci n de su radio o televisi n lo cual se determina encendiendo...

Страница 17: ...R Regulador de intensidad Ajuste el brillo de la pantalla LED 5 ALM 2 VOL Bajar volumen de nivel 16 a nivel 1 Alarma 2 6 ALM 1 VOL Aumentar volumen de nivel 1 a nivel 16 Alarma 1 7 ALM OFF SOURCE POWE...

Страница 18: ...la alarma por 9 minutos una vez transcurridos los 9 minutos la alarma sonar de nuevo Puede presionar el bot n VOL ALM1 o ALM OFF para apagar la alarma Cuando la alarma suene el cono indicado parpadea...

Страница 19: ...n ser confirmada autom ticamente y la funci n de apagado autom tico se activar Si desea apagar el equipo y el tiempo establecido a n no concluye presione el bot n de apagado POWER Para verificar o ca...

Страница 20: ...ESPECIFICACIONES Rango de frecuencia AM 530 1710 kHz FM 87 5 108 MHz Fuentes de alimentaci n 120V 60 Hz 5W 2 bater as AAA 1 5V DC bater as de respaldo no incluidas...

Отзывы: