background image

16

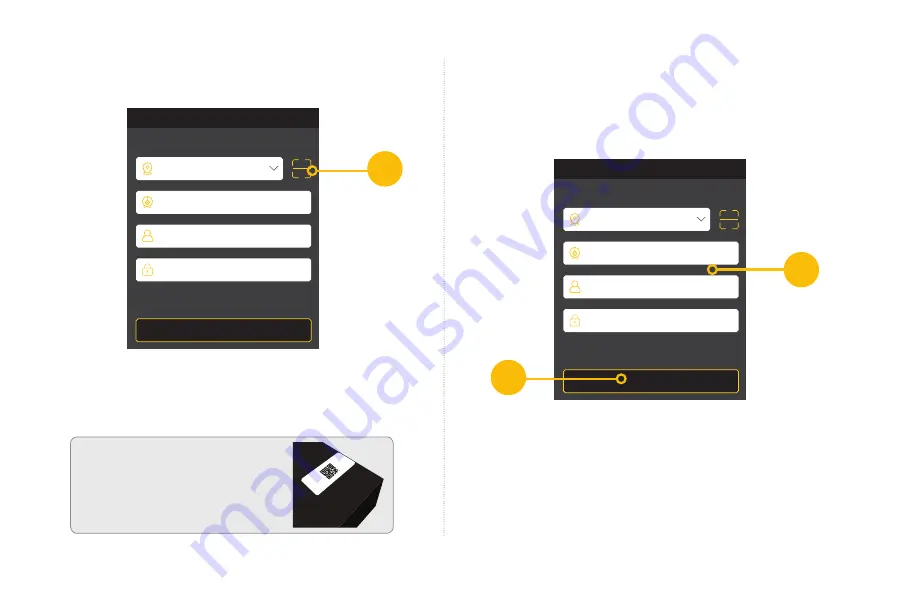
B.  Once you have launched the QT View Mobile App, 

Tap on the QR Code Scan icon.

C.  Scan the QR code displayed on the Wizard screen 

with your mobile device. 

D.  Once scanned, the App will return to the Login 

Screen. The NVR’s ID will appear in the SN (serial 
number) section. Enter the  Account (User Name) 
and your new password. 

E. Tap 

Play

 to begin viewing your cameras

Always test your cameras to view live video before 
you install them onto the wall. 


ATTENTION: 

The QR Code 

is also located on the top of 
your NVR. 

Q-See Scan N’V

iew

12-34-AB-56-CD-F7

IP/DDNS or SN

Nickname

User

Play

Password

Add device

001122334455

My NVR

admin

Play

******

Add device

IP/DDNS or SN

Nickname

User

Play

Password

Add device

001122334455

My NVR

admin

Play

******

Add device

B

D

E

Adding Mobile Devices

After completing the process on your first mobile device, 
click the 

Previous

 button located on the Wizard window 

and repeat Step 9 with that mobile device.

Содержание QT SERIES

Страница 1: ...High Definition Home and Business Security Camera System QT IP HD...

Страница 2: ...o Router 11 Download Mobile App 12 Powering up the NVR 12 Startup Wizard 13 QT View Mobile App 15 QT View on a Computer 17 Installing Your Cameras Getting the Most Out of Your Q See Cameras 18 Using Y...

Страница 3: ...s and businesses Your state of the art Q See system produces sharp clear images and is packed with an abundance of features that make it easy for you to keep a close eye on what matters most On behalf...

Страница 4: ...ed in this warranty policy What doesn t my warranty cover Misuse vandalism or tampering Modification or alteration to hardware or software including the removal of Q See logos or branding Cut or splic...

Страница 5: ...undle Cameras Camera Cables NVR Cables NVR Power Supply 100 30m Ethernet Cables Colors on the back of the NVR are for reference only Your system will include one of the options below HDMI Cable Networ...

Страница 6: ...sh or external hard drives to update firmware or backup recordings Enter Confirm selection Backup Decrease the value in SETUP Enter backup mode in LIVE VIEW Search Enters Search Mode Multiscreen Chang...

Страница 7: ...C 48V Power input Audio Output RCA connection for audio output connect to an amplified speaker HDMI HDMI video output USB Connect USB mouse RS 485 PTZ For Legacy Pan Tilt base control NOTE Your NVR mo...

Страница 8: ...amera Make sure that you hear a click to ensure a good connection ATTENTION The other camera lead is for use with a power adapter not included when the camera is not powered by the NVR and a POE Power...

Страница 9: ...era and receive its video Repeat steps A B for each camera Cameras will appear on screen in Live View in the order they were connected ATTENTION Please test cameras and connections prior to mounting I...

Страница 10: ...cable to the monitor or TV C Plug the monitor or TV into a surge protector Option B VGA Monitor A Plug a VGA cable not included into the NVR s VGA port B Connect the other end of the VGA cable to the...

Страница 11: ...he back either one will work Step 5 Connect To Router A Plug the included Network Ethernet cable into the Network LAN port on the back of the NVR B Connect the other end of the cable to an open port o...

Страница 12: ...ew mobile app to your mobile device Step 7 Powering up the NVR A Plug the NVR power supply cord into the DC 48V Port on the back of the NVR B Plug the power supply or power adapter into a surge protec...

Страница 13: ...e Time Zone System Time GMT 12 West of the International 01 24 2016 04 18 42 Admin Password Setup Date and Time New Password Confirm Password admin 123456 123456 Display Password English Log in Automa...

Страница 14: ...password Wizard Network Settings Wizard Next Previous Edit Security Question Cancel Next Previous Cancel Time Zone System Time Date Format Time Format DST GMT 12 West of the International 01 24 2016...

Страница 15: ...in screen enter the Serial Number shown to the right under the QR code 3 Enter the Username admin 4 Enter your new Password default is 123456 00867F1VE309 www qseeqtview com 00867F1VE309 www qseeqtvie...

Страница 16: ...Always test your cameras to view live video before you install them onto the wall ATTENTION The QR Code is also located on the top of your NVR Q See Scan N V iew 1 2 3 4 A B 5 6 C D F 7 IP DDNS or SN...

Страница 17: ...d you created F Select the computer hard drive you want to use to save video G In the Control Panel click Add Device H QT View will automatically scan your network for any NVRs connected to it J Click...

Страница 18: ...hickness Mount your camera on a wall that is at least 2 5 thick Avoid direct exposure to weather Mount your camera under an eave or awning if possible Get the Most Out of Your Q See Cameras Follow the...

Страница 19: ...local laws before installing cameras 2011 NEC 820 44 Light levels should be approximately the same between camera and target area Do not place near high voltage wires or other sources of electrical in...

Страница 20: ...pens the Settings Menus to adjust your system Screen Display Mode Choose how many along with which live video channels will be displayed on screen Sequence Cycle through a selection of live video chan...

Страница 21: ...s a password the On Screen Keyboard will open up when the field is clicked 1 2 3 4 5 6 7 8 9 0 q w e r t y u i o p a s a d f g h j k l z x c v b n m Text is entered by pointing at each character with...

Страница 22: ...selecting Search and Save in the pull up menu You can search for video that was recorded during a certain time by type of recording and by reviewing snapshots of recordings Once you ve found the desi...

Страница 23: ...16 00 18 00 20 00 01 24 2016 01 24 2016 02 28 34 Searching by Time A Set the start and end times of your search B Select which camera s to search C Click Search D Video recorded during the search peri...

Страница 24: ...Search and Save 01 24 2016 04 18 42 01 24 2016 04 38 42 Camera001 Camera002 Camera003 Camera004 Camera005 Camera006 Camera007 Camera008 Search Backup Playback Manual Camera 01 Camera Name Type Time Pe...

Страница 25: ...ded during the search period will appear in order of the time they were created regardless of channel below the playback window Playback E Select a snapshot to view and press to begin a slide show of...

Страница 26: ...OFF Start C Click Settings B C Admin Search and Save Settings Logout Shutdown Add Camera Edit Camera Image Settings Motion PTZ Camera TCP IPv4 DDNS Port E mail Network Status Network Basic Date and T...

Страница 27: ...ate and time were set up in the Startup Wizard If you have an incorrect date or time first check the settings to see if the time zone is correct A Select Date and Time in the System tile B Automatic t...

Страница 28: ...Y Hr Min Sec M D 19 18 3 36 Cancel OK E Click and Scroll with the mouse to the desired numbers F Click OK E F Question Cancel OK Modifying time will stop the current playback and backup Are you sure t...

Страница 29: ...it Permission Group Modify Password Account andAuthority Encode Parameters Record Schedule Advanced Record Sensor Alarm Alarm Out Motion Alarm Alarm B Enter the Current Password Default Password 12345...

Страница 30: ...ecord Schedule Advanced Record Sensor Alarm Alarm Out Motion Alarm Alarm Live Display agement nt s Username Modify Password Edit User Edit Security Question Group MAC Address admin Administrator 00 00...

Страница 31: ...ng a Password A Click Login in the Start Menu Username Password Display Password Log In Automatically admin Enter Password Login Cancel Login Retrieve Password Answer Retrieve Password Cancel OK Quest...

Страница 32: ...word Account andAuthority Encode Parameters Record Schedule Advanced Record Sensor Alarm Alarm Out Motion Alarm Alarm B Enter the new User Name C Enter the New Password and re enter in the Confirm Pas...

Страница 33: ...ced Ordinary ATTENTION Each Group has a default set of accessible functions for its users Ordinary Audio Talk Intercom and Preview all cameras Advanced Ordinary permissions plus Local and Remote Camer...

Страница 34: ...ssword Account andAuthority Encode Parameters Record Schedule Advanced Record Sensor Alarm Alarm Out Motion Alarm Alarm ATTENTION Your system is factory set to record whenever motion is detected by th...

Страница 35: ...Click and drag with the mouse in the camera view to remove or add areas of motion sensitivity The blue animation below the camera view provides a demonstration ATTENTION In the image above the user i...

Страница 36: ...etection Schedule pull down Live Display Mode Settings Camera Name Sensor Record Schedule Motion Record Schedule Timed Record Schedul Cam1 Cam2 Cam3 Cam4 Cam5 Cam6 Advanced Schedule Config Camera Reco...

Страница 37: ...8 20 22 24 06 08 07 58 D F E D Select the icon E Click and drag with the mouse to remove turn off recording specific times F Click OK Fills in turns on recording Removes turns off recording Manual Set...

Страница 38: ...00 24 00 Tues 0 2 4 6 8 10 12 14 16 18 20 22 24 Manual All Reverse Clear All 00 00 24 00 Wed 0 2 4 6 8 10 12 14 16 18 20 22 24 Manual All Reverse Clear All 00 00 24 00 Thur 0 2 4 6 8 10 12 14 16 18 2...

Страница 39: ...ensor Record Schedule Motion Record Schedule Timed Record Schedule Advanced edule Config Apply E E Click Apply ATTENTION When motion is detected a yellow Motion Indicator and a red Recording Indicator...

Страница 40: ...recorded on your system s hard drive Snapshot Captures still image and saves it on your mobile device Record Records video onto your mobile device s memory Multi Screen View one or more channels simul...

Страница 41: ...ss video on your system s hard drive A Select the system to search B Tap the icon A B C Scroll left or right to find the desired time Tap on the date to choose a different day Recorded events are show...

Страница 42: ...nguage This is the language the NVR will use Local IP Address LAN The NVR s address on your local network IP Internet Protocol IP devices communicate with each other via a local network or over the In...

Страница 43: ...You should see a faint red glow from the infrared LEDs This indicates that your camera has power and is working properly If you still do not have a video signal from the camera check that the video ca...

Страница 44: ...e video image Click on the icon to open the Image Adjust window Select the Flip option at the bottom Camera looking through window has video image during day but not at night The LEDs on the camera ac...

Страница 45: ...smitted If the cable is properly connected but no data is transmitting replace the cable or try another port on the router Your NVR must be connected directly to the router and not through a network h...

Страница 46: ...46 Notes...

Страница 47: ...47 Notes...

Страница 48: ...40 24 7 Online Support Portal and Knowledge Base www q see com support Additional Support Firmware Updates How To s Manuals and Guides Repairs and Returns Software Support Videos Chat Support Mon Fri...

Отзывы: