background image

User Manual for Commercial Series Net DVR 


Page 

55

 Total 

121 


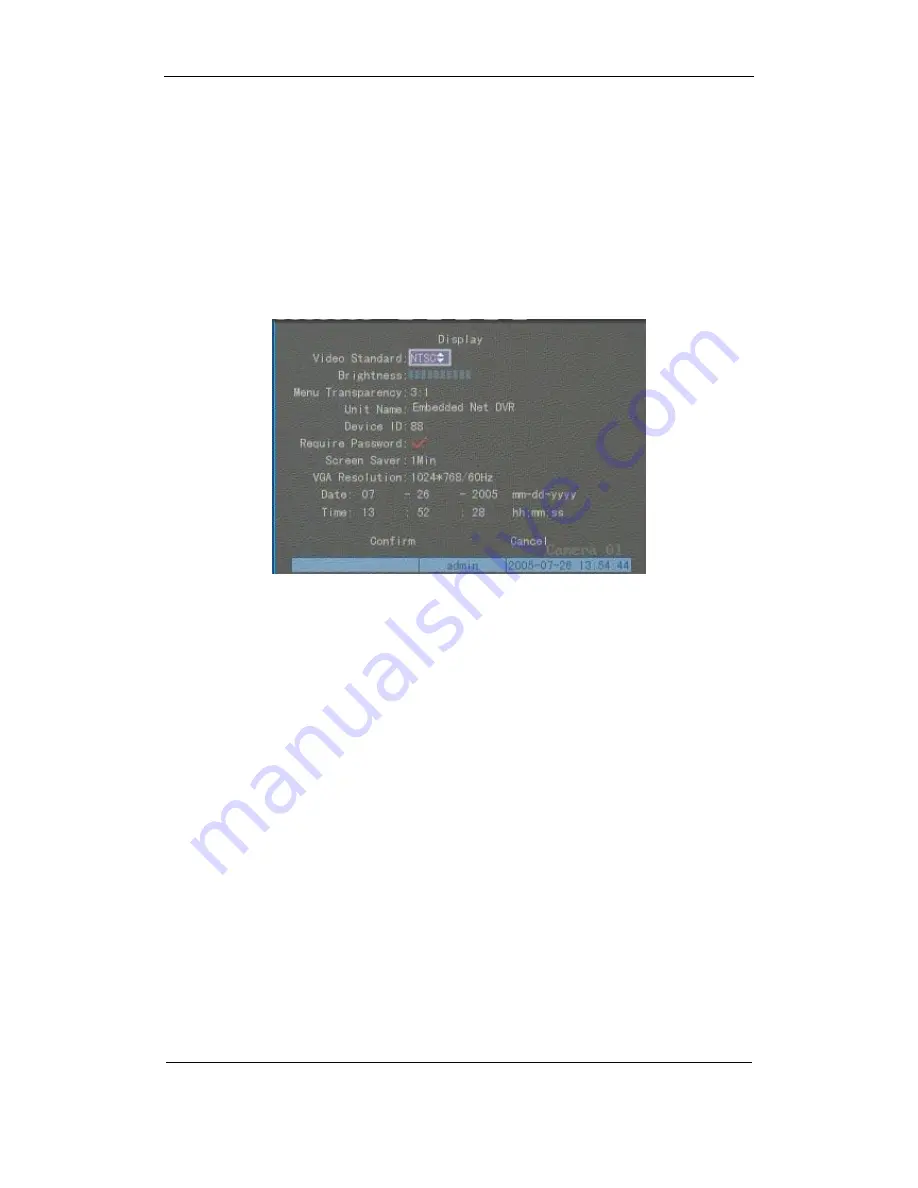
6.4  Video Output Standard and VGA Setup 

Video output standard 


There is one VOUT BNC connector at the rear panel of DVR. It is used to connect with an 

analog monitor and can support PAL or NTSC video output. You can modify video output 

standard to match video input. 

In “Display” menu:  


There is a list box called “Video Standard”, you can use

á

â

key to select PAL or NTSC 

video output.  


VGA setup 


There is one VGA interface on the rear panel of DVR. You can use it to connect with a VGA 

display. You can define VGA resolution and refresh frequency in “Display” menu.  

There are three options: 1024*768/60Hz, 800*600/60Hz and 800*600/75Hz. You can use

á

】【

â

key to select. 

Press “Confirm” button to save or “Cancel” to abort. 

Содержание QSC26408

Страница 1: ...lease read this User Manual carefully to ensure that you can use the device correctly and safely DISCLAIMER The contents of this Manual are subject to change without notice we are also not responsible...

Страница 2: ...anel 17 3 2 Remote Control 19 3 3 Menu Description 21 3 3 1 Menu Items 21 3 3 2 Menu Operation 22 3 4 Character Input 25 Chapter 4 Basic Operation Guide 26 4 1 Power on 26 4 2 Preview 26 4 3 User name...

Страница 3: ...r 7 Utilities 97 7 1 Save Parameters 97 7 2 Restore Parameters 97 7 3 Upgrade 98 7 4 Hard Disk Management 99 7 5 Clear Alarm Out 99 7 6 Reboot 99 7 7 Power Off 99 7 8 View Log 99 7 9 System Informatio...

Страница 4: ...wmen MS0270 www newmen com cn Agiler AGM 018LU www agilertech com Citu CH 3090 www citu cn 2 Supports USB external DVD backup Recommended USB external DVD model list LG GSA E10L BENQ EW164B Samsung SE...

Страница 5: ...ual for Commercial Series Net DVR Page 5 Total 121 If you select Backup mode in DVR Playback menu you can select SATA HDD for backup 5 Solved some old version bugs VGA black screen and Aux audio outpu...

Страница 6: ...at most Each channel is independent H 264 hardware compression and real time PAL 25 FPS NTSC 30FPS Support both variable bitrate and variable frame rate l Supports 16 channels audio input at most Each...

Страница 7: ...rnal alarm etc Others l Supports IR control l Supports RS 485 keyboard l Supports multi level user management Network l Supports TCP UDP RTP Multicast for network preview l Supports PPPoE for broad ba...

Страница 8: ...otal capacity you need refer to Appendix A Please ask the specialist to disassembly the DVR and install HDD If the vendor you purchased the DVR from did not include a HDD have HDD installed by qualifi...

Страница 9: ...u 4 VGA Interface VGA display 5 RS 232 Keyboard Interface Connect RS 232 devices Refer to Appendix B for pin definition RJ45 Ethernet Port Connect network devices Refer to Appendix B for pin definitio...

Страница 10: ...Audio Input Standard BNC 2 Aux video Output Spot monitor for video preview and playback Aux audio Output Spot monitor for audio preview and playback 3 Main video output Main monitor for video and menu...

Страница 11: ...mouse 8 E SATA Optional Extend 1st internal SATA to E SATA 9 SW1 RS 485 terminal resistor switch Default is off The resistor is 120Ohm 10 RS 485 PTZ connection Using T T to connect PTZ Keyboard Interf...

Страница 12: ...gest you use DC under 12V 1A If you use AC please open the jumper There are 4 jumpers JJ1 JJ2 JJ3 and JJ4 on DVR main board corresponding with 4 alarm output The default is closed Warning If you use A...

Страница 13: ...winkle and red means the corresponding HDD has error 3 POWER POWER Device switch with power indicator lamp Green means DVR is working Red means DVR is powered off No light means no power is supplied 4...

Страница 14: ...itch menu mode into preview 3 FOCUS in PTZ control ZOOM in PTZ control 1 ZOOM in PTZ control 2 Switch main aux video output control mode 5 Input Keys Numeric Keys F1 F2 Input number lower case upper c...

Страница 15: ...ork transmission Orange means recording and network transmission 4 POWER POWER Device switch with power indicator lamp Green means DVR is working Red means DVR is powered off No light means no power i...

Страница 16: ...ol 2 FOCUS in PTZ control 3 In preview mode display or hide the channel status bar 1 Multi screen preview switch 2 Switch menu mode into preview 3 FOCUS in PTZ control ZOOM in PTZ control 3 ZOOM in PT...

Страница 17: ...ecording and network transmission 4 POWER POWER Device switch with power indicator lamp Green means DVR is working Red means DVR is powered off No light means no power is supplied 5 Status Lamps READY...

Страница 18: ...trol 3 In preview mode display or hide the channel status bar 1 Multi screen preview switch 2 Switch menu mode into preview 3 FOCUS in PTZ control ZOOM in PTZ control 5 ZOOM in PTZ control 6 Switch ma...

Страница 19: ...of front panel 4 EDIT Same as EDIT key of front panel 5 A Same as A key of front panel 6 REC Same as REC key of front panel 7 PLAY Same as PLAY key of front panel 8 INFO Same as INFO key of front pane...

Страница 20: ...DVR device ID default is 88 can be changed in Display menu and then press ENTER key If the STATUS lamp of DVR front panel turns to green it means you can use IR controller to operate this DVR Stop us...

Страница 21: ...ensitivity area and response setup Recording Overwrite Stop recording Resolution and recording parameters setup Record schedule PreRecord time PostRecord time Network DVR IP address DNS IP Multicast I...

Страница 22: ...MENU key to enter into DVR main menu l Press PLAY short key to enter into playback menu l Perss REC short key to enter into manual record menu l Perss PTZ short key to enter into PTZ control interface...

Страница 23: ...key to switch over b List Box Provides more than 2 options However only one of them can be selected You can use and to select one option For example on the right side of Select Camera there is a list...

Страница 24: ...t DVR Page 24 Total 121 to parent menu Press Cancel button to cancel and return to parent menu The button in grey means it can be operated only after it is enabled How to exit menu Press PREV key to e...

Страница 25: ...he camera name edit box at the bottom of screen the input status appears Here you can press numeric keys to input digital numbers Press A key to change input methods You can select number Uppercase Lo...

Страница 26: ...s DSP initialization If the DSP icon is it means that the DSP has an initialization error please contact administrator at once The second line represents HDD initialization Icons of SATA hard drives a...

Страница 27: ...Press A key to display or hide the camera status bar Camera record status is Icon Icon Color Status Description White No video signal Yellow Vdieo input Pink Manual recording Green Real time recordin...

Страница 28: ...camera preview If DVR has less than 10 channels press one numeric key to switch corresponding channel For example press 2 key to preview 2nd camera If DVR has 10 or more than 10 channels press two nu...

Страница 29: ...select one user perss key to enter into Password edit box input corresponding password press ENTER key to exit edit box The Active Frame will be moved to Confirm button Press ENTER key to enter into...

Страница 30: ...EDIT key to enter into edit box You can use numeric keys to input new password The password can be null It also can be 16 numerals Press ENTER to exit edit box and move to Verify item to input the ne...

Страница 31: ...directly There is PTZ Control prompt in the PTZ control interface The displayed camera name shows which channel s PTZ is under control For example Camera 01 means you are controlling the 1st camera PT...

Страница 32: ...reset number Repeat pressing REC SHOT key and press the preset number DVR will adjust that preset number When you exit PTZ control mode the camera will stay at the current position Note The PTZ preset...

Страница 33: ...l number channel status start stop record start all and stop all buttons Channel Lists the channel numbers that the DVR has Status Channel work status has 4 cases means idle Green means the channel is...

Страница 34: ...ntrol mode 4 6 Playback Note The user must have Playback right Playback interface In preview mode press PLAY key in the pop up login dialog select username and input correct password you can enter int...

Страница 35: ...es such as ATM machine POS machine or others DVR can overlay the text on the real time image and record You can use the text to search the recorded files and play them back Use the numeric keys to inp...

Страница 36: ...eously If DVR can not find the matched files a failure dialog box will pop up 2 Playback by Time In the playback interface select main channel second channel 2 ch playback record type and time section...

Страница 37: ...ayback At the bottom of the image there is an information bar with the following information Volume Play Progress Play Speed Played Time and File Total Time l Display Hide information bar MENU l Open...

Страница 38: ...egment EDIT l Exit ESC l Playback switch When in 2 ch playback press PREV to switch between main channel and second channel Note When DVR is busy if you select high play speed there may be a differenc...

Страница 39: ...e directly Record Daily Backup In the playback interface move Active Frame to Backup Today button press ENTER key all recorded files of all channels for the day will be backed up to the save device A...

Страница 40: ...ackup Move Active Frame to Save button and press ENTER key to start backup When backup is started corresponding message box will pop up to indicate the result Backup video segment You also can backup...

Страница 41: ...y in case of damaging HDD The correct step is using Power Off in the Utilities menu or POWER key on the front panel or on IR controller Shut down DVR normally Use menu Enter into Utilities menu move A...

Страница 42: ...ot press POWER key any more otherwise DVR can not be shut down Abnormally Shutting down DVR Using the power switch on rear panel When DVR is running if you switch off the power the HDD in DVR may be d...

Страница 43: ...C26416 Commercial series DVRs have one main output and one aux output You can use main video output to enter into DVR menu as follows while aux output can not display DVR menu The aux output can suppo...

Страница 44: ...n and Aux output preview properties Please press Main Aux button to enter into Main output control mode then press Menu button to enter into DVR menu the main video output will display the following D...

Страница 45: ...0 Seconds switch time DVR will cycle display 4 channel image every 20 seconds Audio preview If you enable audio preview when you preview single camera DVR will play the audio of that channel Preview l...

Страница 46: ...a preview order you can select preview mode to meet your demand Save setup Press Confirm button to save preview configuration Press Cancel or ESC key to abort Whether in Main or Aux output control mod...

Страница 47: ...th Main and Aux output can be used to playback the recorded files on DVR HDD Press Main Aux button to enter into Main or Aux control mode and press PLAY button to enter into Playback menu You can use...

Страница 48: ...button to control one PTZ Please note if you enter into PTZ control mode Main Aux button is not effective until you press ESC button to exit PTZ control mode Only the users that have Parameters Setup...

Страница 49: ...m sensor type l View tampering alarm schedule l Video lost alarm schedule l Motion detection alarm schedule l External alarm schedule l Alarm output schedule l Transaction l RS232 work mode l Change v...

Страница 50: ...the new password The password is a combination of 16 numerals at most After you finish inputting password press ENTER key to exit Move Active Frame to Verify password edit box input the new password...

Страница 51: ...o chapter 5 1 Step 2 Add new user name In the User Management menu move Active Frame to Add button and press ENTER in the pop up dialog box input the new user name refer to chapter 3 4 press ENTER and...

Страница 52: ...If you want to define the detail rights move Active Frame to Setup Rights button and press ENTER to enter into rights setup menu as follows Operational rights are divided into Local Rights and Remote...

Страница 53: ...ly setup the DVR parameters Log Remotely view the log on DVR Utilities Remotely upgrade firmware format HDD reboot DVR and shut down DVR etc Voice Client talks with DVR Preview Network live preview Al...

Страница 54: ...t name and make it take effect Press Cancel button or ESC key to abort modification Device ID When you use IR controller to operate DVR you must use device ID to select DVR The default device ID of th...

Страница 55: ...odify video output standard to match video input In Display menu There is a list box called Video Standard you can use key to select PAL or NTSC video output VGA setup There is one VGA interface on th...

Страница 56: ...ings include System time time format time display position camera name camera name display position etc System Time In Display menu you can setup DVR system date and time Display System Time You can s...

Страница 57: ...o select OSD format There are following OSD formats MM DD YYYY W hh mm ss default MM DD YYYY hh mm ss YYYY MM DD W hh mm ss YYYY MM DD hh mm ss Here YYYY means year MM means month DD means day W means...

Страница 58: ...Name Position If you do not want to display camera name just disable the check box beside camera name edit box The disable flag is If you enable the check box you can setup the camera name position Y...

Страница 59: ...uration and hue Move Active Frame to the Adjust button on the right side of Brightness Contrast Saturation and Hue press ENTER key you will enter into the corresponding adjust interface In the adjust...

Страница 60: ...teps are following Step 1 Enter into Image Setup menu Step 2 Select a camera You can use keys to select the camera Step 3 Enter into mask area setup interface Enable the check box beside Privacy Mask...

Страница 61: ...k area After you select the red mask area press EDIT key to save the mask area Press ESC key to cancel the mask area The maximum mask area size is 8 8 panes and the minimum size is only one pane You c...

Страница 62: ...em The sensitivity options are Low Normal and High Select one of them to activate Area Setup and Policy Setup function Step 4 View tampering area setup Move Active Frame to Area button press ENTER key...

Страница 63: ...Center and Trigger Alarm Output You can use and EDIT key to enable or disable them is disabled and is enabled Step 8 Save alarm setup After you setup press Confirm button and return to Image Setup int...

Страница 64: ...h case the DVR will send an alarm Step 1 Enter into Image Setup menu Step 2 Select camera Use keys to select one camera Step 3 Enter into Video Signal Loss Handle interface Move Active Frame to the li...

Страница 65: ...cluding On Screen Warning Audible Warning Upload to Center and Trigger Alarm Output You can use and EDIT key to enable or disable them is disabled and is enabled Step 6 Save alarm setup After your set...

Страница 66: ...ff You can use keys to select one If you select Off option DVR will not respond even if motion is detected If you select other options it will active Motion Area Setup button and Policy Setup button I...

Страница 67: ...T key the yellow pane will appear again then you can setup another motion area Clear motion area Clear part of motion area Move the yellow pane to the start clear position of motion area press EDIT yo...

Страница 68: ...ER Save and return to Image Setup menu l ESC Cancel setup and return to Image Setup menu The motion detection area is displayed as follows Step 5 Motion alarm policy Move Active Frame to the correspon...

Страница 69: ...iption If On Screen Warning is enabled when a motion alarm happens and DVR is in preview mode DVR will display the related camera If more than one camera is triggered the DVR will display them one by...

Страница 70: ...s Audio preview If you enable audio preview when you preview single camera DVR will play the audio of that channel Preview layout setup There is a square frame divided into many windows If you select...

Страница 71: ...els are listed You can use keys to select one Stream Type There are two options one is Audio Video stream and the other is Video stream only If you want to record video and audio please select Audio V...

Страница 72: ...select the proper max bit rate based on the camera background and image quality requirement Bit rate You can select bit rate size for fixed bit rate type It is the same as Max Bit Rate Image Quality...

Страница 73: ...e button to enter into recording schedule menu Step 2 Select one day and enable all day recording option For Day item the options are Monday Tuesday Wednesday Thursday Friday Saturday and Sunday Use k...

Страница 74: ...Saturday and Sunday Use keys to select one day Move Active Frame to the check box on the right side of All Day item press ENTER or EDIT key to disable All Day option means disabled and means enabled S...

Страница 75: ...ng 00 00 24 00 6 13 External Alarm Input and Relay Output For 8 channel DVR there are 8 external alarm inputs and 4 relay outputs For 16 channel DVR there are 16 external alarm inputs and 4 relay outp...

Страница 76: ...or other related type Please refer to chapter 5 12 Step 5 Schedule for alarm handle method When an external alarm occurs in the schedule the DVR will respond according to the handle methods Step 6 Al...

Страница 77: ...setup Press Confirm button to save and return to Alarms menu Press Cancel button or ESC key to abort and return to Alarms menu Note Please make sure that the PTZ you are using can support preset sequ...

Страница 78: ...dule button on right side of Alarm Out Time item press ENTER key to enter into the corresponding schedule menu Step 4 Setup alarm out schedule Like other schedule setup you can set 4 time periods for...

Страница 79: ...ith other IP addresses If there is DHCP server in the network you can set the IP as 0 0 0 0 save and reboot DVR In reboot process DVR will search the DHCP server and get a dynamic IP address This item...

Страница 80: ...d network HDD as local HDD If you enable this function DVR will send and save the real time image to that network HDD NFS IP The IP of that network storage server Dir The directory name shared by that...

Страница 81: ...e included client software program To access the DVR through Internet Explorer once you have set up the network settings on the DVR to match the settings of your router you need to modify your browser...

Страница 82: ...Blocker option and select Turn Off Pop up Blocker You will also need to enable Active X controls To do so go to the Internet Explorer tool bar and select the tools option then Internet Options then S...

Страница 83: ...lco p DM DynaColor HD600 JC 4116 Pelco d WX Pelco D VCOM VC 2000 NetStreamer SAE YAAN Samsung Kalatel 312 CELOTEX TLPelco p TLHHX 2000 BBV RM110 KC3360S ACES ALSON INV3609HD Howell Tc Pelco P Tc Pelco...

Страница 84: ...ide of Preset item press ENTER you can enter into Preset setup menu Add preset number You can input preset number among 1 128 in the edit box Then press Adjust button to enter into PTZ control interfa...

Страница 85: ...at that preset number Dwell speed is the speed that PTZ is moved to that preset number Press Add button to add one cruise point Press Confirm button to save the cruise point into the sequence After yo...

Страница 86: ...ontrolling PTZ with direction keys press ENTER to save the operation track and return to Cruise setup menu Press StartCru button to repeat the PTZ track until you press Stop button Press Return button...

Страница 87: ...Connect serial devices Remote PC can control these serial devices through network PPP Mode Only used when work mode is PPP There are two options Active and Passive Active means DVR will diaup through...

Страница 88: ...P Modem passive dialup through PSTN There are two Modems One is connected to the DVR RS 232 port with DCE cable The other is connected with PC COM port Setup at DVR end Step 1 RS232 setup Setup baud r...

Страница 89: ...to connect Modem with PC serial port You can use HyperTerminal or NetTerm to setup modem AT F Retore default parameters Generally Modem is hard flow control AT W W1 Save parameters Step 2 Open Network...

Страница 90: ...User Manual for Commercial Series Net DVR Page 90 Total 121...

Страница 91: ...up connection it will give the message verification of username and password after successfull verification the message will be given on process of register in PC The process is the same as a common d...

Страница 92: ...network failure and NTSC PAL difference Enter into Exceptions menu Including the following handle methods Audible Warning DVR beep warning Upload to Center Send exception information to center host P...

Страница 93: ...iption indicates how to carry out relevant parameter setting according to different links to ATM machine In Transaction Information menu there are 4 kinds of text capture solutions 1 Network Sniff Obt...

Страница 94: ...ay the corresponding text on live video 2 Network receive DVR receives data sent by ATM machine through network You only need to setup DVR listen port The default port value is 10000 In this case you...

Страница 95: ...of DVR as transparent channel mode as follows A software must be run in the ATM machine and send the credit card number transaction code to DVR through RS 232 port Please provide detail ATM machine c...

Страница 96: ...t DVR Page 96 Total 121 In this case you must set the RS 232 of DVR as transparent channel mode as follows Also a software must be run in ATM machine and send command to DVR through RS 232 port based...

Страница 97: ...a Upgrade Hard Disk Stop Alarm Out Reboot Power Off View Log and System Info Enter into Utilities menu 7 1 Save Parameters Save factory default parameters into FLASH memory You can reboot DVR to make...

Страница 98: ...If you select FTP mode you will enter into FTP Upgrade menu Input the ftp server IP and press ENTER key DVR will connect with FTP server through network and download the firmware file If you select U...

Страница 99: ...mal status or not Format HDD Before formatting stop all recording After formatting you must reboot DVR otherwise DVR will not work normally 7 5 Clear Alarm Out Clear the alarm output manually 7 6 Rebo...

Страница 100: ...t Stop Record Net Start Transparent Channel Net Stop Transparent Channel Net Get Parameter Net Config Net get Status Net Alert On Net Alert Off Net Reboot BiComStart Start Voice Talk BiComStop Stop Vo...

Страница 101: ...ery option to activate Start Time and Stop Time items Step 2 Input start time and stop time Step 3 Move Active Frame to Search Log button and press ENTER key to start searching Step 4 After finishing...

Страница 102: ...User Manual for Commercial Series Net DVR Page 102 Total 121 7 9 System Information Press System Info icon in Utilities menu you can get DVR system information...

Страница 103: ...you need to upgrade DVR firmware One is to update old firmware The other is when the code in DVR FLASH has crashed Note Make sure that the DVR and the firmware are compatible before the upgrade 8 1 FT...

Страница 104: ...OK 5 In the password dialog box also input password target in New Password and Verify Password edit box Click OK to save and exit the dialog box 6 In the User Rights Security Dialog select User Name a...

Страница 105: ...rminal software and make sure DVR and host PC are in the same sub net Please use DTE cable to connect DVR will host PC Step 1 Setup and run HyperTerminal The parameters are Baud rate 115200bps Data bi...

Страница 106: ...ormula 2 to calculate the storage capacity i m which is storage of each channel needed in Mbytes i m i q i h i D 2 In the formula i h means the recording time for each day hour i D means number of day...

Страница 107: ...st and 2nd cables are the anode and cathode line for sending 3rd and 4th cables are the anode and cathode line for receiving 7 is the shared grounding line Pin definition for Standard RS 485 serial po...

Страница 108: ...hod to make the network cable when DVR is connected with network hub or switch The corresponding relationship of the direct cable 2 Use the following method to make the cross network cable when DVR is...

Страница 109: ...s DVR output Pin index Name I O Description 1 DCD I Carrier Detect 2 RxD I Receive Data 3 TxD O Transfer Data 4 CTS I Clear Data 5 RTS O Request to Send 6 DTR O Terminal Device Ready 7 GND Ground 8 Nu...

Страница 110: ...l port of the DVR is connected with DTE device with DB9 plug in the corresponding relationship is as follows Connection for RJ45 and DB9 25 pin to 9 pin converter internal connection is defined as fol...

Страница 111: ...Manual for Commercial Series Net DVR Page 111 Total 121 of the cable is 8 pin RJ45 plug in the other end is DB25 pin plug in the corresponding relationship is as following Connection for RJ45 and DB25...

Страница 112: ...Vp p 1k Main audio output None on QSD42208 1 channel BNC Linear Electrical Level 600 Aux audio output 1 channel BNC Linear Electrical Level 600 Audio compression No audio on QSD42208 OggVorbis 16Kbps...

Страница 113: ...Stream type Video Video Audio Max bit rate 32Kbps 2Mbps self define Audio input 8 16 channels BNC 2 0Vp p 1k Main audio output 1 channel BNC Linear Electrical Level 600 Aux audio output 1 channel BNC...

Страница 114: ...0VAC 6 3A 50 60Hz Power consumption 20 42W without HDD and CD R W Working temperature 14 F 131 F Working humidity 10 90 Size 19 Standard 17 25 W 18 D 3 75 H Weight 18 Lbs without HDD and CD R W PAL 17...

Страница 115: ...ips 4 7 Local monitoring Preview mode Monitor and VGA display 1 screen 4 screen 9 screen 16 screen preview mode Auto switch or manual switch 5 11 PTZ control Control pan tilt zoom focus and iris Setup...

Страница 116: ...mote upgrade Remotely upgrade firmware Transparent channel Remotely control serial device connected with serial port of DVR 5 16 Web Using IE or Client software to access DVR PSTN Access DVR through P...

Страница 117: ...start up and makes a sound like di every 10 seconds 1 Used wrong firmware upgrade 2 Compression board has problems 3 Main board has problems There are no images on the monitor connected with VOUT aft...

Страница 118: ...r SDK playm4 dll Notes 1 Place the DVR in well ventilated space so that it operates within the allowed range of temperature and humidity as in specifications 2 If the circuit board gets wet dust on ci...

Страница 119: ...cope of our company Please select payable service 1 Equipment damage caused by improper operation 2 Improper environment and conditions in on which the equipment operates e g improper power environmen...

Страница 120: ...al Series Net DVR Page 120 Total 121 Appendix G Customer Information Card User s Name M r Mrs Company Name Post Address Postcode Phone Number E mail Model Number of Product Serial Number of Product Pu...

Страница 121: ...User Manual for Commercial Series Net DVR Page 121 Total 121 Suggestions...

Отзывы: