Q-See QC403 Скачать руководство пользователя страница 7

PICTURE 6-7

Next under 

Region

 click the 

Select

 button to 

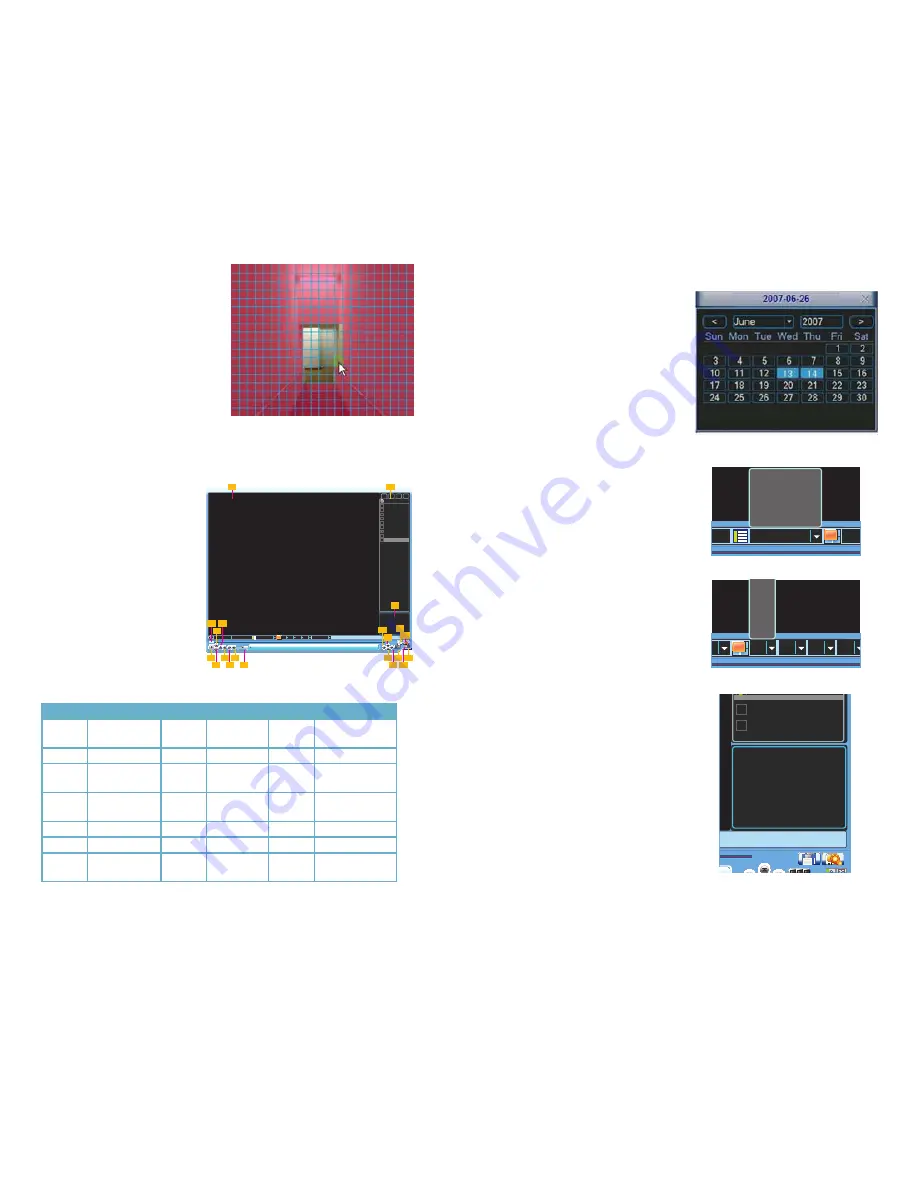
set up the area of the camera display that you 
want to be sensitive to motion.

You will then see the camera’s view overlaid 
with a grid. The green box is the current loca-
tion of the cursor. The red area is the sensi-
tive area and the black area is not sensitive 
to motion. Click the Fn button on the remote 
control to adjust the sensitivity of your mouse 
as you move the cursor. After you have finished 
the setup click the Enter button on the remote 
control to exit. Next set your sensitivity level 
from 1 to 6 (6 being the most sensitive), then 
click the Save button on the Detect screen to 
save the setting. 

PART 7 - PLAYING BACK FILES

PICTURE 7-1

The 

Search and Playback 

window 

can be accessed through the 

Shortcut 

menu

. You can view the playback from 

any camera that was activate during the 
recording session. 

Number  Function

Number  Function

Number  Function

1

Playback 
Window

8

Reverse

15

Backup

2

File List

9

Fast Play

16

Search

3

File Information

10

Previous 
Frame

17

Next Channel

4

Playback 
Progress Bar

11

Next Frame

18

Next File

5

Stop

12

Volume

19

Video Clip

Slow Play

 13

Previous File

20 

Repeat Playback

7

Play

14

Previous 
Channel

21

Full Screen

08-19-2010 00: 00: 00

All

1

ALL

2

3

4

CH

11:37:22 M
11:48:00 R
11:54:00 A
12:10:00 M
13:00:00 R
14:00:00 R

15:00:00 R

16:00:00 R
17:00:00 R

StartTime Type

Start Time

08-19-10 13:20:00

End Time

08-19-10 13:26:00

Size(KB) 

52736

1p 2p 3p 4p

1

4 6

5

13

14

15

16

3

2

7

9 11

8 10 12

17

18

19 21

20

The playback screen can be set to display the recordings from one camera or as many channels as 
you have. 

SEARCH

To begin a search for an event:

STEP 1.

 Enter the date to be searched. 

You can also click on the clock icon 
to open the Calendar. Highlighted 
dates have recorded files.

PICTURE 7-2

PICTURE 7-3

PICTURE 7-4

PICTURE 7-5


STEP 2. 

Enter the start time (if known) or 

skip this field to search the entire day. 
Select the type of event; 

All

Alarm

, or 

Motion Detection (MD)

.

STEP 3.

 Select which channels you wish 

to view. Each of the four slots is a pull-
down which allows you to select a 
specific channel. You can leave these 
empty to view 1-3 channels. You can 
also choose to view all four channels at 
a time simultaneously.

STEP 4.

 Click on the Search icon and any 

records fitting your criteria will be listed 
in the column to the right of the screen. 
Up to 128 files can be displayed and 
multiple tabs (pages) may be displayed 
in the search results depending on the 
number of cameras you have as well 
as how you configured your playback 
display. In the event that a camera is set 
to manually record, the events will be 
broken up by hour.

All

1

CH

All

Alarm

MD

Alarm/MD

CH

13

14

15

16

1

2

3

4

11:37:22 M
11:48:00 R
11:54:00 A
12:10:00 M
13:00:00 R
14:00:00 R

15:00:00 R

16:00:00 R
17:00:00 R

Start Time

08-19-10 15:00:00

End Time

08-19-10 15:59:00

Size(KB) 

52736

Содержание QC403

Страница 1: ...4 Channel H 264 Compression DVR with Variable CIF and D1 Recording Options Quick Installation Guide For Bundles Featuring the QC444 H 264 Network DVR QC444 403 411 426 ...

Страница 2: ...Repeat for all cameras 1A Attach the BNC connector on the power video cable to a Video In port on the DVR Repeat for all cameras 1B Connect the remaining connector to one of the ends on the power splitter Repeat for all cameras STEP 2 Connect the single end of the power splitter to the included power supply STEP 4 Connect both power supplies to a surge protector STEP 5 Connect thesurge protector t...

Страница 3: ...vigate through menus Change selections in pull down menus Up Down buttons Toggle settings Up Down buttons 6 Power Button Puts DVR into Standby mode or wakes it up 7 Status Lights Alarm Not functional on this model Net Red light indicates that network connection is lost HDD Red light indicates that hard drive is operating Power Red light indicates that DVR is powered up 8 USB Port For use with flas...

Страница 4: ...next video 8 Slow Play Multiple slow play speeds or normal playback 9 Address Click to input device serial number 10 Function Aux Key In 1 channel monitor mode pop up assistant function In motion detection interface functions as a directional key to complete setup Backspace Press for 1 5 seconds to clear all contents in current text box In HDD information interface used to switch between HDD recor...

Страница 5: ... are deleted with the key Clicking outside of the keyboard will close it 1 2 3 5 4 6 8 7 9 0 1 4 7 0 2 5 8 3 6 _ 9 a h o u b i p v c j q w d k r x e l s y f m t z g n A H O U B I P V C J Q W D K R X E L S Y F M T Z G N NUMBERS SYMBOLS UPPER CASE LETTERS LOWER CASE LETTERS PART 5 ACCESSING THE DVR S MENUS When the system boots up it will be in multi screen mode Press Enter on the front panel the En...

Страница 6: ...D from midnight to 8am and then records continu ously from 8am to noon Regular followed by a one hour motion detection recording segment until 1pm before returning to continuous record ing after that Then at the end of the day it is in motion detection mode from 5pm to midnight The scale running along the bottom of the menu ranges from 0 to 24 representing the hours of a day You can set starting a...

Страница 7: ... R 16 00 00 R 17 00 00 R StartTime Type Start Time 08 19 10 13 20 00 End Time 08 19 10 13 26 00 Size KB 52736 1p 2p 3p 4p 1 4 6 5 13 14 15 16 3 2 7 9 11 8 10 12 17 18 19 21 20 The playback screen can be set to display the recordings from one camera or as many channels as you have SEARCH To begin a search for an event STEP 1 Enter the date to be searched You can also click on the clock icon to open...

Страница 8: ...36 1p 2p 3p 4p PART 8 BACKING UP FILES The DVR supports backing up to USB flash drives hard drives burners and SD cards Plug in a USB device and go to the Main Menu and then clicking on the Backup icon will open the Backup window The Backup window will display any connected devices along with available space and status If you have a device connected to the USB port on the side of the DVR and it do...

Страница 9: ...tal Drive Anaheim CA 92807 FAX 714 998 3509 WEBSITE www Q See com QUESTIONS OR COMMENTS CONTACT US PRODUCT SUPPORT DOWNLOADS FIRMWARE UPDATES MANUALS www Q See com CUSTOMER SUPPORT Live Chat at www Q See com M F 9 5 PST Email support dpsi usa com Phone 877 998 3440 M F 9 5 PST ...

Отзывы: