background image

5

Get Connected

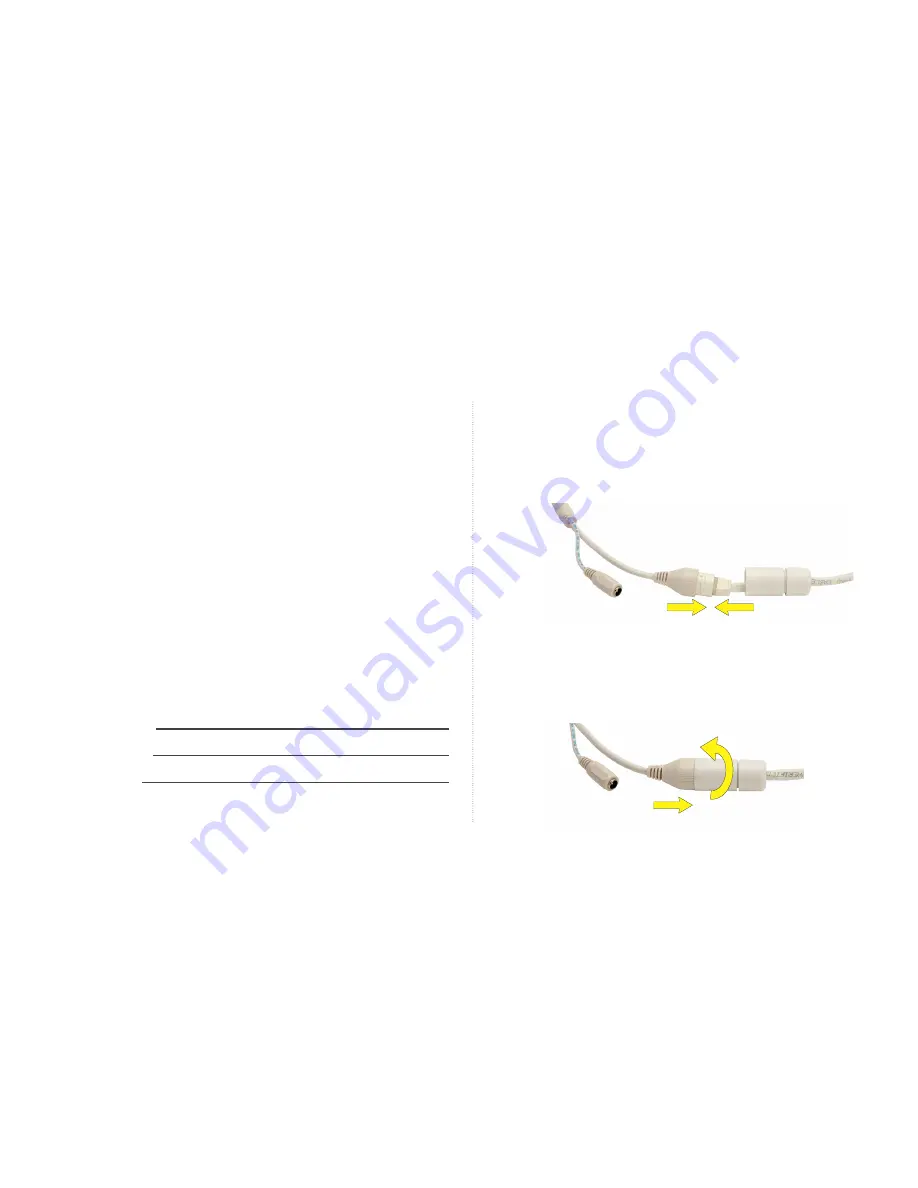
Step 2: Connect Your Cameras

2A.

 Plug the camera network cable into the camera 

by connecting the Ethernet cable into the camera 

network port.  You should hear a clicking sound as 

you connect to the port.

2B.

 Move the white weather-proof housing up and twist 

to secure the cover over the port. Tighten the base 

of the cover to complete the weather-proof seal.

Step 1: Registration

Before installing, please register your device on the 

Q-See Support Portal at 

www.Q-See.com/register

 to 

receive critical updates and support for your system. 

Registering will also help us to assist you with any 

technical or warranty issues if ever necessary.

Please be sure to keep a record of your model 
number(s) and to save this guide, as you will need 
this information if you are ever in need of technical 
or warranty support.

NOTE:

 Your username and password used to register your device are 

not the same as those you use to log in to your system. Please write 
down your username, password, and model number(s) in the spaces 
provided below:

Username: 
Password: 
Model #: 

Содержание Presidio Series

Страница 1: ...QUICK START GUIDE IP Camera NVR Bundle ENGLISH ...

Страница 2: ...nd thank you for choosing Q See Sincerely Priti Sharma President Connect with us on social media Welcome What s Included 3 Understanding Your NVR 4 Get Connected Registration 5 Connect Your Cameras 5 Connect Your NVR 6 Powering Up the NVR Cameras 8 Startup Wizard 9 Setting Up the Presidio Mobile App 12 Get the Most Out of Your Q See System Tips on Camera Placement 16 Troubleshooting 18 Warranty an...

Страница 3: ...uded with every system Number of cameras included vary by system Actual NVR will vary by system Products shown in this section may vary by system 100 feet of Network cable per IP camera HDMI Cable Network Ethernet Cable SATA Cable A B NVR Cables Power Supply Cameras Camera Network Cables ...

Страница 4: ... through all of the steps to setup and test your system before mounting any cameras or hardware Always visit www q see com support to find the most recent guides and up to date support for your Q See products VGA MONITOR VGA 19 NETWORK USB CAMERA POE POWER SUPPLY HD DISPLAY HDTV EXTERNAL MICROPHONE EXTERNAL SPEAKER ALARM ...

Страница 5: ...your device on the Q See Support Portal at www Q See com register to receive critical updates and support for your system Registering will also help us to assist you with any technical or warranty issues if ever necessary Please be sure to keep a record of your model number s and to save this guide as you will need this information if you are ever in need of technical or warranty support NOTE Your...

Страница 6: ... cables are inserted correctly Repeat steps 2A through 2C for each camera Step 3 Connect NVR to Display There are two options to connect the NVR to a display Option A HDMI 1 Plug the included HDMI cable into the NVR s HDMI port 2 Connect the other end of the HDMI cable to the monitor or TV 3 Plug the monitor or TV into a surge protector ...

Страница 7: ...ect the other end of the VGA cable to the monitor A 19 monitor or larger with 1280 x 1024 resolution is highly recommended 3 Plug the monitor into a surge protector Step 4 Connect Mouse Plug the included mouse into the USB port on the back of the NVR If your model has two USB ports on the back either one will work 19 Monitor or Larger ...

Страница 8: ...uter 5A Plug the included Network Ethernet cable into the Network LAN port on the back of the NVR Step 6 Powering Up the NVR Cameras 6A Plug the NVR power supply cable into the power port on the back of the NVR Your power port and power cable may look different than pictured here 6B Plug the NVR power supply cable or power adapter into a surge protector not included ...

Страница 9: ...onitor DISPLAY COMPATIBILITY While the system boots the Q See logo will appear The screen may then go blank for up to 15 seconds If the screen doesn t reappear there may be an issue This NVR requires a display capable of supporting 1280 x 720 or higher Step 7 Startup Wizard 7A The Startup Wizard will appear the first time you boot your Q See Presidio system Select your Language Click OK IMPORTANT ...

Страница 10: ...word and proceed Enter the Default Admin Password 123456 and check the Change Password check box Enter the new Password and Confirm below Click Next 7C Set your Time Zone and adjust the Date and Time Click Next Please write down your new password and keep this guide If you forget your NVR password you will need to contact technical support Password ...

Страница 11: ...ble for Android and iOS Launch the Presidio app and follow the steps in the next section Do not close this screen until you have setup your mobile device You will eventually need to scan the QR Code from the wizard with your mobile device to add your NVR to the app Continue on to the next step in this guide to complete mobile setup then click OK to exit the wizard ...

Страница 12: ... 14 8B Q See Presidio will prompt you to add a device Select Add 8C Select Login Step 8 Setting Up the Presidio Mobile App 8A Ensure that your mobile device is connected to the SAME Wi Fi connection as your NVR Launch the Q See Presidio app For the most up to date instructions go to http bit ly presidioapp ...

Страница 13: ...ail Address Select Verify An email will be sent to you containing a verification code 8F Go to your email inbox Open the Verification Code email and note the code 8G Go back to the Q See Presidio app Enter the Verification Code Select Next ...

Страница 14: ...e Username is also the email address used to create the account Select Login 8H Enter the Password you wish to use for your Q See Presidio Account Review and Agree to the Q See Presidio Terms Select Sign Up 8J A message will appear to add a device Select Add ...

Страница 15: ... The QR Code can also be found by going to Main Menu System Network Q See Cloud 8M Enter a Name for your system Select Start Live View 8N The Live View of your cameras will appear Your system is now configured Go to www Q See com support for more info on features ...

Страница 16: ...ct signal strength especially con crete Mounting Surface Thickness Mount your camera on a wall that is at least 2 5 thick Avoid direct exposure to weather Mount your camera under an eave or awning if possible Follow these tips to maximize the life and performance of your cameras Camera Distance from NVR ...

Страница 17: ...as 2011 NEC 820 44 Light levels should be approximately the same between camera and target area Consistent lighting conditions will provide optimal camera performance Do not place near high voltage wires or other sources of electrical interference Do not place camera behind a window ...

Страница 18: ...l support or you can visit www q see com support for more info Connect the cable to a different channel on the NVR If you see video then the culprit is a bad channel input and the NVR may need to be replaced Troubleshooting Testing for Power and Night Vision After you connect your camera to the NVR and power if you do not see a video image on screen and your NVR does not display a video loss messa...

Страница 19: ...guarantee that interference will not occur in a particular installation If this equipment does cause harmful interference to radio or television reception which can be determined by turning the equipment off and on the user is encouraged to try to correct the interfer ence by one or more of the following measures Reorient or relocate the receiving antenna Increase the separation between the equipm...

Страница 20: ... H16CN1 1 K8CN1 1 Firmware Updates How To s Manuals and Guides Repairs and Returns Software Support Videos GPRI E V1 ADDITIONAL SUPPORT 24 7 ONLINE EMAIL SUPPORT Phone Support Mon Fri 6AM 7 00PM PST 1 877 998 3440 Chat Support Mon Fri 6AM 7PM PST Sat Sun 9AM 5PM PST Languages English Spanish French ...

Отзывы: