W W W . Q - C O N N E C T . C O M
3
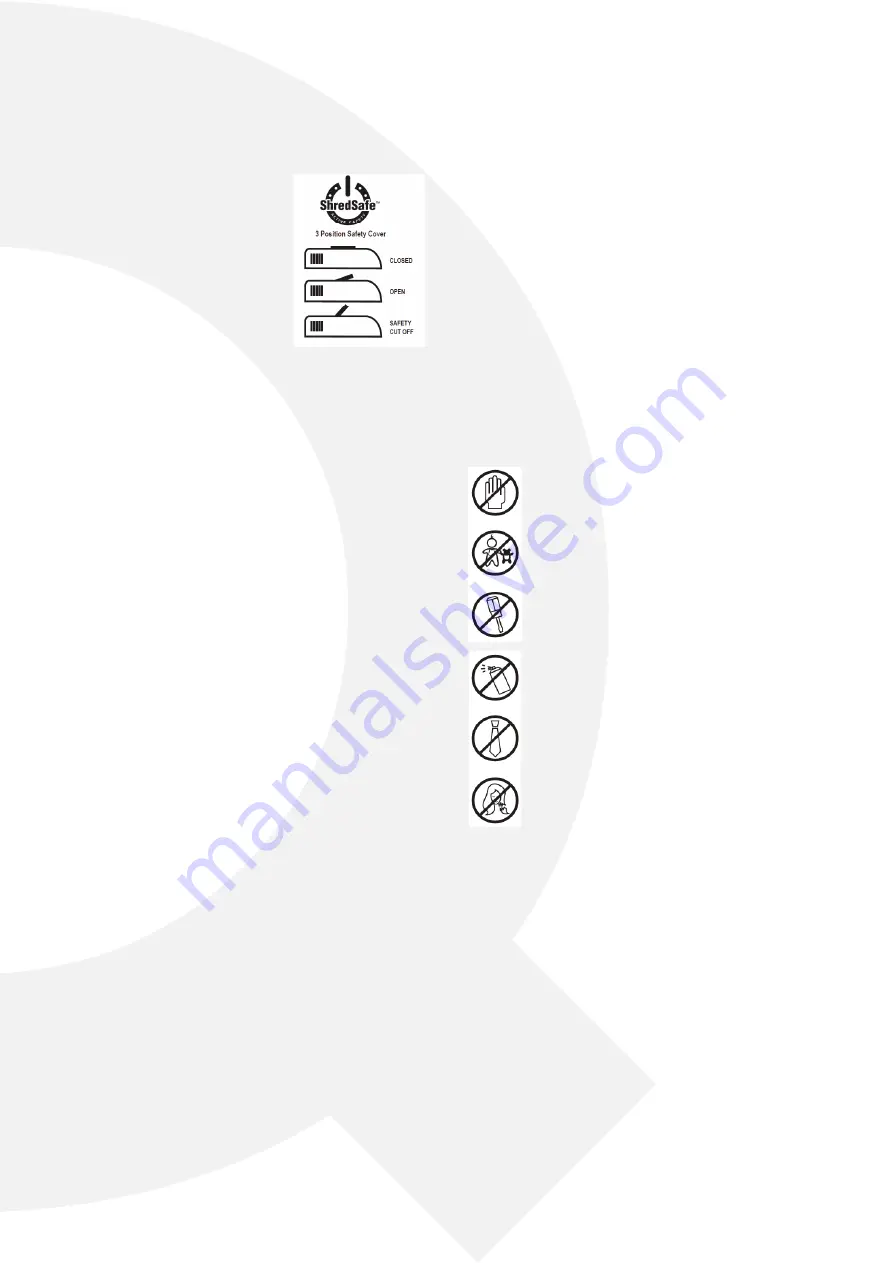
SHREDSAfE fEAtURE
tHE SHREDSAfE COvER HAS 3 POSItIOnS:
Position 1 Closed – This prevents fingers
and objects from being put into the
Shredder, it is recommended the cover
is closed when the shredder is not in
use.
Position 2 Open, Normal Operation –
For shredding paper and credit cards.
The central position allows for normal
shredding operation.
Position 3 Fully open, safety power off -
Shredder not operational.
If fingers or objects are pushed into the entry slot when in position
2, then the ShredSafe cover will be pushed open fully into position
3, cutting the power to the shredder and preventing injury or dam
-
age.
The power indicator light will be off when in this position, and the
shredder will not operate until the safety cover is returned to posi
-
tion 2.
MAIntEnAnCE
1. Empty the waste basket frequently.
2. Reversing the shredder often helps to clear a build up of paper
dust and particles, ensure the basket is not full before revers
-
ing.
3. It is not necessary to oil an Q-CONNECT shredder; however do
-
ing so may extend the life of your shredder. Use a non aerosol,
non flammable vegetable based oil with a long delivery nozzle.
fAQ & tROUBlESHOOtInG
PROBlEM 1 – tHE SHREDDER fAIlS tO OPERAtE
Is the shredder connected at the mains and is the power turned
on?
Is the shredder switch set to ‘auto’?
Is the ShredSafe cover in position 3 (fully open with the safety cut
out operational)? - (set the ShredSafe cover to
position 2) See ShredSafe feature.
Is the bin full indicator lit? – (Empty the waste bin)
Is the shredder located correctly on top of the lower casing? – (Press
down firmly on the shredder head to ensure it is in the correct posi
-
tion)
Has the shredder over heated? – (Turn off at the mains and leave to
cool down for 60 minutes then try again.)
Has the shredder blown a fuse? – (Turn off at the mains and try re
-
placing the fuse in the mains plug.)
PROBlEM 2 – tHE SHREDDER wIll nOt StOP wORkInG
The shredder is designed to operate for a couple of seconds after
paper has cleared the machine – this is normal and helps clear pa
-
per through the cutting heads. If the shredder continues to work
after a shredding cycle and does not stop then this is either;
1. The waste basket is full. You should empty the basket or com
-
pact the shredded paper.
2. Some paper is blocking the auto sensor, try clearing it by revers
-
ing and then returning the switch to auto or by shredding some
more paper.
PROBlEM 3 – tHE SHREDDER HAS jAMMED wHIlSt SHRED-
DInG
Empty the waste bin and try reversing the unit to clear the jam.
If this does not work disconnect power, trim off paper above and
below the jam, reconnect power and try alternating between re
-
verse and auto until the jam clears.
If at any point the shredder stops working during this process it has
probably over heated and will need to cool down for 60 minutes.
Please be careful not to exceed the maximum paper capacity and
feed the paper in straight, please be aware damage caused to the
shredder by inserting too much paper or by failing to shred using
a straight paper path is classed as misuse and invalidates your war-
ranty.
Never attempt to clear paper jams by inserting implements into the
shredder or by opening the unit.
wARnInG SyMBOl ExPlAnAtIOnS
Do not insert fingers into the shredder and avoid
touching the feed opening with your hands.
Do not let children use or play near the shredder, keep
unplugged when not in use.
Do not insert any object into the shredder opening
other than the material to be shredded.
Do not spray ANY aerosol products on or in the vicin
-
ity of the shredder as this might lead to combustion,
do not shred any materials which may have come into
contact with any combustible chemicals.
Avoid loose clothing like ties or jewellery touching the
shredder as they might be drawn into the shredder.
Avoid hair dangling over or touching the shredder as it
might be drawn into the shredder.
t


