background image


  46 / 66 


3.7.2.


Safe Stop 

If the Q-BOT detects severe faults or restrictions (such as being outside 

the specified riding range), it performs a Safety Shutdown. 

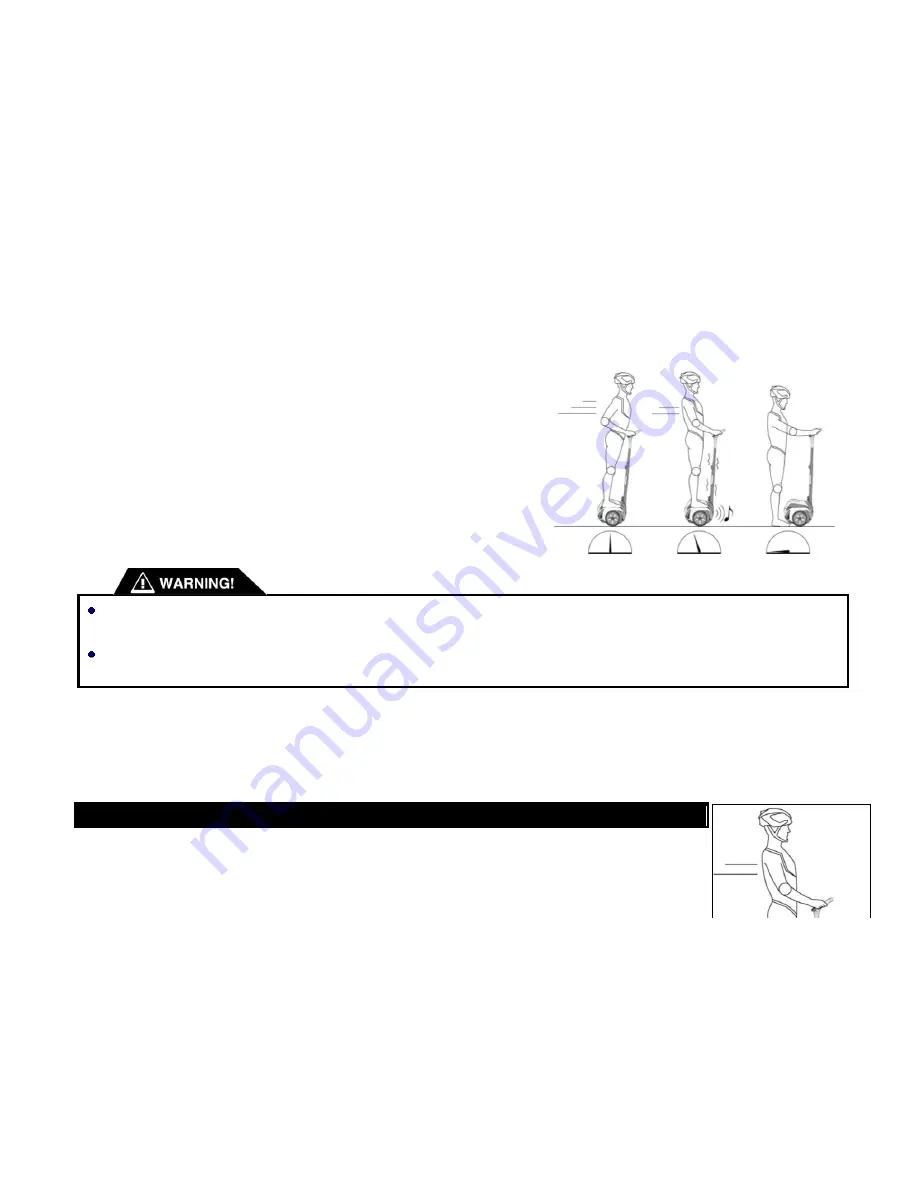
When  a  Safety  Shutdown  occurs,  the  Q-BOT  automatically  reduces  its 

speed,  gives  the  Shaft  Shake  Warning  (shakes  the  handlebar  and  makes 

growling noises), and emits a warning tone. 

You have approximately 14 seconds from the start of a Safety Shutdown 

to  come  to  a  controlled  stop  and  step off.  After  14  seconds,  the  Q-BOT  will 

immediately shut down when the Wheels reach zero speed. 


Never restart and ride your Q-BOT after it has indicated an empty Battery or performed a Safety Shutdown due to low Battery. 

The Q-BOT may not have enough power to keep you balanced, especially if you accelerate, which requires more power.   


If you restart and continue riding after a Safety Shutdown due to low Battery, you risk falling. Also, you risk damaging your 

Battery Pack, resulting in reduced Battery life and capacity. 


3.7.3.


Shaft Vibration Warning 

One of the ways that the Q-BOT notifies you when you are at risk of falling is by vibrating and releasing a warning sound.   

The following chart shows situations that trigger a Shaft Shake Warning, and recommended actions: 


Possible Causes


Recommended Action 

Содержание R1EX

Страница 1: ...on 8 2 1 Product Dimensions 8 2 2 Q BOT Serial Number 8 2 2 1 Specifications 9 2 3 How the Q BOT Works 10 2 4 Q BOT Components 11 2 5 Assembling the Q BOT 12 2 5 1 Unpacking the box 13 2 5 2 Assembling the Q BOT 13 2 6 SmartKey 15 2 6 1 SmartKey Buttons and Display 17 2 6 2 SmartKey Functions 19 2 7 Info LED and Sound Prompt 22 2 7 1 Info LED 22 2 7 2 Sound Prompt 25 ...

Страница 2: ... GPS 30 2 11 USB Charging Port 31 2 12 Smartphone App 32 3 Riding Your Q BOT 32 3 1 Riding Guidelines 32 3 1 1 Safety Cautions 33 3 1 2 Prepare for Riding 33 3 1 3 Powering On the Q BOT 34 3 1 4 Stepping On 34 3 1 5 Moving Forward and Backward 35 3 1 6 Stopping 36 3 1 7 Turning the Q BOT 37 3 1 8 Stepping Off 38 3 1 9 Securing Your Q BOT 39 3 1 10 Powering Off the Q BOT 40 3 2 Practice Riding 40 ...

Страница 3: ...fe Stop 46 3 7 3 Shaft Vibration Warning 46 3 8 Environmental Factors Affecting the Vehicle s Performance 47 3 8 1 Riding Distance 47 3 8 2 Riding in Warm Weather 48 3 8 3 Riding in Cold Temperatures 48 3 8 4 Climbing 48 3 8 5 Descending 48 4 Using the Battery Pack 49 4 1 Battery Safety 49 4 2 Specifications for the Battery Pack 51 4 3 Charging the Q BOT 52 4 3 1 Charging Procedures 52 4 3 2 Charg...

Страница 4: ...y the Turning Shaft 59 6 1 2 Lifting your Q BOT by the Metal Grip 59 6 2 Cleaning Your Q BOT 59 6 3 Storing Your Q BOT 60 6 4 Maintaining Your Q BOT 60 7 Troubleshooting the Q BOT 61 7 1 Common Faults 62 7 2 The Q BOT Cannot Power On 63 7 3 The Q BOT Cannot Enter Balance Mode 63 7 4 The Q BOT Is Shaking 64 7 5 The Turning Shaft Slips or Is Off Centered 64 7 6 The Q BOT Cannot Power Off 65 7 7 The ...

Страница 5: ...5 66 8 1 Report a Problem 65 8 2 How to Reach Us 66 8 3 Obey All Laws and Regulations 66 1 Introduction ...

Страница 6: ...s If you have questions or require more information beyond this User Manual please contact an authorized Q BOT distributor or dealer in your area Whenever you ride the Q BOT you risk injury from loss of control collisions and falls To reduce risk of injury you must read and follow all instructions in this User Manual and watch the Safety Videos 1 2 The Risk of Injury The Q BOT is a self balancing ...

Страница 7: ...anual Safety Videos and help documents for your convenience You can download these electronic files as well as the Q BOT Smartphone App from www imscv com 1 5 Conventions The following conventions are used throughout this manual Warns you about actions that may result in personal injury Cautions you about actions that may result in operational issues or physical damage to the Q BOT Identifies impo...

Страница 8: ...8 66 2 General Information 2 1 Product Dimensions 2 2 Q BOT Serial Number ...

Страница 9: ... the application You may get a higher instant speed but will stabilize at the set speed Distance per charge was calculated under the following test conditions 25 70 Kg payload and smooth terrain The cruising distance varies under different riding conditions Different SCV and battery models will cause a difference in cruising distance The Machine Weight includes a 4 Ah Battery Pack Different models...

Страница 10: ... Affecting the Vehicle s Performance 2 3 How the Q BOT Works The Q BOT works like the human body When walking if you lean forward you take a step forward to keep your balance If you lean back you step back On an Q BOT when you lean forward or back the machine powers the Wheels in the direction that you lean The Q BOT uses dynamic stabilization technology and applies a gyroscope sensors and a Perma...

Страница 11: ...11 66 2 4 Q BOT Components ...

Страница 12: ...12 66 2 5 Assembling the Q BOT ...

Страница 13: ...ter 8 4 Ah Lithium Battery Pack a Useful Tips Manual is included All Q BOT parts must be approved by Q BOT and properly installed Never attempt to stand on an Q BOT without the Turning Shaft properly attached Using your Q BOT without all parts properly installed could damage your Q BOT and result in serious injury from loss of control collisions and falls Do not modify the Q BOT Modifications to t...

Страница 14: ...14 66 Assembling the Q BOT ...

Страница 15: ...ery Pack from the battery package lean the Q BOT body forward and hold it steady Slide the Battery Pack into the Battery Slot When you hear a click gently try to pull the Battery Pack out The Battery Pack is installed properly if it cannot be removed without releasing the latch 4 Press the Reset Button on the back of the SCV and power on the Q BOT using the SmartKey If necessary especially when yo...

Страница 16: ...d its effective communication range is 5 10m depending on working environment and use methods Press the third button Mode Shift Button to activate the SmartKey and to start pairing it with the Q BOT There is a micro USB port at the bottom of the SmartKey Use this port to connect to your PC to see information about your SCV or to charge your SmartKey The SmartKey can also be charged by connecting i...

Страница 17: ...ne and get instuctions on how to pair it with your Q BOT 2 6 1 SmartKey Buttons and Display The display area shows the operational state of the Q BOT and information including your speed distance and battery state SmartKey Button Functions Button Description Power Standby Button Allows you to power the Q BOT on and off Lock Unlock Button Allows you to lock or unlock the Q BOT Shift Button Allows y...

Страница 18: ...dicates that the SmartKey has no signal Appears when the SmartKey cannot detect the Q BOT Q BOT Logo Icon Appears when the SmartKey is being powered on or off using the SmartKey Manned Speed Mode Icon Indicates that the Q BOT detects a rider and is in Speed Mode Assist Mode Icon Indicates that the Q BOT is in Assist Mode Manned Training Mode Icon Indicates that the Q BOT detects a rider and is in ...

Страница 19: ...k Signal icon Indicates that the SmartKey has not detected or has lost its connection to the Q BOT Security icon Indicates that the security function is activated Low Battery icon Indicates that he SmartKey battery needs to be charged Charging the SmartKey takes about 2 hours using the micro USB cable 2 6 2 SmartKey Functions Power on the SmartKey by pressing Button C Shift The SmartKey will autom...

Страница 20: ... Shift Mode SmartKey Button Functions Non Shift Mode Button State Unpair Power on Power off Standby Press Power Standby Button A Pair Power off Power on N A Press Lock Unlock Button B N A Lock Unlock the SCV Lock Unlock the SCV N A Press Shift button C N A Switch between Training Mode Speed Mode and Assist Mode switch between Training Mode and Speed Mode while riding the SCV Switch between Trainin...

Страница 21: ...tton C N A Illuminate turn off Front Light Illuminate turn off Front Light N A Press and hold Lock Unlock Button for 2 seconds B N A Power off the SmartKey Power off the SmartKey N A Press and hold Shift button for 2 seconds C N A Exit Shift Mode Exit Shift Mode N A Press and hold Power Standby Button and Shift button together for 2 seconds A C N A Shut down the SCV Shut down the SCV N A NOTES N A...

Страница 22: ...SmartKey and the Q BOT are paired but the SmartKey cannot communicate with the Q BOT or nobody is riding it 3 minutes When the SmartKey and the Q BOT are paired and can communicate with each other 10 minutes If the SmartKey is powered off you can power it on by pressing the Shift Button C Trigger a horn honk by pressing the Power Button A when riding the SCV 2 7 Info LED and Sound Prompt 2 7 1 Inf...

Страница 23: ...23 66 The Info LED display screen shows the running states of the Q BOT Icons And Descriptions Icon Description Icon Description ...

Страница 24: ...es that the Q BOT is in Remote Control Mode Error icon Indicates an Q BOT system fault Lock Mode icon Indicates that the Q BOT is locked When the Lock Mode icon is not displayed the Lock Setting has been disabled Wi Fi Signal icon Red indicates that Wi Fi is unable to be connected Blue indicates that the SCV has connected to Wi Fi Off indicates that Wi Fi functions well but is not connected Batter...

Страница 25: ... 5 6 1 the faster you ride the faster the circle rotates Bar 1 3 and 5 flash in red when the Q BOT encounters a problem 2 7 2 Sound Prompt The built in speaker on the Q BOT will make different sounds to indicate running state and working mode The Sound Prompt is on by default You can turn off the tone or customize the sounds using the Q BOT Smartphone App See Section 2 12 Smart phone App for more ...

Страница 26: ... Q BOT and the footboard angle is too big the Q BOT will vibrate to warn the rider to slowly level the footboard Self examination Mode The Q BOT will examine and calibrate itself in Self examination Mode Read Section 3 6 for more information Error If the Q BOT detects an error or a system fault during normal riding conditions it will automatically reduce the speed and slowly stop The Tires will be...

Страница 27: ...p Mode In Sleep Mode the Wi Fi module and SmartKey can be awakened at any time After 18 hours in Sleep Mode the entire system will be shut down completely to protect the Battery Press the Reset button on the back of the Q BOT to turn the power on 2 8 2 State Transition Diagram Among Working Modes ...

Страница 28: ...28 66 2 9 The Front Tail Light ...

Страница 29: ...1 Hz Balancing The Tail Light illuminates at half brightness Slowing down The Tail Light illuminates for 1 second and then illuminates at half brightness Turning The Tail Light of the turning direction illuminates and the Front Light flashes from both sides to the middle The brightness of the lights on the Q BOT is not sufficient to guide you when it is dark outside In case of low light please rid...

Страница 30: ...rch nearby APs and try to match with an entry in the AP list If there is a match the Q BOT will connect to the recognized AP if no match is found the Q BOT will switch to AP mode and wait for other devices to connect For the first startup the Q BOT will only start in AP mode since the AP list is empty The SSID of the Q BOT under AP mode is QBOT XXXXXXXX by default the password is QBOT123 XXXXXXX i...

Страница 31: ...deactivate The GPRS GPS Function relies on the local GSM Network To use it insert a SIM Card into the SIM Card slot located on the back of the Q BOT next to the USB Port GPRS GPS fuctions may not be opened at the time you purchase the product these functions will be gradually opened and integrated into the product and App For international users contact local service providers to purchase a SIM Ca...

Страница 32: ...Speed limit Query the Event Log Upgrade the Q BOT firmware Provide Location Based Service LBS Service Customize Voice Prompts for the Q BOT Receive and execute simple orders by remote control Request maintenance service and receive immediate response to your request Read help documents on your App for more information on what the App can do Certain functions are limited to specific models For deta...

Страница 33: ...each use Do not ride if any part is loose or damaged Do not wear loose clothing or jewelry that could get caught in the Q BOT 3 1 2 Prepare for Riding To prepare for your first ride Select an appropriate area for your first ride The area may be indoors or outdoors and should measure at least 4 meters by 4 meters 12 feet by 12 feet It must have a level smooth riding surface with good traction and t...

Страница 34: ...g Mode for your first ride and an icon will appear on the LED Screen to indicate that the power is ON and the Q BOT is in Standby Mode Do not step onto the Q BOT yet Your Q BOT is powered on but it is not balancing 3 1 4 Stepping On Before you attempt to step on for the first time have your helper stand facing you in front of the Q BOT holding the Handlebar securely with both hands Your helper sho...

Страница 35: ...bar Stay calm and relaxed Look forward Some people rock back and forth involuntarily when they first step on The helper should hold the Handlebar firmly If you feel unstable step off the Q BOT one foot at a time and pause before stepping back on The helper should continue holding firmly the entire time and be prepared to keep the Q BOT from moving as you step on or off If you are standing on the Q...

Страница 36: ...ard Then stop leaning back and feel it slow down and stop Do this a few times You should not ride backward as part of your normal riding process Because of the lack of a rear view and direction changes of the turning centrifugal force riding backward could cause unpredictable falls Instead turn and ride forward With your helper standing close by practice going forward and backward a short distance...

Страница 37: ...an cause the Q BOT s tires to lose traction and you could fall Please avoid abrupt stops Always perform a controlled stop by gently shifting your weight away from the direction of movement Avoid slippery surfaces The Q BOT s Tires could lose traction causing you to fall 3 1 7 Turning the Q BOT The Q BOT turns in the direction that you lean the Handlebar You turn the Q BOT by leaning the Handlebar ...

Страница 38: ... while turning Because abrupt turns can be dangerous always lean into turns slowly and smoothly Do not ride crosswise or turn on a slope or it will cause balance angle shifting and thus be dangerous 3 1 8 Stepping Off When you are ready to step off the Q BOT for the first time your helper should hold the Handlebar To step off the Q BOT Remain stationary by keeping your weight centered over the Whe...

Страница 39: ...ward when stepping off It may make the SCV move backward causing unpredictable damage While getting off do not lean the Handlebar forward or it will move forward if you haven t completely moved your weight off Practice stepping off for the first time with your helper standing close by 3 1 9 Securing Your Q BOT The Q BOT provides you with a Security Mode in case you need to leave your Q BOT unatten...

Страница 40: ...ton A on the SmartKey The display on the SmartKey will show an icon and shut off 3 2 Practice Riding You will need to become very familiar with your Q BOT before you attempt to ride outside of your controlled practice environment The more you practice the safer you will be when you move into new places Remember the following as you practice Use Training Mode and ride in areas free of obstacles and...

Страница 41: ...r and more deft Speed Limit 5Km h 15Km h Sensitivity Low High Turning stepping on Will turn only with both feet on Will turn with one foot or both feet on Turning stepping off Will not turn when single a single foot falls to the ground Will turn when a single foot falls to the ground Exit Balance Mode Exits Balance Mode when a single foot falls to the ground Exits Balance Mode when both feet fall ...

Страница 42: ...laid back under Manual Control Mode when the Q BOT and your App are linked Now you can easily control your Q BOT by toggling the buttons in the directions you want the SCV to go 3 5 2 Action Order The Q BOT can execute simple orders that you designate in your App These orders are very easy to master and are explained as following Speed Forward Backward Speed Difference SD Duration and Sound are th...

Страница 43: ...tion Mode allows you to run a thorough examination of your Q BOT to see if any parameters have shifted after a period of operation The Q BOT will run tests under Self examination Mode and store the resulting data Refer to Section 2 7 Info LED and Voice Prompt for more information The following chart shows which items are detected in Self examination Mode Item Description Steer Balance Run the Stee...

Страница 44: ...lerts The Q BOT is equipped with multiple safety alerts It is important to understand these alerts before you attempt to ride your Q BOT 3 7 1 Speed Limiter When you approach the maximum allowed speed for a given situation the Q BOT will push the handlebar back to slow you down The following figure shows the process of speed limiter When the Q BOT pushes the handlebar back stop leaning forward and...

Страница 45: ...r pushes back depends on a variety of factors including set up speed limiter terrain payload and battery condition The below list shows conditions that will trigger the speed limiter Continuous climbing Motor temperature Riding on bumpy roads High Circuit temperature The moment it powers on Battery temperature too high or too low Low battery Continuous descending ...

Страница 46: ...h zero speed Never restart and ride your Q BOT after it has indicated an empty Battery or performed a Safety Shutdown due to low Battery The Q BOT may not have enough power to keep you balanced especially if you accelerate which requires more power If you restart and continue riding after a Safety Shutdown due to low Battery you risk falling Also you risk damaging your Battery Pack resulting in re...

Страница 47: ...Affecting the Vehicle s Performance 3 8 1 Riding Distance Riding distance per charge is greatly influenced by riding habits and environmental factors The following chart shows factors that have great influence Factors Possible Causes Road Condition Riding the Q BOT on flat roads will increase riding distance per charge On the contrary riding on hillsides or steep slopes will decrease riding distan...

Страница 48: ...ly The hotter the components are the lower the speed will be If the components get very hot 80 while riding the Q BOT may activate a safety alert You should stop riding immediately and wait until the components cool off before you continue your ride 3 8 3 Riding in Cold Temperatures Too low temperatures will deteriorate component lubrication and increase resistance Also the battery discharge capab...

Страница 49: ...ing the Battery Pack This chapter describes how to charge and maintain your Q BOT Battery Pack 4 1 Battery Safety For your safety and the safety of others and to maximize Battery Pack life and performance follow the instructions in this Manual Do not use the Battery Pack if the casing is broken emits an unusual odor or is excessively warm or leaks any substance Follow the instructions for charging...

Страница 50: ... the Battery Pack For the best performance please charge the Battery Pack in an environment temperature of 10 30 50 to 86 F Keep Battery Pack out of reach of children and pets Exposure to Battery voltage could result in injury The cells within the Battery Pack contain toxic substances Do not attempt to open Battery Pack Do not insert any object into the Battery Pack or use any device to pry at the...

Страница 51: ...ttery Pack There are no user serviceable parts inside 4 2 Specifications for the Battery Pack The following chart lists the specifications for the Battery Pack Specifications Item Note Battery type Lithium ion Battery These data are measured with a battery capacity of 4 Ah The voltage here refers to lithium battery voltage when the capacity is moderate Charging Time 3 5 Hours Voltage 72 V Capacity...

Страница 52: ...k only when it is within the specified charging temperature range Failure to charge the Battery Pack properly could result in permanent damage If the Battery Pack is excessively discharged it could also cause serious damage Be sure to use the original charger for Q BOT charging Please carefully read the Safety Notes before you use the Battery Pack 4 3 1 Charging Procedures To charge the Battery Pa...

Страница 53: ...Pack The Q BOT Battery Pack can be used about 500 times depending on which type of Battery Pack you use After Subsequently the Battery capacity will reduce to 80 Replace the Battery Pack to ensure the best performance of the Q BOT Back up Battery Packs can be purchased from Authorized Q BOT Dealers and Distributors The Battery Pack is designed to be replaced easily and can be charged separately To...

Страница 54: ...and avoid heavy vibration during transportation Do not use or transport a Battery Pack if the casing has broken open Lithium ion Battery Packs are considered Hazardous Materials under shipping regulations Comply with all local federal and individual country laws when transporting the Q BOT Battery Pack The shipping methods for Lithium ion Battery Packs are as follows Ground Sea Air Battery Pack In...

Страница 55: ...the safety instructions Be familiar with and obey all local laws and regulations and only ride your Q BOT in places that riding SCV s is allowed Do not use the Q BOT if you are under the influence of alcohol banned substances or prescription medications Wear a helmet and elbow and knee pads when riding your Q BOT Wear proper clothing Do not wear sharp jewelry or high heels to avoid damage or injur...

Страница 56: ...o not modify the components of the Q BOT or ride a modified SCV Modifying an Q BOT will affect its performance and can cause damage Do not ride the Q BOT on slippery roads or in bad weather conditions such as heavy rain heavy snow or ice Do not ride the Q BOT on uneven roads that are full of sticks trash or stones Do not ride the Q BOT in dangerous environment such as road with pits and cracks ste...

Страница 57: ... Even checking battery information on the SmartKey or Info LED may distract you Do not break any other rules in the User Manual Pay special attention to the content in the WARNING or NOTE column 5 3 Safety Alerts Before letting others ride your Q BOT make sure that they have watched the Safety Videos and read this User Manual carefully When riding the Q BOT please wear a good quality well fitting ...

Страница 58: ... not lean against the Handlebar or the Turning Shaft as this may cause you to fall Please step off of the Q BOT and charge the Battery Pack when the Q BOT has a low battery Do not park the Q BOT in places where traffic will be blocked Do not rest anything on the Footboard Mat while riding the Q BOT Stay where you are and call for the police if you are in a traffic accident If you need to carry som...

Страница 59: ... Lifting your Q BOT by the Turning Shaft Lift your Q BOT using the Rubber Handle on the Turning Shaft 6 1 2 Lifting your Q BOT by the Metal Grip Lift your Q BOT using the Metal Grip when you need to carry it for long distances or are carrying it without the Turning Shaft attached 6 2 Cleaning Your Q BOT Clean your Q BOT ...

Страница 60: ...g Your Q BOT Store your Q BOT indoors in a place that is free of moisture humidity and extreme temperatures To maximize the performance of your Q BOT Battery Pack fully charge your Battery Pack before storage and while in storage fully charge it every three months 6 4 Maintaining Your Q BOT Check the Tires and Wheels periodically to see if they have become loose If the Tires are loose check the so...

Страница 61: ...n troubleshoot certain problems with your Q BOT before contacting an Authorized Q BOT Dealer or Distributor or Q BOT Customer Care This chapter provides lists of problems and recommended actions Some common problems The Q BOT will not power on The Q BOT will not enter Balance Mode The Q BOT is prone to shaking The Turning Shaft slips or is off centered The Q BOT will not power off The Q BOT cannot...

Страница 62: ...Customer Care at service imscv com 32 Sensor Error Sensor Failure Contact Q BOT Customer Care at service imscv com 33 Excessive Angle Excessive angle due to road conditions or other reasons when the Q BOT is in Balance Mode Ride the Q BOT following instructions See page 10 for Max Climbing Angle 34 Excessive Speed Excessive Speed when the Q BOT exits Balance Mode Reduce speed before stepping off 3...

Страница 63: ...arge Motor Electric Current Overload Ride the Q BOT following proper operating instructions and avoid steep or rugged surfaces 7 2 The Q BOT Cannot Power On Recommended Action Make sure your Q BOT s Battery Pack is charged Make sure your SmartKey is charged Make sure you and your SmartKey are no further than 5m 15 ft from your Q BOT Verify that the SmartKey and your Q BOT are linked Check the Smar...

Страница 64: ...commended Action Check the joints between the Handlebar and the Turning Shaft If they are loose tighten them Check the joints between the Handlebar and the Quick Release Lock If they are loose tighten them Check the joints between the Tires and the Wheels If they are loose tighten them 7 5 The Turning Shaft Slips or Is Off Centered Recommended Action Step on the Footboard Mat and stand still If th...

Страница 65: ...the SmartKey for two seconds to restart the Q BOT 7 7 The Q BOT Cannot Be Added in the App Recommended Action Make sure the Q BOT is not powered off If it is powered off restart it Wi Fi system needs 1 2 minutes to initialize If the Q BOT is set to use a Dynamic IP Address please be aware that it may take 1 2 minutes to get the IP address Make sure you are connected to a DHCP server that can effec...

Страница 66: ...er requests please contact us at info imscv com 8 2 How to Reach Us Q BOT Technologies Co Ltd E mail info imscv com Website www imscv com 8 3 Obey All Laws and Regulations Before riding the Q BOT on public roads and sidewalks please consult local authorities and become familiar with applicable laws and regulations ...

Отзывы: