8
9
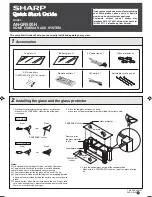
Fase 5: Allentare 2 viti anteriormente ma NON ALLENTARLE COMPLETAMENTE.
Fase 6: Allineare le viti posteriori e avvitarle leggermente.
Fase 7: Stringere tutte e 4 le viti fino a quando il subwoofer è posizionato in piano sulla base della staffa. La staffa è progettata per flettersi
man mano che si avvitano le viti, mantenendo il subwoofer fermamente contro il dispositivo di smorzamento delle vibrazioni.
Fase 8: Fare riferimento al manuale completo del subwoofer per completare l’installazione dell’impianto.
ATTENZIONE: Non appoggiare o posizionare nulla sulla superficie del subwoofer una volta montato sulla parete. La staffa da parete è
progettata per supportare SOLO il subwoofer.
Stap 1: Plak het trillingsdempingskussen op de wandbeugel in de aangegeven positie. OPMERKING: voor de 3060S zijn 2 trillingskussens
nodig.
Stap 2: Zet de beugel op de juiste plaats en markeer de schroefgaten zo, dat de beugel waterpas wordt geïnstalleerd.
Stap 3: Schroef de beugel in de wand (fittingen zijn niet meegeleverd) en zorg ervoor dat de wand en de bevestigingsmethode geschikt zijn
om de hele gewicht te ondersteunen.
Stap 4: Plaats de subwoofer op de beugel door de voorste voetjes uit te lijnen met de schroefgaten, en de achterkant van de subwoofer plat
tegen het trillingsdempingskussen aan te houden. OPPASSEN: Duw niet tegen het rooster.
Stap 5: Schroef de voorste 2 schroeven losjes in, maar DRAAI ZE NIET HELEMAAL VAST.
Stap 6: Zorg voor uitlijning van de achterste schroeven en schroef ze losjes in.
Stap 7: Draai de 4 schroeven gelijkmatig aan, totdat de subwoofer plat tegen de onderkant van de beugel aan ligt. De beugel geeft mee
wanneer u de schroeven aandraait, zodat de subwoofer strak tegen het trillingsdempingskussen aan zit.
Stap 8: Raadpleeg de complete handleiding van de subwoofer om de installatie af te ronden.
OPPASSEN: U mag niet tegen de subwoofer leunen wanneer die aan de wand bevestigd is en u mag er ook niets op zetten. De wandbeugel
kan ALLEEN het gewicht van de subwoofer ondersteunen.
Passo 1: Insira a almofada antivibrações no suporte de parede na posição indicada. NOTA: o modelo 3060S requer 2 almofadas
antivibrações.
Passo 2: Posicione o suporte secundário e assinale as posições dos orifícios dos parafusos, assegurando que o suporte está perfeitamente
horizontal.
Passo 3: Aparafuse o suporte na parede (fixações não fornecidas) assegurando que a parede e o método de fixação são suficientes para
suportar a carga total.
Passo 4: Coloque o suporte secundário no suporte alinhando o pé dianteiro com os orifícios de aparafusamento e segurando o suporte
secundário contra a almofada antivibrações. CUIDADO: Não pressione contra a grelha.
Passo 5: Aparafuse ligeiramente os 2 parafusos dianteiros mas NÃO APERTE TOTALMENTE.
Passo 6: Alinhe os parafusos traseiros e aparafuse ligeiramente.
Passo 7: Aparafuse os 4 parafusos uniformemente até o suporte secundário estar aplicado sobre a base do suporte. O suporte foi
concebido para fletir à medida que se aperta os parafusos, suportando o suporte secundário firmemente contra a almofada antivibrações.
Passo 8: Consulte o manual do subwoofer para concluir a instalação do sistema.
CUIDADO: Não se apoie nem coloque qualquer objeto sobre a parte superior do suporte secundário depois de estar montado na parede.
O suporte de parede foi concebido para suportar APENAS o suporte secundário.
Krok 1: Przymocuj podkładkę tłumiącą wibracje do wspornika ściennego w przedstawionej pozycji. UWAGA: kolumny 3060S wymagają 2 podkładek
przeciwwibracyjnych.
Krok 2: Ustaw wspornik subwoofera i zaznacz otwory na śruby sprawdzając, czy wspornik jest ustawiony idealnie w poziomie.
Krok 3: Przykręć wspornik subwoofera do ściany (elementy mocujące niedostarczane) sprawdzając, czy ściana i metoda mocowania są odpowiednie do
utrzymania całkowitej masy.
Krok 4: Umieść wspornik subwoofera, ustawiając przednie nóżki w linii z otworami na śruby i przytrzymując tył subwoofera płasko na podkładce tłumiącej
wibracje. UWAGA: Nie naciskaj na osłonę kolumny.
Krok 5: Wkręć BEZ PEŁNEGO DOKRĘCANIA przednie 2 śruby.
Krok 6: Wyrównaj tylne śruby i dokręcić je lekko (bez dokręcania).
Krok 7: Dokręć równo 4 śruby do momentu osadzenia subwoofera płasko na podstawie wspornika. Wspornik poddaje się przy dokręcaniu śrub, gdy
przytrzymujemy pewnie subwoofer oparty na podkładce tłumiącej wibracje.
Krok 8: W celu wykonania pełnego montażu subwoofera należy skorzystać z informacji podanych w jego instrukcji obsługi.
UWAGA: Nie opieraj się ani nie stawiaj niczego na górze subwoofera po zamontowaniu na ścianie. Wspornik zaprojektowano z myślą o utrzymywaniu
WYŁĄCZNIE subwoofera.
PT
PL
NL


