Installation
1.
To install the Pyroclassic Sloping Ceiling Flue Kit begin by locating the Pyroclassic IV fire (or the
Pyroclassic Raised Hearth if it is being used) in its proposed position, and mark a point on the ceiling that is
directly above the centre of the fire’s flue outlet, (or the hole in the raised hearth). Check the location
allows the Outer Casing of the Thermosyphon Assembly to clear all structural roof timbers.
2.
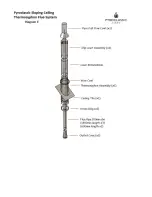
Cut an oval hole in the ceiling and a corresponding oval hole in the roof 250mm wide. Cut the
length to suit the ceiling angle to fit the Ø250mm Thermosyphon Assembly (Use the Ceiling Plate as a
cutting template).
3.
Temporarily slide fit an appropriate roof flashing (not supplied) around the Thermosyphon
Assembly outer liner
before mounting the assembly.
4.
Now mount the Thermosyphon Assembly by lowering into the oval hole and fix to the roof at 4
points, 90 degrees apart, using the mounting brackets provided. Take particular care when lowering into the
oval hole to avoid scratching or gouging the assembly outer liner.
(Note: if you prefer to mount the Thermosyphon Assembly from below, you will need to remove the vent
cowl by drilling out the two rivets installed. The Cowl can be refitted after installation of the Thermosyphon
Assembly).
5.
Ensure the 250mm Outer Casing protrudes at least 250mm below the ceiling on the lower side and
is
securely installed
, (remembering this has to take the whole weight of the outer flue system).
6.
With the Thermosyphon Assembly secured in place, lower the flashing to the roof, silicon seal the
edges and fix flashing securely to the roof.
7.
Attach the Ceiling Tile with a screw through each corner. Now fit the Dress Ring of the
Thermosyphon Assembly by firmly pressing into the Outer Casing until rim is bottomed. Three rivets is
sufficient to secure the cap in place (you may wish to omit a rivet from the frontal area for aesthetic
reasons).
8.
With the Pyroclassic IV fire in position, place the Outlet Cone (supplied with the fire) into the fire
spigot. The spigot has a pre-drilled pilot hole, use this hole to secure the Outlet Cone to the spigot with the
supplied screw so that it cannot be lifted out should the flue accidentally get caught up on something
during the expansion and contraction process.
9.
The 100mm S/S flue pipes can now be fitted from inside the room (ensure the Dress Ring is fitted to
the bottom of the 250mm Outer Casing. Ref: para 7). Secure each joint with sealant and three ss rivets
equally spaced around the joints to prevent unintentional or accidental separation.
Once all the required flue sections have been connected, position the bottom length of flue pipe into the
Outlet Cone. (Take care not to scratch the Outlet Cone).
Note: The flue pipes must be assembled with swage roll end down (towards fire).
10.
The 200x600mm Liner Assembly can now be fitted by placing over the upper 100mm flue pipe and
fixed to the top spigot of the Thermsyphon Assembly with 4 rivets equally spaced around the
circumference. Slide Slip Liner Assembly over 200x600mm liner and push downwards to expose upper
section of flue.
Do Not fix slip liner yet
.


