background image

www.PyleUSA.com

www.PyleUSA.com

Picture Control

AV Picture Selections:

Use the unit (remote control) to achieve the desired settings.

1. Press the 

MENU

 (remote 

TFT MENU

) button on the unit to bring up the  


    on-screen picture control menu.

2. Select the desired menu by pressing 

MENU

 button on the unit to choose main:

    PICTURE, VOLUME, OPTION, SYSTEM

 or 

CLOCK

. Press the          (remote          )

    button to enter main menu.

3. Press the           (remote         ) button to adjust the sub-menu setting.

    In the menu controlled process, press the 

MENU

 button to return to the upper

    level of menus.

Playing a Disc

Playing DVD player

Turn ON the power, and place the disc in.

1. Press the power button to turn ON (Power indicator is OFF).

    display is ON and the player will start loading the disc.

2. Press the Open button to eject the disc tray out, then insert the disc, press the  

    open button again to close. The player will recognize the different formats of  

    the discs, and disc mark will be displayed on the top left side of the screen.

3. While playing DVD discs, please select one item in DVD menu or title menu.

    while playing VCD2.0 or CD, this player plays one by one.

4. Press the Direction Buttons or the Number Buttons to select the desired item,

    then press Enter or Play to start.

5. The player will play automatically. Press Pause to stop temporarily, press pause

    again Pause or Play to cancel pause. While playing a DVD disc, press stop for

    memory stop, press Play for memory play, press Stop twice to stop playing .

Note:

 To stop playing DVD press Stop twice.

Basic Operation

FM channel:  

This unit has multiple frequencies

Unit Control

Press the menu button on the unit, press the AV/DVD button, then press +/- to 

select the SOUND CONTROL item. Press AV/DVD button, select the press +/- to 

display the FM menu, press unit AV/DVD button, then press +/- to select the FM 

channel. In the menu controlled process, press the MENU button to return to the 

upper level of menus.

Remote Control

press the menu button on the remote control, press the          button, then press     

          to select the SOUND CONTROL item. Press the          button, then press         to

display the FM menu, press          button, then press          to select the FM channel.

In the menu controlled process, press the TFT MENU button to return to the 

upper level of menus.

6

7

Video System Interface

Use the included remote control or buttons on the monitor panel to control your 

media.

Hold in the MENU button to access settings, hold the MENU button to exit the 

settings screen interface.

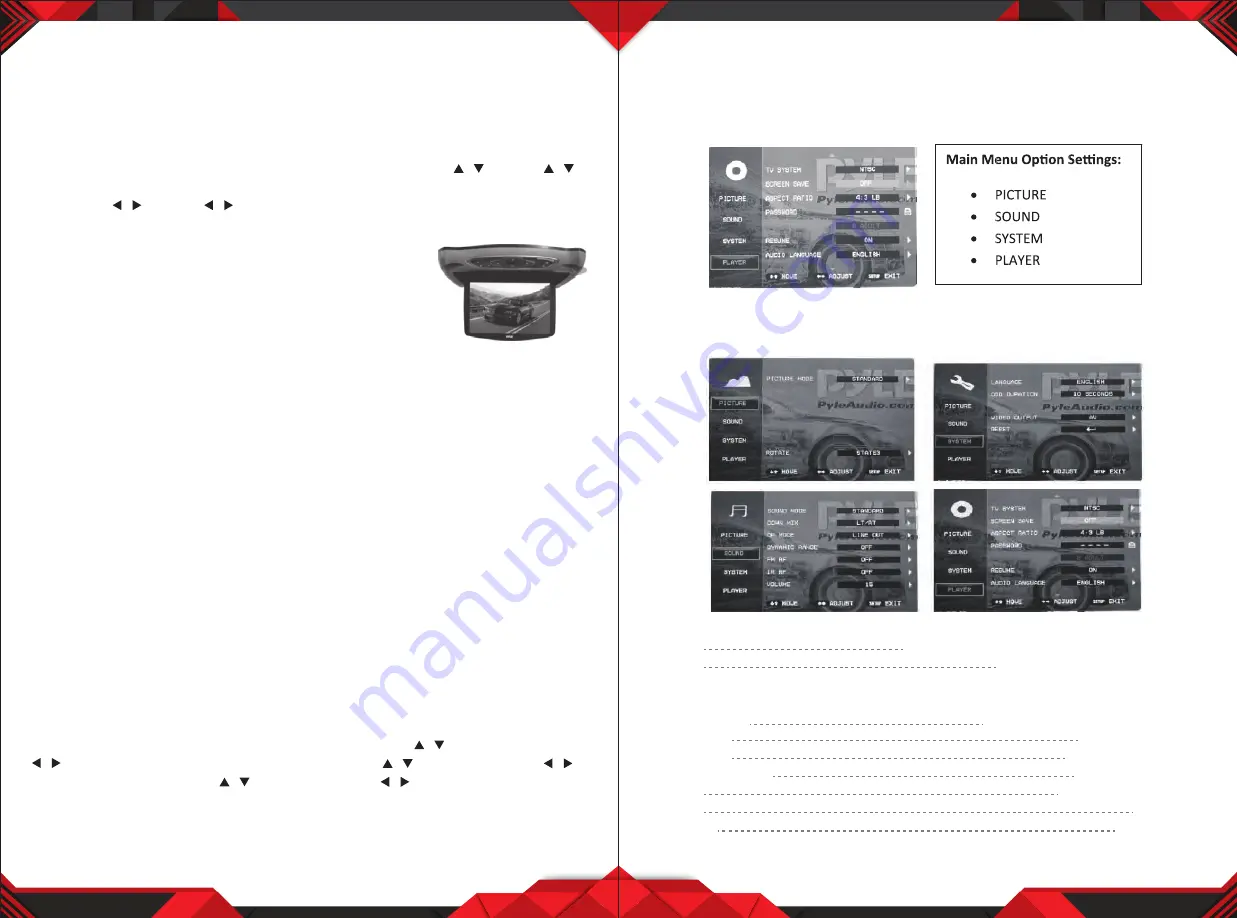
Settings and Configuration - System Setup

Use the included remote control or buttons on the monitor panel to control 

system setup configuration.

Picture

Mode

                                                               standard, vivid, soft, optimal, user (custom)

Rotate

                                                                                       state 1, state 2, state 3, state 4

Sound

Sound Mode                                                                          

 standard, music, speech, movie

Down Mix

                                                                                                         LT/RT, stereo, VSS

OP Mode

                                                                                                       Line out, RF remod

Dynamic Range

                                                                                            OFF, 1/8 - 7/8, full

FM RF

                                                                                                           Frequency selection

IR RF

                                                                                                                                    A, B, OFF

Volume

                                                                                                                        0 - 15 (Max)

/

/

/

/

/

/

/

/

/

/

Содержание PLRD146

Страница 1: ...Roof Mount LCD Monitor PLRD146 13 3 Roof Mount TFT LCD Monitor Built In Multimedia Disc USB SD Player with Wireless FM IR Transmitter ...

Страница 2: ...liquids in your car If you or your child spills any liquid on these products park your vehicle at the roadside turn the key off to disconnect the power and then wipe the products with a towel Do not operate the equipment until all liquids have evaporated or you have had the monitor inspected by a qualified Technician Severe harm or death can occur Just use a wet cloth to clean the screen only use ...

Страница 3: ... number enabling you to locate it easily Chapter DVD Only 2 3 Name and Function of Each Part Sections of a picture or a musical piece that are smaller than titles A title is composed of one or several chapters Each chapter has an assigned chapter number enabling you to locate the chapter you want Depending on the disc no chapters may be recorded Track Video CD and audio CD only Sections of a pictu...

Страница 4: ...he slot the SD USB is automatically played To stop press the button STOP To stop temporarily press the button PLAY PAUSE To resume again press the button PLAY PAUSE To replay a song you want 1 Press the button after choosing a song track you want by using Arrow button 2 You can replay the song directly by entering the number of the song Disc Menu You can select the following menu when are recorded...

Страница 5: ... to cancel pause While playing a DVD disc press stop for memory stop press Play for memory play press Stop twice to stop playing Note To stop playing DVD press Stop twice Basic Operation FM channel This unit has multiple frequencies Unit Control Press the menu button on the unit press the AV DVD button then press to select the SOUND CONTROL item Press AV DVD button select the press to display the ...

Страница 6: ... label facing the back of the PLRD146 The contents will automatically play upon insertion MP3 Playback Insert a USB Flash or SD Memory Card and your media will automatically play Installation Professional Installation Recommended Product Installation Housing Changing Operation 1 Turn over the machine and take down the metal support bracket carefully 2 Tighten the metal support bracket to the ceili...

Страница 7: ... damaged gluey label it might result in damage to your DVD player Don t put discs in the sunshine Park your car in the shade Caution Wipe softly with a wet cloth and then with a dry one Before playback wipe the disc outward from the center with a clean cloth Do not use any type of solvent such as thinner benzene commercially available cleaners or antistatic spray To avoid damaging your DVD player ...

Страница 8: ...Portable Car Etc 3 sets of interchangeable 2pc snap on color skins Choose from Grey Black or Tan Whats in the Box LCD Monitor One wireless remote control User of manual One small release key 2 sets of interchangeable housings Fix Screws x 4 pcs Technical Specifications Resolution 1280 x 800 Brightness 450 Cd Sq M Contrast Ratio 500 1 Power Source DC 12 Volt Multi System NTSC PAL Auto Switch Dimens...

Отзывы: