background image

4

www.PyleUSA.com

3

www.PyleUSA.com

             • CAMERA INTRODUCTION

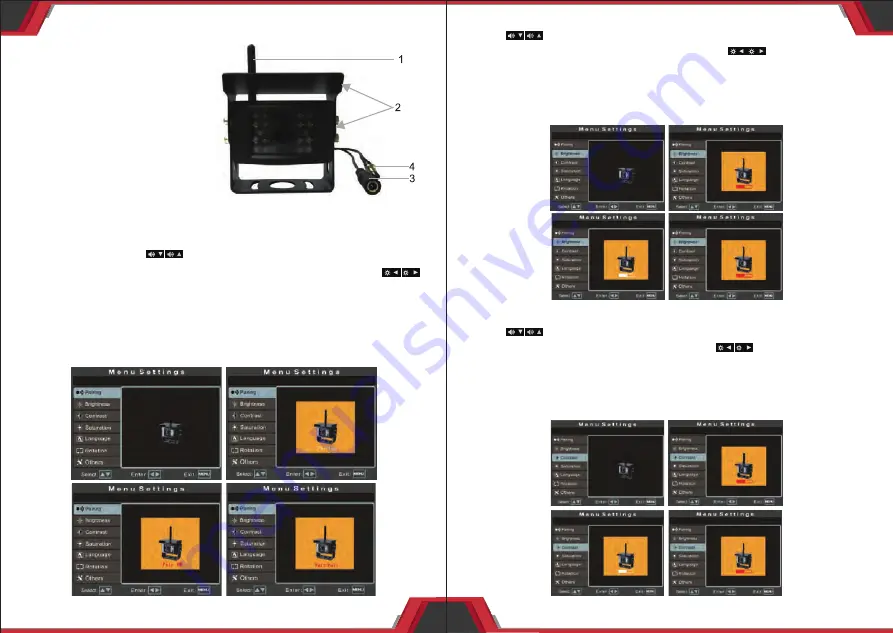
1. 2.4G antenna

2. U shaped bracket and sun shade

3. Power cable: DC 12-24V input
4. Pairing button

B. Menu Setup Introduction
1. Pairing Setting

Press the “MENU" key on the panel or remote control to open the menu 
interface; then press ”                ” on the panel or “VIDEO" “MODE'on 
remote control to switch to the “Pairing" option; and then press ”               ” 
on the panel or 'LEFT" "RIGHT" on remote control, at the same time, hold 
the camera pairing button to pair. It will show "Pair OK” after 2-5 seconds 

if pairing successfull, othewise it  will show “Pair fail” and need to re-pair. 

Press "MENU" to exit current setting. Just as shown in the following 

pictures.

2. Camera Brightness Setting

Press ”                ” 

on the panel or “VIDEO" “MODE'on remote control to 

switch to ”Brightness” option, and then press ”                ” on the panel or 

“LEFT” “RIGHT” on remote control to enter into the camera brightness 

setting and press them again to adjust the specific parameters. Press 

"MENU” to confirm the adjusted parameter and press it again to exit the 

current setting. Just as shown in the following pictures.

3. Camera Contrast Setting

Press ”                ” 

on the panel or "VIDEO" “MODE'on remote control to 

switch to “Contrast” option, and then press

 ”                ” on the panel or 

“LEFT” “RIGHT” on remote control to enter into the camera contrast 

setting and press them again to adjust the specific parameters. Press 

“MENU” to confirm the adjusted parameter and press it again to exit the 

current setting. Just as shown in the following pictures.

Содержание PLCMTR78WIR

Страница 1: ...2 4Ghz Vehicle Camera Video Monitor System with Wireless Video Transmission Waterproof Rated Cam Night Vision 7 inch Display for Bus Truck Trailer Van ...

Страница 2: ... use 12 24 Volt Systems Includes All Necessary Cables Wiring 2 2 PRODUCT APPLICATION This product adopted high resolution TFT color digital screen and 2 4G digital wireless technologies which used embedded processor and embedded operating system combined several latest technologies in the IT field such as audio and video compression decompression technology special shockprooftechnology It has no r...

Страница 3: ... as shown in the following pictures 2 Camera Brightness Setting Press on the panel or VIDEO MODE on remote control to switch to Brightness option and then press on the panel or LEFT RIGHT on remote control to enter into the camera brightness setting and press them again to adjust the specific parameters Press MENU to confirm the adjusted parameter and press it again to exit the current setting Jus...

Страница 4: ...NU to exit the current setting Just as shown in the following pictures 6 Rotation Setting Press on the panel or VIDEO MODE on remote control to switch to Rotation option and then press on the panel or LEFT RIGHT on remote control to enter into rotation setting press them again to make the image up down left right rotated Press MENU to exit the current setting Just as shown in the following picture...

Страница 5: ...FT RIGHT on remote control to set the wireless signal channel frequency The default state is CH1 channel There are 14PCS wireless signal channel optional 2412 2484MHZ If there is several monitors work on the same frequency may have unstable signal or image flicker problem which could be improved by changing the frequency Press MENU to exit the current setting Just as shown in the following picture...

Страница 6: ...camera 3 REMOTE CONTROL 1 POWER Open or CLose Monitor 2 VIDEO Increase Volume 3 Left Direction Key Decrease Brightness 4 MENU Open or Exit Menu 5 Right Direction Key Increase Brightness 6 MODE Decrease Volume 4 ACCESSORIES 6 User Manual 1PC 3 2 4G antenna 2PCS 4 2 4G 3M antenna extension cable 1PC 5 2 4G wireless camera 1PC 7 Hexagon wrench 2PCS 3mm 4mm ...

Отзывы: