background image

128-6528

8 of 28

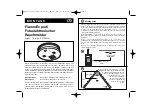
White w/ Black Trace Wire: (+) Siren Output
This is the positive siren feed wire.  Route this wire through a grommet in the firewall to the siren
location.  Connect the White w/ Black Trace wire to the Red wire of the Siren.  Secure the Black wire
of the Siren to a known chassis ground or solid clean metal surface.

Siren Wiring Detail

8

SIREN

l

BLACK

(-) TO VEHICLE'S CHASSIS GROUND

TO WHITE w/BLACK WIRE OF MODULE

RED

l

Purple Wire: (+) Door Trigger Input
If the vehicle's door courtesy light sw 12 volts when the door is opened, (Some Fords and some
Imports), you must connect this wire to the positive output from one of the vehicle's door pin switches.  In
most cases, the Purple wire will need to be connected to only one door switch no matter how many doors
the vehicle has as most door lighting circuits are wired in parallel.  This wire will be shunted when remote
starting the vehicle and will remain shunted, if active, while running under command of the remote start.  If
this wire is active when the system is armed, the siren will emit three chirps.  When the zone clears, the
siren will emit 1 chirp to confirm full arming. See below for wiring details.
Note for vehicles with interior delay lighting see programming under title "Completing The Installation".

Positive Door Switch Wiring Detail

Dark Green Wire: (-) Instant Trigger Input
This is the instant on ground trigger input wire.  This wire must be connected to the hood and trunk pin
switches previously installed.
NOTE: This wire will be shunted when remote control channel 3 is accessed, (trunk release).  This wire
will remain shunted all the while there is ground present and for 5 seconds after the ground is removed.
This allows the operator to open the trunk via the remote transmitter without having to first disarm the
alarm system.   See below for wiring detail.

Hood Pin Switch Detail

Содержание PRO-9800

Страница 1: ...seconds turn ignition Off Short chirp then long chirp First Then turn the ignition back On 1 chirp 1 second door locks Press transmitter Lock button to change 2 chirps 3 5 second door locks Press tran...

Страница 2: ...128 6528 2 of 28 THIS PAGE INTENTIONALLY LEFT BLANK 2...

Страница 3: ...er for the type of ignition system used in your particular vehicle Regardless of the vehicle Gasoline or Diesel for every installation the vehicle MUST HAVE a Tach Signal Input Auto matic Transmission...

Страница 4: ...he belt line dashboard of the vehicle for best reception Special considerations must be made for windshield glass as some newer vehicles utilize a metallic shielded window glass that will inhibit or r...

Страница 5: ...ge IMPORTANT DO NOT PLUG THE SIX PIN MAIN POWER HARNESS OR THE MULTI PIN INPUT OUTPUT HARNESS INTO THE CONTROL MODULE UNTIL ALL CONNECTIONS TO THE VEHICLE HAVE BEEN MADE AFTER SELECTING YOUR TARGET WI...

Страница 6: ...e between the starter inhibit relay when used and the neutral safety switch as shown in the following diagram Failure to connect this wire to the ignition switch side of the of the neutral safety swit...

Страница 7: ...d parking lights connect this wire to a fused 12 volt source Max 15 Amps NOTE If the vehicle s parking lights are ground switched connect this wire to chassis ground White Wire Parking Light Flasher O...

Страница 8: ...in parallel This wire will be shunted when remote starting the vehicle and will remain shunted if active while running under command of the remote start If this wire is active when the system is arme...

Страница 9: ...30 85 to a fused 12 volt battery source rated for a minimum of 25 Amp Connect terminal 87 to the third ignition wire in the vehicle C GM VATS Key Override If the vehicle has the General Motors VATS sy...

Страница 10: ...ontrol Module whenever it is grounded also trigger for the alarm when armed Connect the Grey w Black trace wire to the hood pin switch previously installed This wire must be routed through a grommet i...

Страница 11: ...te Black wire of the relay See below for detail of wiring also see Yellow Start wire detail for connection to vehicle considerations Brown w Black Trace Wire Positive Inhibit Input Plus Trigger When A...

Страница 12: ...d source or to a solid clean metal part of the chassis Be certain to remove any paint or grease and secure this wire with a self tapping screw and ring terminal Chassis Ground Connection Detail Brown...

Страница 13: ...race wire is provided to beep the vehicle s horn This is a transistorized low current output and should only be connected to the low current ground output from the vehicle s horn switch If the vehicle...

Страница 14: ...the starter output until this wire drops the 12 volts In other words in a Diesel vehicle with glow plug preheat circuit when the ignition is turned on the vehicle will not crank until the glow plugs...

Страница 15: ...twin lead wires loaded in the two pin blue connector are the ground supply and program valet override input of the Remote Start unit When the Grey wire is grounded under certain conditions the unit wi...

Страница 16: ...door unlock motor wire and cut it at a convenient location to allow wiring of an optional relay Connect the door side of the cut wire to terminal 30 of the optional relay added Connect the vehicle sid...

Страница 17: ...30 of the optional relay added Connect the vehicle side of the cut wire to terminal 87a of the optional relay added Connect the red wire of the 3 pin harness to terminal 86 of the optional relay adde...

Страница 18: ...smitter button 1 being programmed for channel 1 and transmitter button 2 being programmed for channel 2 Refer to pages 1 and 2 for alarm selectable features RF Programmable Features Feature Selection...

Страница 19: ...the vehicle temperature reaches 0 and then will run the allotted time REMOTE START SELECTABLE FEATURES Feature LtsFlash 1X Lts Flash 2X Lts Flash 3X Lts Flash 4X Default LED Pattern 1 RF Start Chirp...

Страница 20: ...d then repeat the tach learn routine Diagnostics Enter selectable feature 7 and turn on as described above NOTE Diagnostic mode is a temporary mode Once you have accessed the diagnostic mode the unit...

Страница 21: ...low the vehicle operator to prevent operation of the Remote Start Unit regardless of the RF transmitter operation To test the integrity of the manual shut down enable circuit 1 Place the control switc...

Страница 22: ...ear selector is in any position other than park or neutral the mechanical function will not allow the key to be turned to the start position or be removed from the ignition cylinder This configuration...

Страница 23: ...tor as it is in contrast to the normal operation of a vehicle utilizing an electrical neutral start switch and is inconsistent with the operators manual Additional information concerning Key In Sensor...

Страница 24: ...SAFETY TEST shown in this manual To connect to the key in sensor as shown in method 1 A Locate the control wire that connects the drivers door pin switch to the key in sensor switch B Cut this wire an...

Страница 25: ...er handle cover over the handle of the control switch for ease of identification This will allow your customer to distinguish the Remote Start control switch from the program switch 2 Mount the contro...

Страница 26: ...128 6528 26 of 28 26...

Страница 27: ...128 6528 27 of 28 THIS PAGE INTENTIONALLY LEFT BLANK...

Страница 28: ...128 6528 28 of 28 2003 Audiovox Electronics Corp Hauppauge NY 11788 128 6528 999 audiovox com For Custom er Service Visit O ur W ebsite At Product Inform ation Photos FA Q s O wner s M anuals...

Отзывы: