
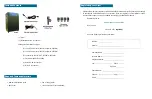


Set the System Pressure:
With compressor running -
• Pull the Capacity Control Valve knob out.
• Adjust knob until the reading on the
pressure gauge is
50 PSI
.
• Push knob in to lock.
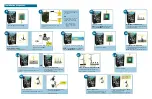
12
9
• Connect the included Power Cord to the
dryer.
• Plug the Power Cord into a 1
125 VAC outlet for P550W /
WLP models
OR
• Wire the Power Cord to a 20
253 VAC, 1 Phase outlet for
P552W / WH / WLP models:
• Line – Black (Brown)
• Neutral – White (Blue)
• Ground – Green (Green/
Yellow)
• Let dryer run until Humidity
2%.
NOTE
: Press the
RESET
butt
goes into
SHUTDOWN
due t
13
For SINGLE Outlet Dryers ONLY:
• Connect a 3/8” air supply line to the Outlet
Port.
For 4-Port Outlet Dryers ONLY:
• Connect up to four (4) 3/8” air supply lines
to the Outlet Ports.
• Open Outlet Ports as required.
16
OR
Set the Static Pressure:
• Pull the Static Pressure Regulator knob out.
• Adjust knob until the reading on the
pressure gauge is
17 PSI
.
• Push knob in to lock.
19
Installation Steps cont.
• Verify that the dryer is powered
OFF
.
8
• Power the dryer
ON
.
NOTE
: Press the
RESET
button if the dryer
goes into
SHUTDOWN
due to Humidity.
10
For P550WH and P552WH ONLY:
• Open the
fi
rst Outlet Port slightly to create a
small amout of air
fl
ow.
11
110 -
WH /
08 -
:
• Power the dryer
OFF
.
14
y drops below
ton if the dryer
to Humidity.
For SINGLE Outlet Dryers ONLY:
• Remove the Precision Bleed Ori
fi
ce
fi
tting
from the Outlet Port.
NOTE
: Save ori
fi
ce for low
fl
ow applications.
15
NOTE - For all Dryers with minimal FLOW
:
Install the included Precision Bleed Ori
fi
ce
fi
tting to maintain a constant air
fl
ow
17
• Power the dryer
ON
.
18
20
Set the Outlet Pressure:
• Pull the Outlet Pressure Regulator knob out
(or loosen the retaining nut – LP Models).
• Adjust knob until Outlet Pressure (
OUTP
)
reading is at desired setting.
• Push knob in to lock.
(or tighten the retaining nut – LP Models).


