background image

PureFlow AirDog® 

AirDog® II DF-100, DF-165, & DF-200                                                          2001-2010 Duramax Diesel 
Section 9                                                                                                   Fuel Filter and Water Separator 

21 


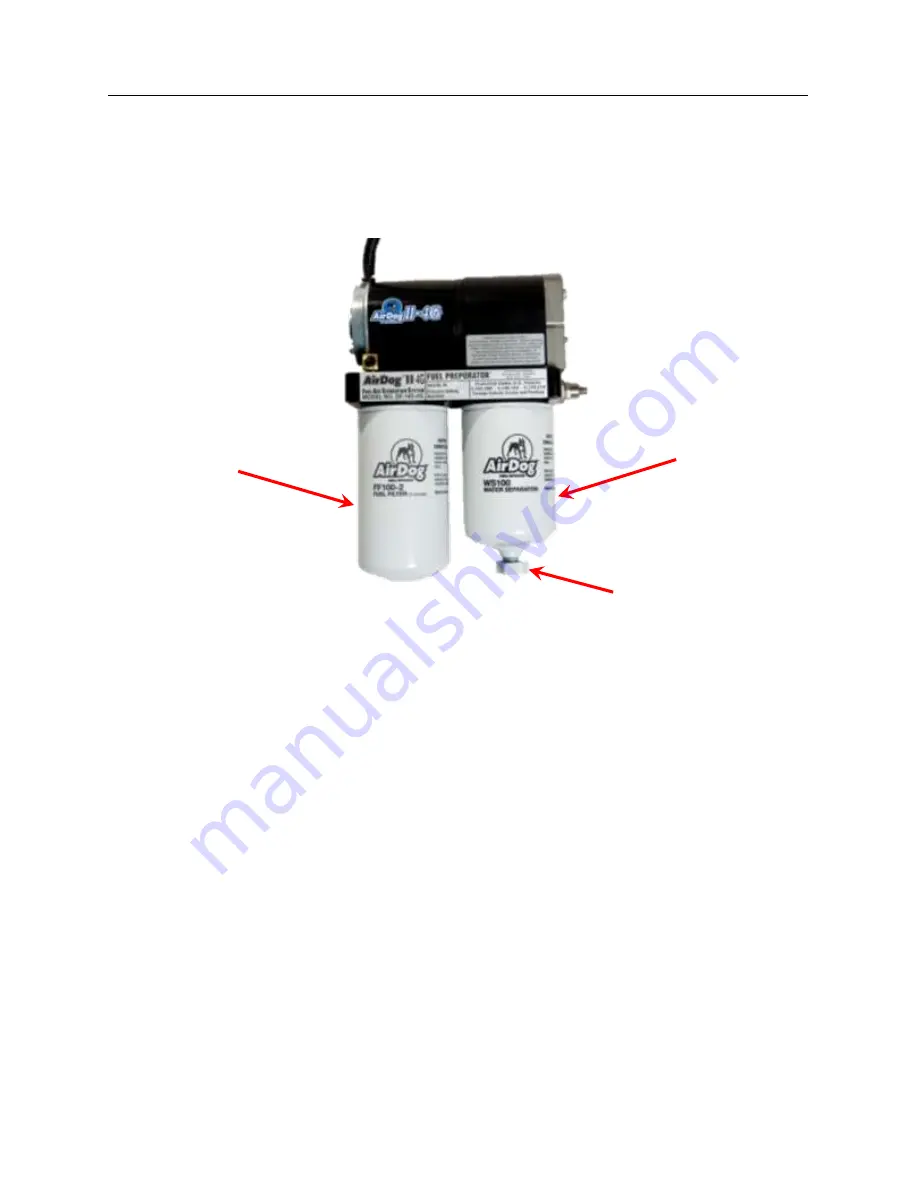
AirDog® 

WATER 

SEPARATOR 

AirDog® 

2 MICRON  

FUEL FILTER 

WATER DRAIN 

VALVE 

FILTER SERVICE RECOMMENDATIONS 


Plugging of either the fuel filter or the water separator itself will cause low fuel pressure and 
low flow to the engine.  If a low fuel pressure issue exists, replace the fuel filter. Typical fuel 
filter life is 15-20k miles depending on fuel quality. 


The Water Separator 


Replace the water separator every other time you change the Fuel Filter or if it becomes 
damaged or plugged.  It is suggested to check/drain the water separator every three months or 
as needed should you experience excessive ‘water in fuel’ conditions. When installing the water 
separator, be sure to clean the underside of the AirDog® base. Follow the instructions printed 
on the pre-filter for proper tightening procedures. 


CAUTION:

 Be extremely careful to prevent any contaminates or debris from entering the pre-

filter when removing it for cleaning! Large debris will jam the Gerotor and cause the fuse to 
blow. This is not a warranty item. Should this happen, you can easily put the system back into 
working order. See the instructions on “How to clean the Gerotor” for proper procedures. 

The Fuel Filter 


Remove the fuel filter by turning it counter clockwise. 

DO NOT

 pre-fill the fuel filter with fuel. 

The AirDog® will fill the filter and prime the system automatically. Follow the instructions on 
the filter for proper tightening procedures. 


CAUTION: 

Dispose of waste fuel and used filters properly 


Содержание AirDog II DF-100

Страница 1: ...2001 2010 Duramax Diesel PROTECTED BY CANADIAN PATENT US PATENTS AUSTRALIAN PATENT 2 108 391 5 355 860 5 746 184 6 729 310 2005101054 NEW ZEALAND PATENT 532356 Additional Foreign Patents Pending in E...

Страница 2: ...PureFlow AirDog AirDog II DF 100 DF 165 DF 200 2001 2010 Duramax Diesel 2 SMALL and COMPACT 7 Long X 3 2 Wide X 10 Tall...

Страница 3: ...is adjustible for fine tuning the system for performance upgrades WARNING RUNNING THE PUMP ABOVE 75PSI FOR THE 100 AND 165 AND ABOVE 30PSI FOR THE 200 WILL DECREASE THE LIFE OF THE PUMP SIGNIFICANTLY...

Страница 4: ...J2044 Quick Connect System The SAE J2044 quick connect system is the most commonly used system in the automotive industry The images below show the formation of SAE J2044 connection To connect the ass...

Страница 5: ...Fittings Brackets and Mounting Fuel Lines Section 5 Fuel Line Assembly Section 6A Supply Line to Engine Section 6B Return Line to Tank Section 6C Suction Line from Tank ELECTRICAL HARNESS Section 7 Wi...

Страница 6: ...for technical assistance 5 When installing the AirDog fuel lines be sure to keep the ORIGINAL ENGINE RETURN LINE connected as it is from the factory SAFETY GUIDELINES CAUTION Please be sure to chock t...

Страница 7: ...C 1 Frame Bracket Set 010 3C 0002 010 3C 0001 1 Wiring Harness 5E 2 010 1 Bundle of Plastic Ties 5H 2 1 06 12 1 Spacer 010 3C 0003 A P 1 20ft of Hose HS20 5 1 2 Straight Hose Quick Connect End FQC12S...

Страница 8: ...PureFlow AirDog AirDog II DF 100 DF 165 DF 200 2001 2010 Duramax Diesel 8 ILLUSTRATION OF QUICK CONNECT COMPONENTS...

Страница 9: ...g II 4G filter base as illustrated in figures 1 2 and 3 Using a 3 4 deep socket torque the fittings to 120in lb or 10ft lb DO NOT overtighten the fittings or damage may occur 4 2 Dip the threaded end...

Страница 10: ...n and a 1 2 wrench The bracket assembly should look like figure 7 4 4 Attach the AirDog II 4G to the frame bracket assembly as shown in figure 8 using the supplied hardware in the mounting bracket har...

Страница 11: ...rame between the AirDog bracket assembly and the backing plate figure 9 using the 3 8 bolts lock washers and nuts included in the kit You will need two 9 16 wrenches Properly torque all fastners BE SU...

Страница 12: ...r oil Figure 11 and press it into the fuel line HS20 until all three barbs are covered Figures 12 and 13 The fuel line end should look like Figure 15 5 2 Now plug that fuel line with that fitting into...

Страница 13: ...uction tube quick connect fitting 6A 1 Remove the factory fuel supply line from the fuel tank suction tube Place the 1 2 fuel line disconnect tool around the fuel line and press into the Quick Connect...

Страница 14: ...hind the fuel cooler in the previous step A click will be heard once properly connected 6A 4 Run the fuel line along the frame as mentioned in step 5 3 to the Engine port in the AirDog Cut the fuel li...

Страница 15: ...ou will need to only cut the outer rubber hose then slide the plastic tube inside the return fill tube supplied in the kit then clamp the rubber fill tube onto the adapter as shown in figure 22 6B 3 A...

Страница 16: ...led Fuel In A click will be heard once properly connected 6C 2 It may be necessary to remove or bend the metal fuel tank shield Figure 23 to gain access to the fuel tank suction line connection 6C 3 A...

Страница 17: ...cidental contact The light kit is sold separately and is not included in this kit Secure the Relay and Fuse Holder to the Vehicle 7 1 Secure the relay and fuse holder to the vehicle Be sure to rout th...
Страница 18: ...Be sure to install the fuse that is removed back into the fuse tap we supply once installed into the fuse box the fuse tap should have both fuse spots filled TBC Batt Ign 1 or 2 Acc and HVAC are commo...

Страница 19: ...sitive post of the driver s side battery Connect the Black lead to the Negative post of the same battery 7 4 Route the wiring harness to the AirDog and connect the 2 pin Deutsch connector to the corre...

Страница 20: ...HECKING FOR EXCESSIVE PUMP NOISE NOTE Each AirDog II has been manufactured in a Quality Controlled process and wet tested for operation and performance before shipment This is a smooth running system...

Страница 21: ...ou experience excessive water in fuel conditions When installing the water separator be sure to clean the underside of the AirDog base Follow the instructions printed on the pre filter for proper tigh...

Страница 22: ...mage the Gerotor CLEANING DEBRIS CHECKING FOR DAMAGE IN TO THE GEROTOR ASSEMBLY STEP 4 Remove the O rings and clean inspect the inside of the Gerotor pocket STEP 5 Reinstall the center gear STEP 6 Ali...

Страница 23: ...DAMAGE TO THE INJECTION SYSTEM INSPECTING THE REGULATOR SEALS AND CHANGING THE REGULATOR SPRINGS Step 1 Remove the regulator by turning the Adjustment Screw counter clockwise using a 3 4 wrench Step...

Страница 24: ...as been made NOTE It is not necessary to pre fill the fuel filter CAUTION DO NOT OVER TIGHTEN OVER TIGHTENING CAN DISTORT THREADS OR DAMAGE THE FILTER SEAL 3 To prime the filter turn the ignition swit...

Страница 25: ...n no event shall the SELLER be liable for any special incidental indirect or consequential damages of any kind or nature whether or not the BUYER of the PRODUCT was advised of the possibility of damag...

Страница 26: ...in the event the phone call is accidentally disconnected and then transfer the customer to a PureFlow AirDog Customer Service Representative Should a Customer Service Representative not be available...

Отзывы: