6
CustomerServic
e
@
GQBrands.c
om
GQBrands.c
om
1-866-498-5269
PASO 3:
A. Retire la T
uerca
y el Tornill
o del
Trampolín de 15FT en el lado der
echo de
la Pa
ta
en forma de U.
No retir
e todos l
os Tuer
cas y t
ornillos al
mismo tiempo, sólo ajus
te
1 set para
mantener la fuerza del Mar
co
en todo
momento.
NOT
A:
Asegúrese de guar
dar las piezas retir
adas
guardadas o en un lugar segur
o lejos de la
co
lchonet
a mientras c
onstruy
e el recint
o.
B. Con la ayuda de otro adult
o, sostenga
el poste
compl
eto del r
ecinto alineando
ambos agujeros cuadr
ados para
comenzar la ins
talación.
NOT
A:
Po
ste Curv
ado Del Recinto debe hac
er
frent
e al centr
o del trampolín.
C. Una vez alineado, T
ornillo en el pos
te
compl
etado a la pierna. Siga las
instruc
ciones en la página siguiente
(página 10) para que el pedido y
las partes c
orrect
as se peguen
corr
ectament
e
D. Continúe haciendo esto
en todas las
patas en f
orma de U una por una hasta
que haya ins
talado t
odos los 6 pos
tes del
armario firmemente.
INSTRUCCIONES DE
MONTAJE
6
CustomerService
@
GQBrands.com
GQBrands.com
1-866-498-5269
ASSEMBLY INSTRUCTIONS
STEP 3
:
A. Remove the Nut and Screw from 15FT
Enclosure Trampoline on the right side
of the U-Shaped Leg.
Do not remove all nuts and bolts at the
same time, only 1 set a time to keep the
strength of the Frame at all times.
NOTE:
Make sure to keep removed parts stored
or in a safe place away from the mat while
building the Enclosure.
B. With the help of another adult, hold the
completed enclosure pole by aligning
both square holes to begin installation.
NOTE:
Curved Enclosure Pole must face the center
of the trampoline.
C. Once aligned, screw in the completed
pole to the leg. Follow the directions on
the next page (Page 10) for the order and
right parts to attach properly
D. Continue to do this on all U Shaped Legs
one by one until you ave installed all 6
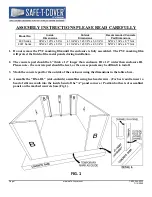
Enclosure poles tightly.


