Turntable Installation
A. Never place the glass tray upside down. The glass
tray should never be restricted.
B. Both glass tray and turntable ring assembly must
always be used during cooking.
C. All food and containers of food are always placed
on the glass tray for cooking.
D. If glass tray or turntable ring assembly cracks or
breaks, contact your nearest authorized service
center.
Countertop Installation
Remove all packing material and accessories. Examine the oven for any damage such
as dents or broken door. Do not install if oven is damaged.
Cabinet: Remove any protective film found on the microwave oven cabinet surface.
Do not remove the light brown Mica cover that is attached to the oven cavity to protect
the magnetron.
Installation
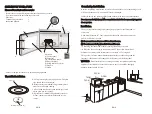
1.Select a level surface that provides enough open space for the intake and/or
outlet vents.
A minimum clearance of 7.5cm is required between the oven and any adjacent
walls. One side must be open.
(1) Leave a minimum clearance of 30cm above the oven.
(2) Do not remove the legs from the bottom of the oven.
(3) Blocking the intake and/or outlet openings can damage the oven.
(4) Place the oven as far away from radios and TV as possible. Operation of
Microwave oven may cause interference to your radio or TV reception.
2.Plug your oven into a standard household outlet. Be sure the voltage and the
frequency is the same as the voltage and the frequency on the rating label.
Do not install oven over a range cook top or other heat-producing
WARNING:
appliance. If installed near or over a heat source, the oven could be damaged
and the warranty would be void.
7.5CM
30CM
OPEN
7.5CM
EN-8
EN-9
Shut off oven power if the door is opened during operation
SETTING UP YOUR OVEN
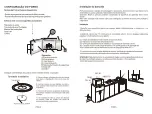
Names of Oven Parts and Accessories
Remove the oven and all materials from the carton and oven cavity.
Your oven comes with the following accessories:
Glass tray
Turntable ring assembly
Instruction Manual
1
1
1
Glass tray
Turntable ring assembly
A
C
D
E
Operation.
A) Control panel
B) Glass tray
C)Observation window
D) Door assembly
E) Safety interlock system
F) Stop Pin
G)Frame
F
B
G
F
Содержание PK-MA320
Страница 2: ...520mmX430mmX290mm 220V 50Hz PK MA320 900W...
Страница 3: ......
Страница 4: ......
Страница 5: ...7 5CM 30CM 7 5CM A C D E F B G F...
Страница 7: ...255 340 340 100 250 250 120 90...


