


27
Rev 2.0 6/21
Assigning an IP Address
By default, the camera has the IP address “192.168.100.88”. You have several methods to change this IP address to
match your network scheme. Please see the instructions below for your preferred setup.
DHCP
If your network supports DHCP, you can have it automatically assign an IP using one of the methods below.
●
IR Remote
– Press
[*]
>
[#]
>
[4]
to enable DHCP
●
Upgrade Tool v2.7/v2.8
– Select DHCP from Config the tab
Static Address
If you want to give your camera a more permanent IP address, assign the camera a static IP address. You have two (2)
options to assign this address.
1. Upgrade Tool v2.7/v2.8
– Assign a static IP address from the Config tab
2. IR Remote
– Press
[#]
>
[*]
>
[#]
> [number 0~9] to set the camera’s IP address to 192.168.100.8(number 0~9)
For more information on using the Upgrade tool, please see Using the Upgrade Tool below.
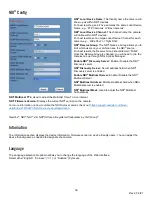
Using the Upgrade Tool
You can use the Upgrade Tool to assign a dynamic IP address, static IP address, firmware upgrade the camera, backup
core files, and lastly; restore core files. Please follow the instructions below for best use.
Search Tab
Use the Search Tab to find your camera on your network. The “Interface” drop down allows your to select which network
to search. After selecting the proper network type, click the “Search” button to begin your search.
Once you find the camera you wish to adjust, right click the corresponding IP address to reveal the control menu. From
here, select the corresponding tab for the way you want to adjust your camera.
Содержание PT12X-NDI-GY-G2
Страница 11: ...10 Rev 2 0 6 21 Dimensional Drawings mm ...
Страница 35: ...34 Rev 2 0 6 21 Network ...


