background image


37 


Rev 1.2 7/15 


Enter your new IP information as required and click the “Set” button.    Note: In order to view or control the camera, the PC 

must be able to see this IP address, either by virtue of being in the same subnet or by appropriate routing settings in a rou ter 

or network switch that connects these networks.


NOTE

Camera’s Factory Default IP Address and Login:   

IP: 192.168.100.88 

User name: admin 

Password: admin 


2


Accessing the IP Camera: 

2.1


Input 

http://

[your IP address]

, (where 

[your IP address]

 is the IP address set for the camera) into the URL line of your 

browser. Results may be better with IE web browser; others may cause latency or fail to show a live image. 

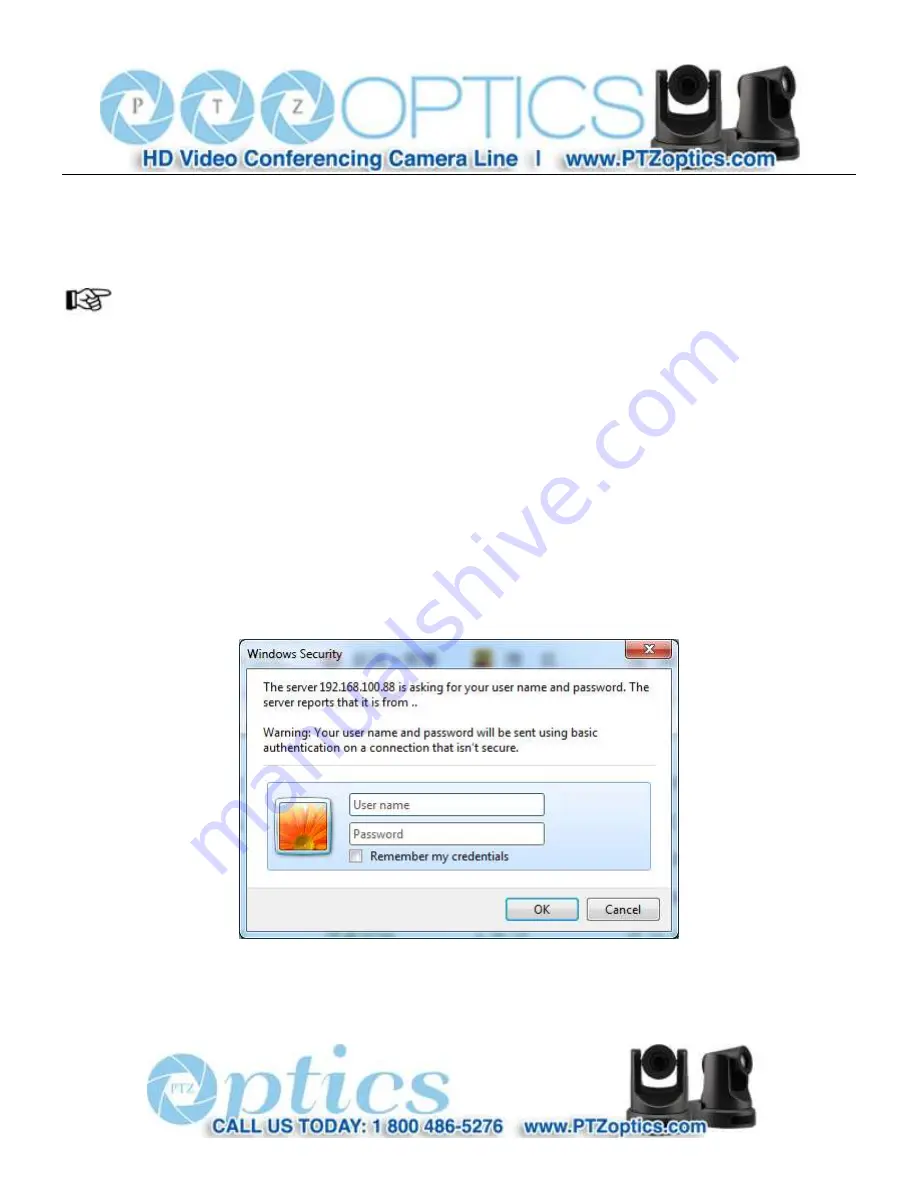
A login window will pop up, as shown below: 


2.2


Input the User name and the Password and click "OK" to enter the web interface.


Содержание 12x-SDI

Страница 1: ...PTZ Optics 12x SDI User Manual V1 2 English...

Страница 2: ...ove the cover Removal of the cover may result in an electric shock In case of abnormal operation contact the manufacturer Never operate outside of the specified operating temperature range humidity or...

Страница 3: ...4 Features 4 5 Product Specifications 5 6 Main Unit 7 7 IR Remote Controller Explanation 8 8 Using the IR Remote Controller 10 9 RS 232 Interface 13 10 Serial Communication Control Command Listings 1...

Страница 4: ...maximum current supply of 2A Polarity of the power supply plug is critical and is as follows Handling Avoid any stress vibration or moisture during transportation storage installation and operation Do...

Страница 5: ...2 Rev 1 2 7 15 Quick Start Step 1 Please check that all connections are correct before powering on the camera...

Страница 6: ...the camera off VIDEO SYSTEM 0 8 1 9 2 1080i60 A 3 1080i50 B 4 720p60 C 5 720p50 D 576i 6 1080p30 E 480i 7 1080p25 F Step 4 Press the Switch ON button on the rear of the camera the power lamp will ill...

Страница 7: ...t frame rate of 60 fps frames per second 5 Includes a Tamron high quality super telephoto lens supporting 20x optical zoom and 16x digital zoom 6 The high SNR signal to noise ratio of the CMOS sensor...

Страница 8: ...l Noise Reduction Video S N 55dB Horizontal Angle of View 6 9 tele to 72 5 wide Vertical Angle of View 3 9 tele to 44 8 wide Horizontal Pan Range 170 Vertical Tilt Range Up 90 Down 30 Pan Speed Range...

Страница 9: ...m Protocols VISCA Pelco D Pelco P Power Connector JEITA type DC IN 12V Input Voltage 12VDC 10 8 13 0V DC Current Consumption 2 0A Max Operating Temperature 23 F to 104 F 5 c to 40 c Storage Temperatur...

Страница 10: ...ng and control 2 CVBS composite video SD Interface 8 HDMI 1 3 Digital Video Output 3 System select dial resolution 9 HD SDI Serial Digital Video Output 4 RS485 jack 10 USB 2 0 Maintenance Only 5 RS232...

Страница 11: ...ng numeric key preset position Clear preset Erase a preset position CLEAR PRESET Numeric button 0 9 Erases a corresponding numeric key preset Or CLEAR PRESET Erases all of the presets simultaneously 4...

Страница 12: ...nd tilting of the lens Press HOME button to face the camera back to front 9 Menu Setting Menu button Press this button to enter or exit the OSD menu 10 Zoom Buttons Zoom Zoom In on subject for narrowe...

Страница 13: ...ired do it in sequence not simultaneously For example F1 means press first and then press and then press F1 1 Pan Tilt Control Tilt up Press Tilt down Press Pan left Press Pan right Press Face the cam...

Страница 14: ...ht Switch BLC ON OFF Press this button to enable the backlight compensation Press it again to disable the backlight compensation Note Backlight is only effective in full auto exposure mode 5 Presets S...

Страница 15: ...ton corresponding to the camera with the IR address that you want to operate This allows for up to 4 cameras to be operated via the same IR remote in the same room 8 Camera IR Address Set Press 3 butt...

Страница 16: ...3 TXD 4 GND 4 DTR 5 RXD 5 GND 6 GND 6 DSR 7 IR OUT 7 RTS 8 NC 8 CTS 9 RI For Control Daisy Chain 1st Camera 2nd Camera Mini DIN 1 DTR 1 DTR 2 DSR 2 DSR 3 TXD 3 TXD 4 GND 4 GND 5 RXD 5 RXD 6 GND 6 GND...

Страница 17: ...85 Half duplex mode with support for VISCA Pelco D or Pelco P protocol The parameters of RS485 are as follows Baud rate 2400 4800 or 9600 bps Start bit 1 bit Data bit 8 bits Stop bit 1 bit Parity bit...

Страница 18: ...0 60 03 FF Indicates that two sockets are already being used executing two commands and the command could not be accepted when received Command Canceled z0 6y 04 FF y Socket No Returned when a command...

Страница 19: ...ear Standard 8x 01 04 08 03 FF Far Variable 8x 01 04 08 2p FF p 0 low 7 high Near Variable 8x 01 04 08 3p FF Direct 8x 01 04 48 0p 0q 0r 0s FF pqrs Focus Position Auto Focus 8x 01 04 38 02 FF AF On Of...

Страница 20: ...1 04 0B 00 FF Iris Setting Up 8x 01 04 0B 02 FF Down 8x 01 04 0B 03 FF Direct 8x 01 04 4B 00 00 0p 0q FF pq Iris Position CAM_Gain Reset 8x 01 04 0C 00 FF Gain Setting Up 8x 01 04 0C 02 FF Down 8x 01...

Страница 21: ...n CAM_PictureEffect Off 8x 01 04 63 00 FF Picture Effect Setting B W 8x 01 04 63 04 FF CAM_Memory Reset 8x 01 04 3F 00 pp FF pp Memory Number 0 to 127 Set 8x 01 04 3F 01 pp FF Recall 8x 01 04 3F 02 pp...

Страница 22: ...AFSensitivity High 8x 01 04 58 01 FF AF Sensitivity High Normal Low Normal 8x 01 04 58 02 FF Low 8x 01 04 58 03 FF CAM_SettingReset Reset 8x 01 04 A0 10 FF Reset Factory Setting CAM_Brightness Direct...

Страница 23: ...20 Rev 1 2 7 15 CAM_ColorHue Direct 8x 01 04 4F 00 00 00 0p FF p Color Hue setting 0h 14 degrees to Eh 14 degrees...

Страница 24: ...0 50 05 FF Manual CAM_RGainInq 8x 09 04 43 FF y0 50 00 00 0p 0q FF pq R Gain CAM_BGainInq 8x 09 04 44 FF y0 50 00 00 0p 0q FF pq B Gain CAM_AEModeInq 8x 09 04 39 FF y0 50 00 FF Full Auto y0 50 03 FF M...

Страница 25: ...09 04 3F FF y0 50 0p FF p Memory number last operated SYS_MenuModeInq 8x 09 06 06 FF y0 50 02 FF On y0 50 03 FF Off CAM_LR_ReverseInq 8x 09 04 61 FF y0 50 02 FF On y0 50 03 FF Off CAM_PictureFlipInq 8...

Страница 26: ...w 0z 0z 0z 0z FF wwww Pan Position zzzz Tilt Position CAM_TypeInq 8x 09 00 03 FF y0 50 01 FF C Type y0 50 02 FF M Type y0 50 03 FF S Type CAM_DateInq 8x 09 00 04 FF y0 50 0r ss uu uu vv ww 0D FF Versi...

Страница 27: ...0h 14 degrees to Eh 14 degrees CAM_AWBSensitivit yInq 8x 09 04 A9 FF y0 50 00 FF High y0 50 01 FF Normal y0 50 02 FF Low Block Inquiry Command List Command Command packed Inquiry Packet Comments CAM_...

Страница 28: ...n 0 Off r bit3 0 Picture Effect Mode CAM_EnlargementBl ockInq 8x 09 7E 7E 03 FF y0 50 00 00 00 00 00 00 00 0p 0q rr 0s 0t 0u FF p AF sensitivity q bit0 Picture flip 1 On 0 Off rr bit6 3 Color Gain 0h...

Страница 29: ...M Set Preset 0xFF Address 0x00 0x03 0x00 Preset ID SUM Clear Preset 0xFF Address 0x00 0x05 0x00 Preset ID SUM Call Preset 0xFF Address 0x00 0x07 0x00 Preset ID SUM Auto Focus 0xFF Address 0x00 0x2B 0x...

Страница 30: ...t Preset 0xA0 Address 0x00 0x03 0x00 Preset ID 0xAF XOR Clear Preset 0xA0 Address 0x00 0x05 0x00 Preset ID 0xAF XOR Call Preset 0xA0 Address 0x00 0x07 0x00 Preset ID 0xAF XOR Auto Focus 0xA0 Address 0...

Страница 31: ...compensation mode Optional items On Off Effective only in Auto mode ExpComp Exposure compensation value Optional items 7 7 Effective only when ExpCompMode is On Backlight Set the backlight compensatio...

Страница 32: ...or One Push ok Manual RG Red gain Optional items 0 255 Effective only in Manual mode BG Blue gain Optional items 0 255 Effective only in Manual mode RG Tuning Red gain fine tuning Optional items 10 10...

Страница 33: ...SpeedByZoom The depth of field scale switch Optional items On Off AF Zone Auto focusing area Optional items Top Center Bottom AF Sense Automatic focusing sensitivity options Optional items Low Normal...

Страница 34: ...ess Decided according to the argument AUTO VISCA Optional items 1 7 P_D_Address PELCO D address Optional items 0 254 P_P_Address PELCO P address Optional items 0 31 V_AddrFix Lock IR Address from chan...

Страница 35: ...the following figure Restore Reset all settings to factory default settings Optional items Yes No Note Press HOME button to confirm All parameters are then restored to default values including IR Remo...

Страница 36: ...AT6 patch cable or directly to your PC via a CAT5 or CAT6 crossover cable 2 Turn on camera power 3 If successful the orange network light will illuminate and the green light will start flashing If uns...

Страница 37: ...34 Rev 1 2 7 15 Picture 1 1 Direct connections via cross over network cable Picture 1 2 Connections to LAN via patch cable to LAN wall jack or LAN switch...

Страница 38: ...downloads web site Run upgrade exe Click the Search tab Click the Search Button The software will show the camera s IP address subnet mask network gateway and the camera s MAC address as shown below I...

Страница 39: ...36 Rev 1 2 7 15...

Страница 40: ...ects these networks NOTE Camera s Factory Default IP Address and Login IP 192 168 100 88 User name admin Password admin 2 Accessing the IP Camera 2 1 Input http your IP address where your IP address i...

Страница 41: ...the free VLC player software Please go to http www videolan org vlc Click the download VLC button If a download window appears click Save Then install the VLC player software by executing the file fr...

Страница 42: ...r camera 2 2 Setup your network router for port forwarding so that incoming requests to the Host Domain Name are forwarded to your camera VLC stream media player monitoring 1 VLC media player procedur...

Страница 43: ...sp Your Ip Address your port number desired stream number 1 for Main stream or 2 for sub stream For example you would type rtsp 192 168 100 88 554 1 Note When the RTSP port number is the default value...

Страница 44: ...sed upon video resolution the higher the resolution is the bigger the playing area is Double click the viewing window and it will show in full screen Double click again and it will return to the initi...

Страница 45: ...4 PTZ Speeds Tilt speed can be set at any rate between 1 24 Pan speed can be set at any rate between 1 20 Zoom and Focus speeds can be set at any rate between 0 7 5 PTZ Presets After manually setting...

Страница 46: ...change the language of the menu 1 Media 1 1 Video Setup Click Video The streaming parameters may now be set in the right side area The camera can send 2 simultaneous streams For example one in HD and...

Страница 47: ...50HZ PAL and 60HZ NTSC and Dial Priority see rotary dial on camera formats 60Hz is used for North America Video Coding Support both baseline and mainprofile formats for H 264 video encoding Baseline i...

Страница 48: ...key frame interval Affects the quality of the video compression This setting defines how many predicted frames will be used for each actual frame from 2 150 Shorter intervals increase video quality at...

Страница 49: ...e box on the right shows the corresponding numerical value The Default setting is 43 Saturation Color Saturation 0 100 Use the slider control The box on the right shows the corresponding numerical val...

Страница 50: ...box on the right shows the corresponding numerical value The Default setting is 0 Flip Mirror Check the Flip box to invert the image vertically for a ceiling mount Check the Mirror box to invert the i...

Страница 51: ...the Cancel button to leave settings unchanged 1 4 System Settings Click System The system parameters may now be set in the right side area 1 Initialize Work Mode RTSP Real Time Streaming Protocol is t...

Страница 52: ...device can be set here The Default the IP address of the camera is 192 168 100 88 The MAC address can be modified but should be left as set by the factory Please note that after changing the IP settin...

Страница 53: ...RTSP streaming protocol The default port 554 PTZ Port Supports camera control via the TCP protocol The default port 5678 Apply and Cancel Buttons After modifying the parameters press the Apply button...

Страница 54: ...an internal UDP server The default port number is 1259 When client and server set up a UDP connection the client sends PTZ command to the internal server and the server will then parse and execute the...

Страница 55: ...YYYY Pan Position ZZZZ Tilt Position Down 8x 01 06 01 VV WW 03 02 FF Left 8x 01 06 01 VV WW 01 03 FF Right 8x 01 06 01 VV WW 02 03 FF Upleft 8x 01 06 01 VV WW 01 01 FF Upright 8x 01 06 01 VV WW 02 01...

Страница 56: ...cgi ptzcmd action pan speed tilt speed Parameter Descriptions Camera IP camera IP address action including up down left right ptzstop pan speed 1 low speed 24 high speed tilt speed 1 low speed 20 high...

Страница 57: ...7 high speed Wide Variable 81 01 04 07 3P FF Focus Stop 81 01 04 08 00 FF Far Standard 81 01 04 08 02 FF Near Standard 81 01 04 08 03 FF Far Variable 81 01 04 08 2P FF P 0 low speed 7 high speed Near...

Страница 58: ...tzctrl cgi ptzcmd action zoom speed Camera IP This camera s IP address action including zoomin zoomout zoomstop zoom speed 0 low speed 7 high speed Focus Control URLformat as below http Camera IP cgi...

Страница 59: ...56 Rev 1 2 7 15...

Страница 60: ...K POWER lamp is lit 2 Check whether the camera can self test after startup camera will do a brief pan tilt tour and return to the home positon or if preset 0 is set the camera will return to the prese...

Страница 61: ...e camera to address 1 Press Camera Select 1 on the remote to control the camera 3 Try removing other sources of IR interference e g sunlight fluorescent lighting Serial communication does not control...

Страница 62: ...ht belongs to PTZ Optics may not be cloned copied or translated in any way without the explicit permission of the company Product specifications and information referred to in this document are for re...

Отзывы: