TECHNICAL
SPECIFICATION
INPUT
Voltage Range
100Vac 240Vac
-
Frequency Range
50 60Hz
/
Input Power
ord
C
NEMA 5 15
3 Prong Power Cord
-
/ -
Intput Ground Reference
Earth Grounded
OUTPUT
-
ON
AC
Output Voltage
12Vdc
Nominal
(
)
Continuous Power Capacity
3A 36WATT
(
)
OUTPUT
-
ON
BATTERY
Output Voltage
12Vdc
Nominal
(
)
Continuous Power Capacity
3A 36WATT
(
)
BATTERY
Battery
Type
Lithium lon Battery Pack
Design Life
10 15Years
-
Battery
Capacity
14 8V 5200mAh
.
/
Typical Recharge Time
<
12
hrs
Replaceable Pack
Yes
SURGE
PROTECTION
AND
FILTERING
Lightning Surge Protection
/
Yes IEC 61000 4 5 2005 LEVEL D
(
- -
)
MANAGEMENT
Battery Auto Charge
-
Yes
Remote Battery Alarming
Optional
Local Alarming Audible Visual
(
/
)
Yes
Alarm
Silence
24
Hour
Silence
Yes
Disable
Indefinitely
Yes
ONT Reset
Yes
Cold
Start
Yes
PHYSICAL
Maximum Dimensions
×W×D
(
L
)
155mm×89mm×31mm
Weight lb
( .)
1 76lb
with battery pack
.
(
)
ENVIRONMENT
Operating Temperature
-
10
℃ -
49
℃(
14
℉ -
120
.
2
℉)
at
full
power
Operating
Humidity
0
-
95
%
noncondensing
within
enclosure
Max Operating Elevaion
10
000ft 3 000m
,
( ,
)
Storage Temperature
-
30
℃ -
65
℃(-
22
℉ -
149
℉)
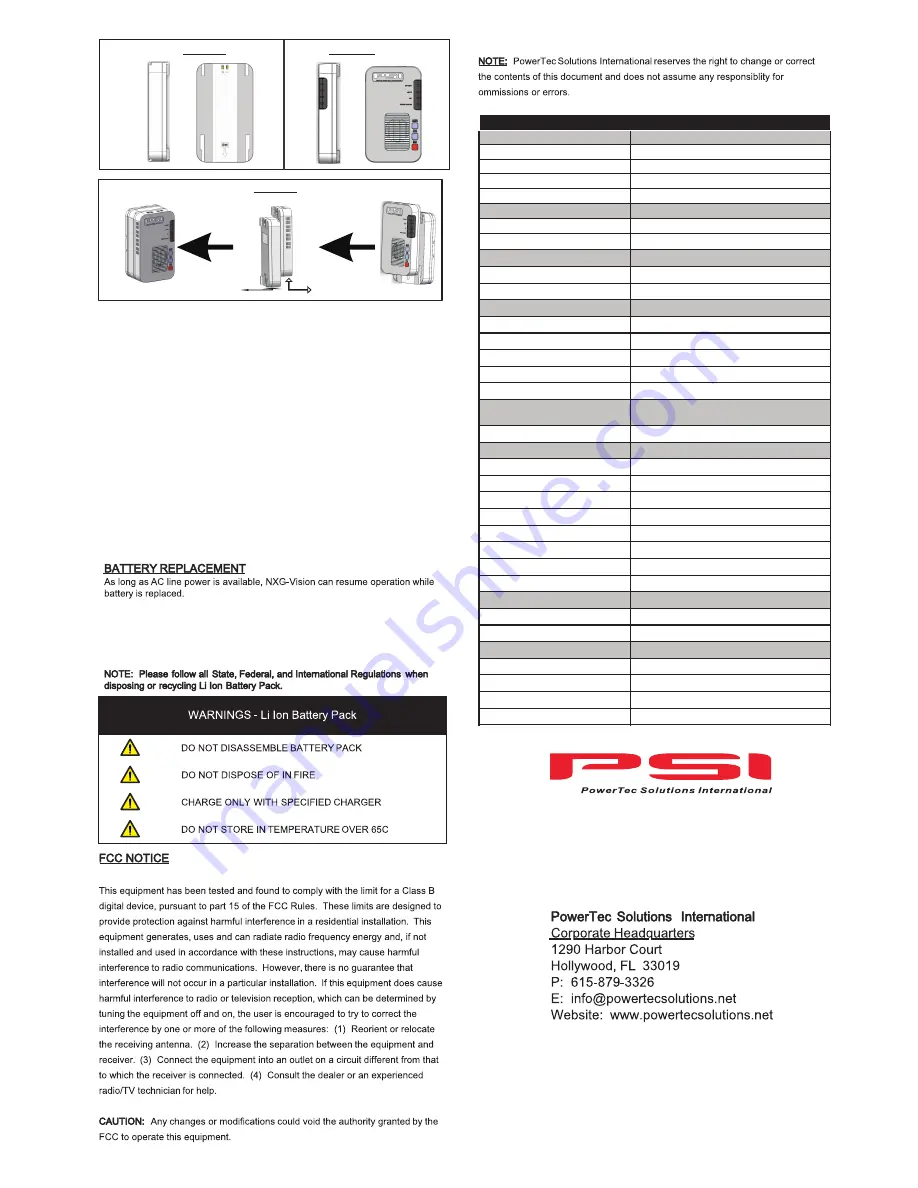
FIGURE
2
FIGURE 3
FIGURE
1
FIGURE
1
FIGURE
2
PROCEDURE:
Remove the NXG-Vision Battery Pack by sliding off in opposite direction
of installation(FIGURE 3) and follow "Installation Step A." above for
installing new NXG-Vision Battery Pack.
INSTALLATION
A.Slide NXG-Vision Battery Pack (FIGURE 1) onto NXG-Vision Power Supply/
Charger (FIGURE 2) until NXG-Vision Battery Pack becomes fully flush with
NXG-Vision Power Supply/Charger. You should hear a "click" when NXG-Vision
Battery Pack is fully seated.
B.Connect provided AC Power Cord to AC Input Connector on bottom of
NXG- Vision Power Supply/Charger.
C.Connect 3 Prong AC Power Cord Plug End into standard 3 Prong AC Receptacle
rated for NEMA 5-15 3 Prong AC Plug.
D.Verify "System Status" LED is "On" with Green illumination.
E.Connect NXG-Vision to ONT (Optical Network Terminal).
F.Ensure "System Status" LED is the only illuminated LED on NXG-Vision.
If any additional LEDs are illuminated recheck NXG-Vision Battery Pack to make
sure it is fully seated and ensure that all wiring from NXG-Vision to ONT is installed
correctly as listed by ONT specific instructions.


