background image


46 

1. Installing AA Batteries 

The device operates on two AA batteries. You can use alkaline, NiMH or lithium batteries. Use NiMH of 
lithium batteries for best results. 

1.


Turn the D-ring counter clockwise and pull up to remove the cover. 

2.


Insert the batteries, observing polarity. 

3.


Replace the battery cover and turn the D-ring clockwise. 

4.


Hold 


5.


Select 

Setup->System->Battery Type


6.


Select 

Alkaline, Lithium 

or

 Rechargeable NiMH


2. Device settings 

1.


Hold 


2.


After the device is on, it begins acquiring satellite signals. The device may need a clear view of the 

sky to acquire satellite signals.  

3.


You can check current position and accuracy in 

Satellite Page 

4.


For better precision you can enable 

GPS+GLONASS

 mode in 

Setup->System 

->Satellite System->GPS+GLONASS

 and turn 

WAAS/EGNOS


On

5.


Make sure that 

USB Mode

 is set to 

Mass Storage

 (Setup->System->USB Mode) 

For more information please check Garmin eTrex manual. 


10.B.   First Time Installation of the GPS Module 


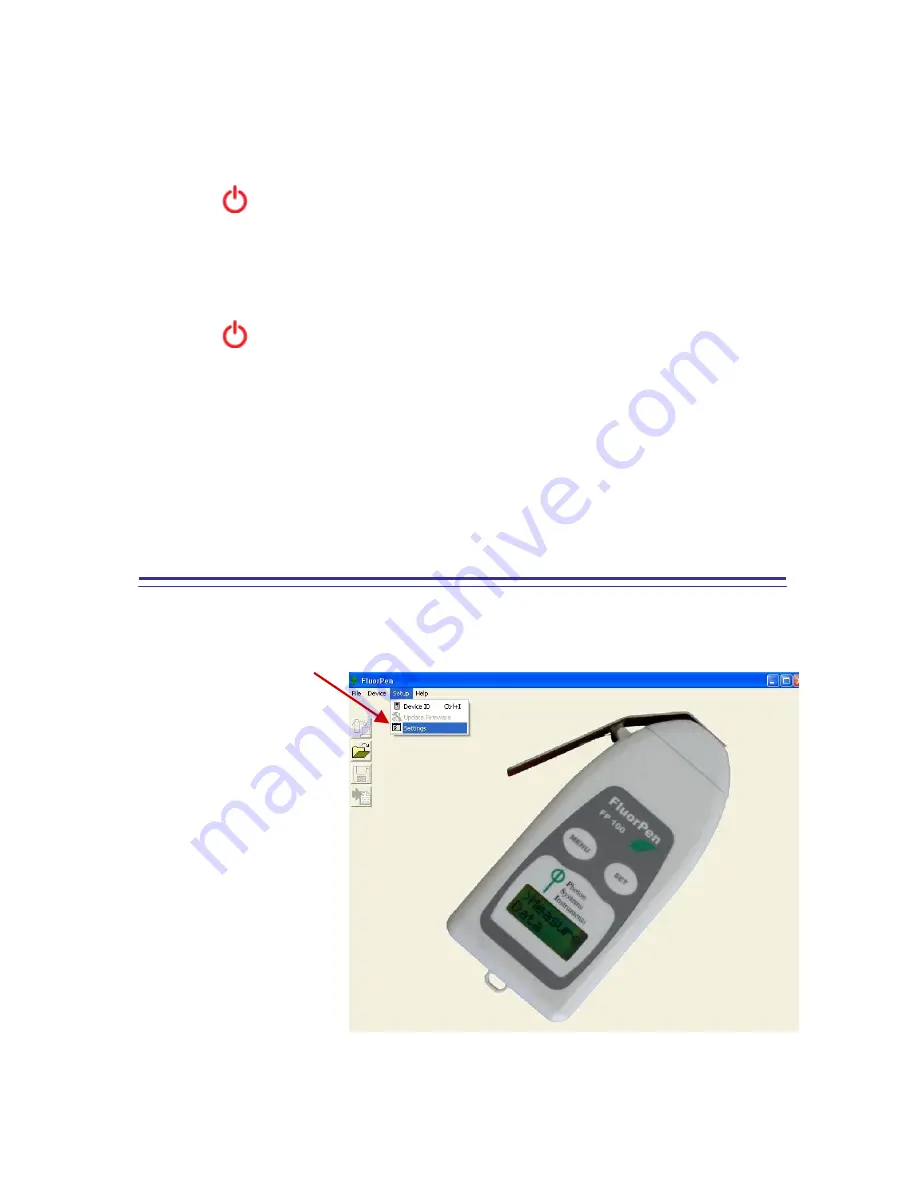
Step 1:


Enabling GPS Module in the FluorPen Software 


Select:

 Setup>Settings 


Содержание FluorPen FP 100

Страница 1: ...io on n M Ma an nu ua al l For FluorPen FP 100 FluorPen FP 100 MAX PAR FluorPen FP 100 MAX LM FluorPen FP 100 B FluorPen FP 100 U FluorPen or PAR FluorPen with detachable leafclips PSI Photon Systems...

Страница 2: ...ing 26 8 A General Information 26 8 B USB Pairing 26 9 FluorPen Software 27 9 A Starting up 27 9 B Menu and Icon Explanation 28 9 C Example of Data Transfer and Visualization 30 9 D Explanation of OJI...

Страница 3: ...compatible Memory Capacity Up to 4 Mb Internal Data Logging Up to 100 000 data points Display 2 x 8 characters LC display Keypad Sealed 2 key tactile response Keypad Escape Time Turns off after 3 minu...

Страница 4: ...of Microsoft Corporation The Bluetoothmodule BlueNiceCom III is endowed with a declaration of conformity with the following norms EN 300 328 V1 6 1 2004 11 EN 301 489 1 3 V1 5 1 2003 12 EN 50371 Decem...

Страница 5: ...values of 20 measurements Measured data are sequentially stored in the internal FluorPen or PAR FluorPen memory Data transfer to a PC is via USB or Bluetooth communication Comprehensive FluorPen 1 0...

Страница 6: ...ght Curve and Photosynthetically Active Radiation PAR in the range from 400 to 700 nm Adapted for use with detachable leaf clips leaf clips sold separately FluorPen measures the following parameters F...

Страница 7: ...s serve to describe adaptation of Quantum Yield to six or five different light levels see more in Chapter 8 F of this Manual PAR Photosynthetically Active Radiation Photosynthetically Active Radiation...

Страница 8: ...communication only Bluetooth Communication Module FluorPen FP 100 B or FP 100 MAX only USB Communication Module FluorPen FP 100 U or FP 100 MAX only Other Accessories or Optional Features according to...

Страница 9: ...Only in the PAR FluorPen FP 100 MAX LM Only in the FluorPen FP 100 MAX W supplied with a special open window leaf clip Leaf clip Menu key Set key Optical window Textile strap holder Light Meter Sensor...

Страница 10: ...m dirt or moisture The damaged or dirty pad can be easily removed by tearing it off from the surface To affix a new one just remove the sheeting and stick the pad on cleaned and dried surface Be sure...

Страница 11: ...luorPen FP 100 MAX D and PAR FluorPen FP 100 MAX LM D Sample holder is a clip for gentle fixing of a leaf sample and its short duration dark adaptation D version of the PAR FluorPen with detachable le...

Страница 12: ...e yellow color represents the first level Sub Menus and their Options The green color represents the second level Sub Menus and their Options Full line arrows are used for the SET key Dashed line arro...

Страница 13: ...13...

Страница 14: ...14...

Страница 15: ...15...

Страница 16: ...16...

Страница 17: ...17...

Страница 18: ...18...

Страница 19: ...19...

Страница 20: ...h card Make sure that the PC s Bluetooth setting is discoverable meaning that it shows up when other devices search for nearby Bluetooth connections Consult the user guide for your PC or Bluetooth car...

Страница 21: ...n mind that the FluorPen turns off automatically after about 3 minutes of no action Turning off the FluorPen always turns off Bluetooth Step 2 Starting the Bluetooth Application on Your PC Be aware th...

Страница 22: ...that the FluorPen is in discoverable mode see Step 1 Step 4 Searching for a New Bluetooth Device Mark the following box My device is set up and ready to be found Select Next Step 5 Selecting the Fluo...

Страница 23: ...3 Step 6 Starting the Pairing Process Your Bluetooth Pairing Passkey is 0000 Select Let me choose my own passkey Enter 0000 four digits Select Next Step 7 Completing the FluorPen Pairing Select Finish...

Страница 24: ...e FluorPen press and hold the SET key Scroll to the Setting menu press the MENU key twice then press the SET key once Select BT_On to enable Bluetooth press the SET key Keep in mind that the FluorPen...

Страница 25: ...her when the Bluetooth feature has been turned off in one or both of the devices or when the units move outside their operating range If the devices have been turned off simply turn them on and enable...

Страница 26: ...ave these components 1 USB enabled FluorPen FluorPen FP 100 MAX and FluorPen FP 100 U include connector for communication by USB cable 2 USB cable 8 B USB Pairing Connect the USB cable to a computer a...

Страница 27: ...e either USB or Bluetooth For USB connection you need to have the USB driver installed in your PC You find the driver on the installation disk USB driver folder If you check the Device Manager in Wind...

Страница 28: ...the FluorPen memory Online Control Settings sound and time Attach GPS File Used for download data from GPS module Menu Setup Device ID Detects the Bluetooth connected device Update Firmware Used for s...

Страница 29: ...gle If the box is checked all measured data are visualized in one graph i e the value of each new measurement is added to the currently used graph window If the box is not checked a new graph is opene...

Страница 30: ...id an OJIP measurement Step 2 Click the Download icon or select Device Download Step 3 The Data table appears File name Time of experiment Measured parameter Experiment description Switch to graphic v...

Страница 31: ...ocol Measuring by protocol export all protocols at once OJIP NPQ LC Selected only exports only one measurement that is selected by mouse otherwise it will export everything Source data exports raw dat...

Страница 32: ...32...

Страница 33: ...dV dt 0 M0 TR0 RC ET0 RC 4 F300 F0 FM F0 Area Area between fluorescence curve and FM background subtracted Fix Area Area below the fluorescence curve between F40 s and F1s background subtracted SM SM...

Страница 34: ...34 Example of OJIP protocol...

Страница 35: ...the duration of the light exposure and the dark recovery phase in the number and interval between pulses See table below Phase Duration of pulses 1st pulse Pulse interval NPQ1 Light 60s 5 7s 12s Dark...

Страница 36: ...36...

Страница 37: ...37 Example of NPQ1 protocol Example of NPQ2 protocol...

Страница 38: ...in number and duration of individual light phases and light intensities of phases Phase duration Light intensities mol m 2 s 1 LC1 6 60s 10 20 50 100 300 500 LC2 5 30s 100 200 300 500 1000 LC3 7 60s...

Страница 39: ...39...

Страница 40: ...40...

Страница 41: ...41 Example of LC1 protocol Example of LC2 protocol...

Страница 42: ...42 Example of LC3 protocol...

Страница 43: ...ased during the software update Before starting any software update export all your data from the FluorPen memory into your computer Step 1 Starting Update Select Setup Update Firmware Step 2 Selectin...

Страница 44: ...44 Step 3 Finishing Upload Select OK to start uploading of the update The bottom bar indicates the upload progress Press OK to finish upload...

Страница 45: ...ule might be connected to the device IMPORTANT INFORMATION For proper GPS reading the time in your FluorPen and in your computer must be synchronized Pre set time and time zone must correspond to GPS...

Страница 46: ...rgeable NiMH 2 Device settings 1 Hold 2 After the device is on it begins acquiring satellite signals The device may need a clear view of the sky to acquire satellite signals 3 You can check current po...

Страница 47: ...luorPen time with the time of your PC Time must be set correctly witch respect to your time zone Step 2 GPS Positioning Switch the GPS module on and wait until the GPS position is fixed GPS green LED...

Страница 48: ...dule and set your computer to FluorPen communication enable Bluetooth or connect to serial or USB port Step 2 Downloading FluorPen Data Start FluorPen program Connect FluorPen device Download Measured...

Страница 49: ...C Communication is set properly if the hardware is recognized by your PC Step 4 Downloading GPS Data Select Device Attach GPS file to download data from the GPS module Step 5 Completing the Download S...

Страница 50: ...de on site repair charges such as labor travel or other expenses associated with the repair or installation of replacement parts at the customer s site PSI repairs or replaces faulty instruments as qu...

Отзывы: