background image

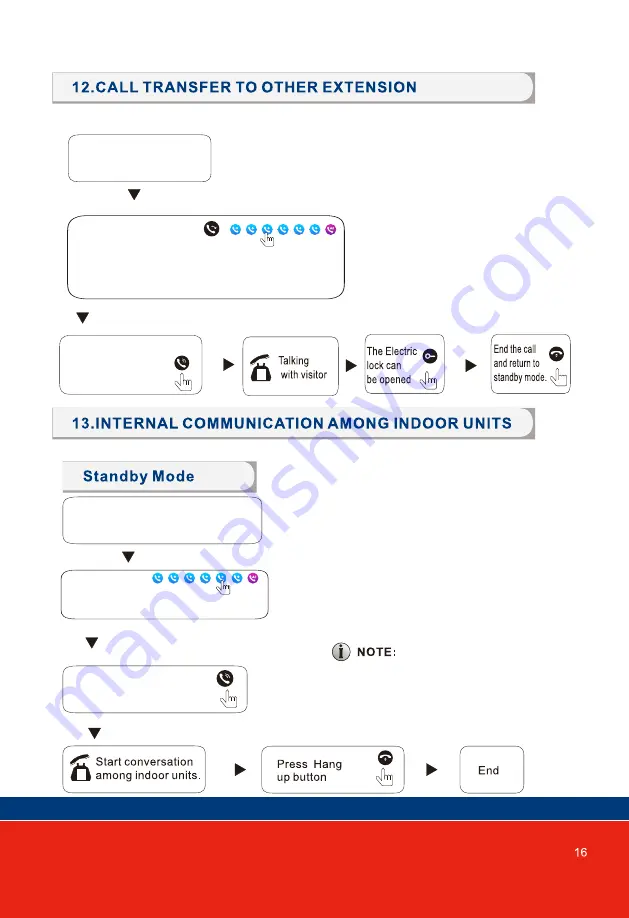
Internal communication function requires at least two indoor and one Door Station to be connected.

At least 2 indoor units are required.

The selected monitor 
will ring

Press the Answer button of 
the receiving monitor to 
accept the incoming call

Door Station calls indoor 
monitor and conversation 
is underway

Press the Answer button 
of the receiving 
monitor to accept 
the incoming call

Press Transfer Call 
button to see choice 
of extensions to transfer the call to.
Note: The selected extension must be online 
and connected correctly for a successful transfer.

The selected monitor will ring

Tap the monitor to enter the Main

Menu page. Tap the Intercom icon

to see a list of monitors.

While on an internal call, the volume & screen
settings cannot be adjusted.

Tap to select a 
Monitor to call. The number 
corresponds to the Monitor DeviceID.

Содержание panacom PAN930SKHD

Страница 1: ...PAN930SKHD ...

Страница 2: ......

Страница 3: ...Motion Detection ...

Страница 4: ...indoor monitor Picture memory when MicroSD card fi ed MicroSD card not supplied Digital Photo Frame Displays photos from MicroSD Card IP 65 surface Door Sta on Support 128GB TF MicroSD card for pictures or video recording Mo on picture recording when MicroSD card installed MicroSD card not supplied ...

Страница 5: ...48mm 17 5mm 133mm 3 DOOR STATION SPECIFICATION Power source Front of surface mount camera PAN931SCHD ...

Страница 6: ...4 INSTALLATION OF DOOR STATION to Door Station specification for regulator location ...

Страница 7: ...Displays visitor s image monitor settings Transmits voice to outdoor camera MicroSD card slot Microphone TFT display Insert an MicroSD card for recording for use with Digital Photo Frame media playback ...

Страница 8: ...pixels Specifications External 12VDC 100 240VAC plugpack Max 1200mA Analog call half duplex Supports 6 indoor units 2 Door Stations and 2 CCTV cameras Additional Features 0 50 2GB 128GB class 10TF card Micro SD Note read write speed Class10 Surface mount 4 channel motion detection CVBS CVI TVI AHD 1080P Unlocking Monitoring Internal intercom Transfer Call History Playing Clock Leave message Backgro...

Страница 9: ...e of 30cm or more from AC power to avoid electrical interference Avoid installation of the device near strong radiation source eg TV DVR Pcs etc Do not drop shake or knock the device to avoid damage to its components ...

Страница 10: ...nce The electric lock is not included in the package Use 12VDC electric strike only Do not exceed 500mA Panacom Cable Requirements 1 CAT5e or CAT6 network cable connection mode CAT5e or CAT6 Cable distance 50 meters BLK BRN BLU RED BRN WHT BLU WHT GRN WHT ORG WHT WHT YEL GRN ORG ...

Страница 11: ......

Страница 12: ......

Страница 13: ......

Страница 14: ... which setting is selected The recording time is 120 seconds or until button is pressed The monitor will then return to Standby mode There is an alarm input for each of the two camera channels Each alarm input can be configured to accept either a Normally Closed NC or Normally Open NO alarm inputs or be turned OFF A NO alarm input will trigger an alarm event when the ALM GND cables are shorted toge...

Страница 15: ...g ON To unlock the lock while on a call press button 1 The conversation will automatically end 20seconds after an Unlock command is sent 2 While ringing a call can be cancelled by pressing and holding the door bell button for 5 seconds 3 The monitor with the installed MicroSD Card will record the entire call Ensure its Record Mode is set to Video 4 The user can manually take a snapshot while talki...

Страница 16: ... button to end monitoring or talking and return to Standby mode 1 If a device eg Camera2 is selected for monitoring but there is no attached device no Image will be displayed 2 If you are using two indoor units both can simultaneously monitor the same door station The same image will be displayed on both monitors 3 If a call button is pressed while a monitor is in Monitoring mode the monitor will ...

Страница 17: ...he Answer button of the receiving monitor to accept the incoming call Press Transfer Call button to see choice of extensions to transfer the call to Note The selected extension must be online and connected correctly for a successful transfer The selected monitor will ring Tap the monitor to enter the Main Menu page Tap the Intercom icon to see a list of monitors While on an internal call the volum...

Страница 18: ... active for the device eg Door1 if its Motion Detection turned ON Movement on other devices is ignored 2 If more than one Motion Detection channel is active the first device to detect motion will be displayed first Motion detected on other devices will wait for the first device to finish its motion detection period before they can be serviced in turn 3 If the Master Monitor is installed with a suitabl...

Страница 19: ...N in System setting and the Digital Photo Frame mode is turned OFF 4 If there are unread messages Call History records or motion detection or alarm records the number of unread messages will appear against its icon in the Standby screen 5 In Clock Mode the user can tap a shortcut key to directly view the messages The Digital Photo Frame if turned ON will start automatically on return to Standby Mo...

Страница 20: ...on or Standby icon After entering this page you will see 6 icons The first five are other extensions except the local device Tap on a numbered icon to call an extension Or tap the All icon to call all indoor units If All is selected then all Monitors will ring However only one Monitor can answer the call and start a conversation 15 2 1 Intercom Intercom Event Setting Silent Monitor Lock Media Standb...

Страница 21: ...he display will be black when it returns to Standby Mode from the Main Menu Page Keytone indicates whether there is a button sound when operating the indoor unit Motion detection preview If turned ON a detected image is displayed on the indoor monitor when motion detection is triggered If the preview is turned OFF no image is displayed but the background recording still runs Ringback indicates tha...

Страница 22: ...ensibility Indicates the sensitivity of motion detection Including low medium and high low indicates that the motion detection is difficult to trigger medium indicates that the motion detection is easier to trigger and high indicates that the motion detection is easy to trigger Motion detection duration The recording time of motion detection can be set to 1 5 minutes and the default is 1 minute Mess...

Страница 23: ...gether If the signal system is set to Auto the signal type is not selectable and is fixed to the Auto signal type Signal mode It is divided into three modes Auto PAL and NTSC When set toAuto the indoor monitor will automatically detect the video signal type of the Door Station Ring time When a Door Station calls the Indoor Monitor the ringing period is 5 to 45 seconds The default period is 30s Ring...

Страница 24: ...two recording modes Record video and Snapshot Record means that when an alarm is triggered the indoor monitor with the MicroSD card automatically starts recording until the alarm ends or the user presses button to stop manually Capture is when the alarm is triggered the indoor monitor with the MicroSD card automatically captures the photo of the camera The user can also manually press button to ca...

Страница 25: ... with MicroSD Card user to load the picture files into the USER Photo folder of the MicroSD Card Only for models with MicroSD card slot Digital photo frame time Indicates how long each picture is shown when the Digital Photo Frame Mode is active Background music Indicates whether the Background music is played while in Standby mode An MicroSD Card must be inserted with MP3 music files in the USER Mu...

Страница 26: ...roSD Card Formatting SD On selection the user will be prompted to confirm whether to format the MicroSD Card Tap Yes to format the MicroSD Card WARNING All information on the MicroSD Card will be deleted If successful the messages Format successful MicroSD insert successful will be displayed If no MicroSD card is inserted a No MicroSD card error message is displayed Factory reset On selection the u...

Страница 27: ...ttons playback mode play progress and volume 1 Select the Playback mode The mode changes with every tap on the icon 2 Tap on the Volume icon to show the Volume slider Adjust the volume by dragging the slider up or down The volume range is 0 10 and the default volume is 7 3 During playback drag the progress bar cursor to fast forward or rewind 15 4 1 Music ...

Страница 28: ... Drag the progress bar indicator to fast forward or rewind 2 Tap on the Volume icon to show the Volume slider Adjust the volume by dragging the slider up or down The volume range is 0 10 and the default volume is 7 1 Save the video in the USER Movie directory of the MicroSD card 2 If a visitor presses the doorbell or an alarm triggers during playback the playback will stop and the monitor will swi...

Страница 29: ...ach picture will be displayed for the same duration as the Digital Photo Frame mode 2 Tap the middle of the screen to display playback controls Press once to pause the play and then press once or play the previous or next picture and press the icon to return to the picture list 3 Place your photo files JPG format into the USER Photo folder on the MicorSD card These JPG files will be automatically de...

Страница 30: ...e four folders in this folder namely ALARM folder CALL folder MD folder MSG folder CALL folder Stores the call history of the indoor unit and the Door Station MD folder Stores the motion detection record of Door Station MSG folder Stores the message record of the indoor unit All the records of the above four folders can be seen in the Event menu BgMusic folder Store background music files for indoo...

Страница 31: ...cally captured snapshots or recorded video when an alarm is triggered by a camera 2 Manually captured snapshots or recorded video when an alarm is triggered by a camera 3 Note After selecting the record long press will display the open delete delete all and close In the record list click the previous or next page to turn the page 1 At home mode normal working mode 2 Away The visitor enters the mes...

Страница 32: ...an be set from 0 to 10 the default is 07 Brightness The value can be set from 0 to 50 default value is 25 Contrast The value can be set from 0 to 50 the default is 25 Saturation The value can be set from 0 to 50 the default is 25 ...

Страница 33: ......

Страница 34: ......

Отзывы: