background image


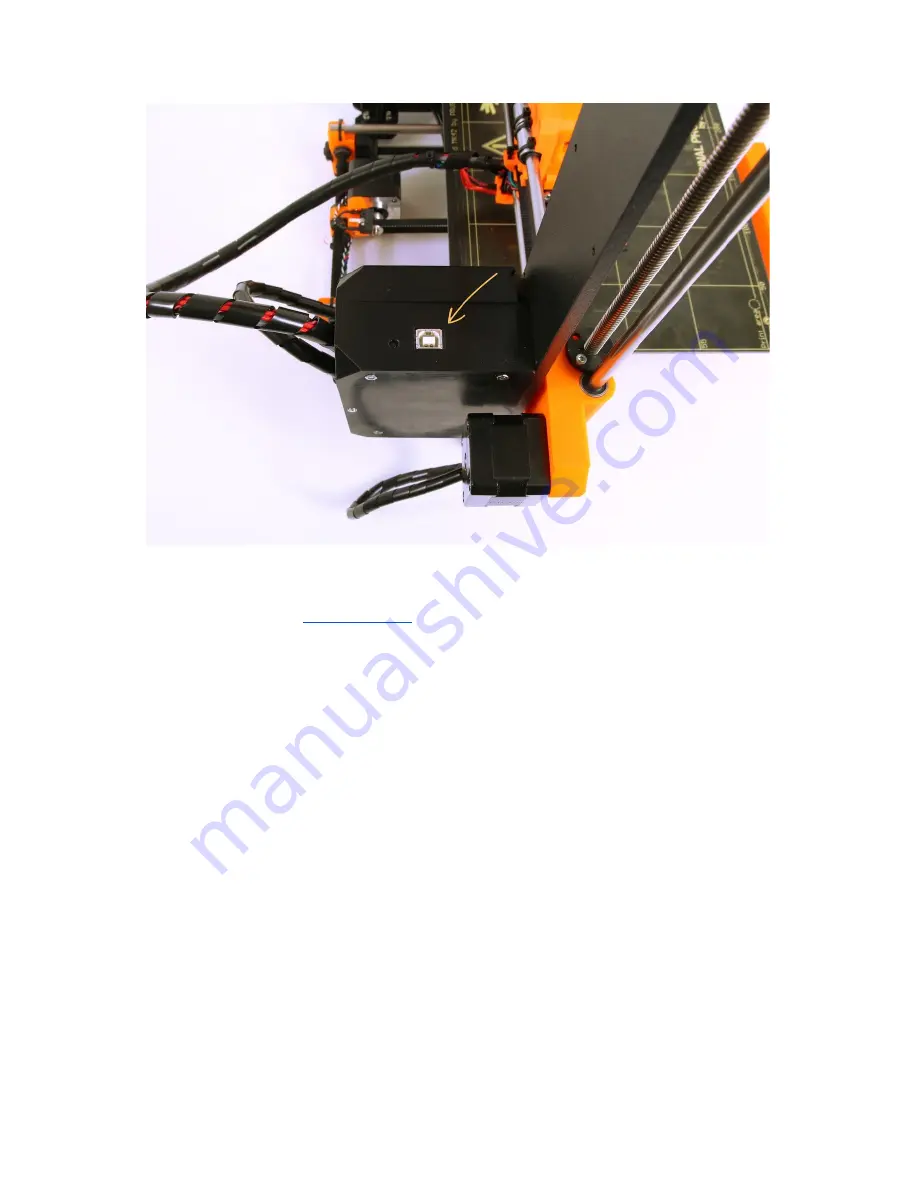
Pict. 16 ­ You can find USB port here  


● Choose connection port in Pronterface (download available with the 

printer

 drivers, 

see the chapter 

8 Printer drivers

): Mac users use 

/usbmodem

 port, PC Windows 

ports are COM1, COM2, etc.; the correct port is displayed in device manager, Linux 
users 

connect

 the 

printer

 using the virtual serial port. When the 

printer

 is connected 

click the 

Connect


button. Right column shows the connection information.  

● Next step is 

loading

 the 

model

 with 

Load


model


button and choosing the 

model_name.gcode 

(no special symbols in file name). 

● You can control the movement of all 

printer

 axes at the control area.  

● Next you can 

preheat

 the 

printer

 and prepare it for the 

printing

. Set the temperatures 

for the 

nozzle

 (heater) and 

heatbed

 (bed) and click 

Set 

button. Printer starts 

heating 

immediately. 

Always check that the temperatures set in Pronterface are correct 

according to our material guide! 

● You can check the actual temperatures of 

nozzle

 and bed in Pronterface. 

● When 

model

 is loaded right column shows the 

estimated


print

 duration: 

Estimated 

duration (pessimistic) 


Содержание Original Prusa i3 MK2

Страница 1: ......

Страница 2: ... PRINT 1 Read the safety instructions carefully page 7 2 Place the printer on a flat and stable surface page 11 3 Download and install the drivers page 31 4 Calibrate the printer by following our calibration flow page 11 5 Insert SD into the printer and print your first model page 24 Handbook version 1 04 from August 8 2016 Prusa Research s r o ...

Страница 3: ...a i3 the third iteration of the original 3D printer It is constantly updated with the latest innovations and you ve just purchased its latest version In addition to printer hardware upgrades the main goal is to make the technology more accessible and understandable for all users Josef Prusa also organizes workshops for the public participates in professional conferences dedicated to the populariza...

Страница 4: ...XYZ error messages and resolution kit only 15 6 3 5 1 Y axis alignment kit only 18 6 3 6 Calibrate Z 18 6 3 7 Mesh bed levelling 19 6 3 8 Loading the filament into the extruder 20 6 3 8 1 Unloading the filament 21 6 3 9 First layer calibration kit only 21 6 3 9 1 Bed level correction kit only 22 6 3 10 Finetuning the first layer 22 6 3 10 1 Print prusa logo 22 6 3 10 2 Check probe height kit only ...

Страница 5: ...g 41 11 4 Replacing changing the nozzle 41 11 5 Axis fluency 42 11 5 Printing problems 43 11 5 1 Layers break and split when printing from ABS material 43 11 5 2 Models contain either too much or not enough of the filament 43 11 6 Problems with finished models 43 11 6 1 Model breaks and or is easily damaged 43 12 FAQ common issues when assembling the printer kit 44 12 1 Nozzle print surface gap is...

Страница 6: ... Please check the http prusa3d com drivers page for updated version of this 3D printing hanbook PDF download In case of any printer related problem do not hesitate to contact us at info prusa3d com We are glad to receive all your valuable comments and tips We strongly suggest you to visit our official forum at forum prusa3d com where you can find solutions to common issues tips advice and hints in...

Страница 7: ...damage Make sure that the power cord is not mechanically or otherwise damaged Stop using damaged cable immediately and replace it 5 When you disconnect the power cord from the socket pull the plug rather than the cord to reduce the risk of damage to plug or AC outlet 6 Never disassemble the printer power supply it does not contain any parts that could be repaired by an unskilled worker All repairs...

Страница 8: ...prints 3D printers use two different diameters of a filament you can find more in chapter Materials 2 85 mm and 1 75 mm 1 75mm version is used more worldwide though there is no difference in printing quality Filament is provided on a spool where you can find the basic information filament maker material ABS PLA etc and filament diameter 2 85 mm filament is commonly called as 3 mm This printer supp...

Страница 9: ...d in chapter 6 2 Printer assembly We offer the support for users who purchased the printer kit through our official forum If you need help do not hesitate to visit our forum at forum prusa3d com You can find the answers for your problem there If not please just post your question directly there Pict 2 Original Prusa i3 MK2 printer kit unboxed ...

Страница 10: ...age the electronics and thus the proper printer functionality Anytime you move the printer always hold the upper frame with hotbed upright pointing away from you as pictured in p ict 3A Do not forget to remove all shipping helpers parts shown in pic 3B or the white zipties used Pict 3A Proper handling of a printer Pict 3B Do not forget to remove all shipping helpers parts ...

Страница 11: ... risk of draft Attach the filament holders to the upper frame Attach Filament to the holders Make sure the filament spool doesn t jam and can move freely Plug in the AC power cord check to make sure the proper setting for AC voltage is selected 110V 220V and turn on the switch Check out the firmware version in the Support menu via LCD panel and if it s older than 3 0 6 please upgrade to the latest...

Страница 12: ... The surface does not have to be cleaned before every print It is just important to not touch the print bed with your hands or dirty tools Clean your tools with the same solution as you would the bed and you will be able to start your next print right away You can leave small marks on the print surface with your nozzle or tools they will typically be shinier than the rest It does not affect the fu...

Страница 13: ...ill attach very strongly Prepared juice can be also purchased in our e shop Unfortunately UPS service does not allow to deliver any acetone based products due to shipping constraints In that case you get only the bottle and ABS from our e shop and you have to source the acetone locally 6 3 4 Selftest kit only The purpose of the selftest routine is to check most common errors when assembling and co...

Страница 14: ...t only The Original Prusa i3 MK2 comes with a full mesh bed leveling feature however for this to work we need to first calibrate the distance between tip of the nozzle and P I N D A P rusa IND uction A utoleveling probe The process is fairly straightforward so let s get to it We also suggest to check out our Guide for New User first at www prusa3d com buildvideomk2 with calibration tips The purpos...

Страница 15: ...bed or even push the print bed away from the PINDA probe so the PINDA probe will not trigger properly and the calibration will fail Place a sheet of a regular office paper for example the checklist shipped with every order and hold it under the nozzle during the first round first 4 points being checked of calibration If the nozzle catches on the paper during the process power off the printer and l...

Страница 16: ...will print correctly 6 XYZ calibration failed Left front calibration point not reachable Even if the printer moves the print bed to the end Y end stop the PINDA probe cannot reach the left front bed calibration point Move the left Y threaded rod in the Z frame away from you so the PINDA probe reaches the left front bed calibration point reliably You can find how to fix this in the next chapter 6 3...

Страница 17: ...rinter has been moved to an uneven surface Before doing anything else make the Z axis level by going all the way up and try again At the end of the X Y calibration the printer measures the reference height above each of the 9 bed sensor points and stores the reference heights into a non volatile memory During the normal bed leveling it is expected that the PINDA probe triggers not further than 1 m...

Страница 18: ...ion New version of the Y belt holder with a slot shipped from August 8 2016 allows to make a 1 mm adjustment to both the front and the back Loosen the Y belt holder screws push the belt holder part towards the Y motor and retighten the screws 6 3 6 Calibrate Z Calibrate Z is located in Calibration menu It should be performed after you move the printer to different location It saves the heights of ...

Страница 19: ...t followed and there is a plastic debris on the print nozzle then the debris may touch the print bed or even push the print bed away from the PINDA probe so the PINDA probe will not trigger properly and the calibration will fail 6 3 7 Mesh bed levelling Mesh bed levelling can be found in Calibration menu It is the same procedure which is performed before every print You can use it to check the P I...

Страница 20: ...in menu Insert the filament to the extruder choose the Load filament option in the menu and press the button to confirm Filament is then loaded to the extruder by the extruder stepper automatically You should cut the top of the filament as shown in the picture below p ict 7 detail Pict 7 Loading the filament to the extruder Check if the filament is flowing from the nozzle If you change the filamen...

Страница 21: ...for PLA On the LCD menu go to Print from SD and run V2calibration gcode file from the bundled SD card The printer will probe the bed and start printing zig zag pattern on the print surface The nozzle will be at the height based on the P I N D A probe setting it must not by any means touch the print surface Pict 8 How to tune the nozzle height live during the test print Observe the line which is be...

Страница 22: ...rons and even 20 microns can make a huge difference When you are using this function do small incremental changes 6 3 10 Finetuning the first layer 6 3 10 1 Print prusa logo After finishing the calibration gcode it is a good idea to print a simple object The Prusa gcode from the supplied SD card is a great example The Live adjust Z function described in 6 3 9 First layer calibration works during e...

Страница 23: ...ind the probe must be always higher than the nozzle tip otherwise it will catch on prints Pic 11 Probe response diagram 6 3 11 Securing of the probe kit only After couple of prints ideally secure the bottom nut on the probe with a drop of Loctite 243 Blue Threadlocker to prevent loosening over time Pict 12 Secure the bottom nut on the probe with a drop of Loctite 243 Now you are done ...

Страница 24: ...d model model_name gcode Printer will start printing the object The filename gcode must not contain any special characters otherwise the printer is not able to display the file on the LCD If you remove the SD while printing printer will pause automatically When you reinsert the SD press the LCD knob and choose Continue option Confirm and printing will resume 7 1 Removing objects from the printer W...

Страница 25: ...ime 3 and the actual Z axis position 5 Pict 14 LCD layout 1 Nozzle temperature actual desired temperature 2 Heatbed temperature actual desired temperature 3 Progress of printing in shown only during the printing 4 Status bar Prusa i3 MK ready Heating model_name gcode etc 5 Z axis position 6 Printing speed 7 Elapsed printing time shown only when printing 7 2 2 Print statistics The printer tracks pr...

Страница 26: ...inter must be powered on 2 Press and hold the rotary selector 3 Press and release the reset switch marked with X directly below the rotary selector 4 The printer will indicate a successful reset by beeping You can then release the rotary selector and wait for the printer to boot up 7 2 4 LCD layout Items not mentioned below are not used for the common print setup you should not change any of the u...

Страница 27: ... XYZ Calibrate Z Mesh Bed Leveling Auto home Bed level correct Show end stops Reset XYZ calibr Settings Temperature Nozzle Bed Fan speed Move axis Move X Move Y Move Z Extruder Disable steppers Mode Power Silent Live adjust Z Select language Statistics Support prusa3d com forum prusa3d com howto prusa3d com ...

Страница 28: ...00 Watch the results of increased speed on the printed model and adjust the speed eventually When increasing the speed always check the model is cooled properly especially when printing small object from ABS increased speed causes the distortion sometimes called warping of the model You can prevent this issue by printing more similar objects together layer printing interval is long enough to preve...

Страница 29: ...step is loading the model with Load model button and choosing the model_name gcode no special symbols in file name You can control the movement of all printer axes at the control area Next you can preheat the printer and prepare it for the printing Set the temperatures for the nozzle heater and heatbed bed and click Set button Printer starts heating immediately Always check that the temperatures s...

Страница 30: ...re you can manipulate the printer axes 6 Setting the nozzle and bed temperatures 7 Thermometer 8 Confirming the set temperatures heating start 9 2D print process preview 10 Info panel Estimated print time axis position and other info is displayed after loading the model 7 3 Printer addons 7 3 1 Different nozzles E3D a UK based company supplies hotends for the Original Prusa i3 MK2 has whole ecosys...

Страница 31: ...gs and programs Slic3r preparing the 3D models to gcode format for printing Pronterface printing from a computer in case you don t want to print from SD NetFabb repairing the corrupted or unprintable models Settings optimized print settings for Slic3r Cura Simplify3D and KISSlicer Drivers for Prusa i3 printer Windows a Mac drivers Test objects 9 Printing your own models 9 1 Where you can get the 3...

Страница 32: ...thusiasts There is a great deal of 3D programs free or paid your choice depends more on your personal taste and preferences The following is a list of other programs used for making 3D models OpenScad DesignSpark Mechanical Fusion 360 Blender Maya 3DS Max Autocad and many more 9 3 Slic3r A 3D printer can print almost anything Whether you ve downloaded 3D models from the Internet or created your ow...

Страница 33: ... Right click on model opens the menu with rotate resize and other options 9 Type of model preview 10 Model preview 9 4 Bundled 3D models We asked couple known 3D designers and prepared some printable object for you to print They are ideal for the first prints on your new printer STL and GCODE files are available after installing the drivers package in 3D Objects folder or bundled on your SD card Y...

Страница 34: ...r in our drivers offers the Original Prusa i3 MK2 ColorPrint option in the printer selection First of all you need to prepare regular gcode with common print and filament settings Save the file Then go to www prusaprinters org and choose Color Print in the header menu Drag the gcode to frame and click on Add change button Find the height of the layer where you want to make the color change This ca...

Страница 35: ...ains of the previous filament if yes choose this option to continue printing with a new color 2 Filament not loaded If the new filament was not loaded properly choose this option and the printer will start the automatic filament load again When the filament is loaded properly you can choose the Yes option and the printing will continue with a new color 3 Color not clear Filament was loaded but the...

Страница 36: ...erial If you print an object with a gradient lower than 45 the material overhang would be preventing the object to be printed correctly Slic3r allows you to print such objects thanks to the Printing with support function Support material is an extra structure printed as scaffolding for the object you can remove the support material after the printing is finished Choose the Print Settings tab 1 and...

Страница 37: ...ant to scale down the model evenly or you can alter the size of a model along the one of the axes Along X Y Z axis Pict 24 Size change of a printed object If you need to print an object that doesn t fit the printer you have to cut the object using Slic3r Right click and choose the Cut option in menu You can cut the object horizontally if you need to perform a cut in a different axis use the Flip o...

Страница 38: ...s Nozzle temperature 240 C Bed temperature 80 100 C Heatbed Make sure the surface is clean as described in 6 3 2 PEI print surface preparation chapter Do not use isopropyl alcohol to clean the bed or the adhesion may be too strong 10 4 HIPS Universal stable material with good heat resistance suited for printable mechanical components Nozzle temperature 220 C Bed temperature 100 C You can set the b...

Страница 39: ...t flex materials can bond to the bed too much and require to use glue on the bed as separator to prevent PEI damage 10 8 Dialing in new materials Each manufacturer produces slightly different material even though they are under the same group For example Prusa PLA and ColorFabb PLA will have slightly different output when printed To achieve the best possible output you should experiment with the n...

Страница 40: ... of a new filament Heat the nozzle remove the filament from the extruder and cut the rod cca 10 cm above the damaged part The next step is to clean the extruder There is a service hole on the left side of the extruder where you can access the hobbed pulley pict 28 Clean the hobbed pulley then heat the nozzle before re loading the filament If a problem persists you will have to clean the nozzle Pic...

Страница 41: ... least 200 C Heating the nozzle is crucial for removing the old nozzle and putting in the new one 1 Move the extruder body upwards to get to the nozzle end LCD menu Settings Move axis Move Z Set the height by rotating the LCD knob and then confirm 2 Unscrew the screw on fan mouthpiece and the two screws on the print fan and remove both parts Pict 29 part 1 3 Remove the two front screws on the nozz...

Страница 42: ...Pict 29 Nozzle change 11 5 Axis fluency If one of the axes doesn t move fluidly you can apply a small amount of oil e g all purpose machine oil This will lower the friction ...

Страница 43: ...to the command line When you change the filament flow next print will use the same settings unless you change it again in menu or you reset the printer or unplug it from the power source 11 6 Problems with finished models 11 6 1 Model breaks and or is easily damaged A typical feature of larger models printed from ABS If you have set the temperature properly the printer is away from drafts and obje...

Страница 44: ...ow these steps Align the Y axis so that each Y corner is sitting on the table none should be off the table Align the tightening of each Y axis threaded rod so that each Y corner is perpendicular facing upright to the table surface Align the tightening of each Y axis threaded rod so that each M8 threaded rod is at a right angle to the M10 threaded rods the Y axis must form a perfect rectangle when ...

Страница 45: ... to the assembly manual Pict 31 Proper wiring of the connectors 12 3 Printer can t read SD card First make sure that the file name on the SD does not contain special characters otherwise the file could not be displayed on LCD If there is no error in the file name check the EXT2 wiring from electronics to LCD If the cable is connected properly try to swap the cables ...

Страница 46: ...ay to check is printing a round object if any of the belts are not tightened properly the result is an irregular shape instead of a perfect circle Y axis belt is located under the heatbed X axis belt moves the extruder See the pictures with properly tightened belts Pict 32 A properly tightened Y axis belt under the heatbed Pict 33 A properly tightened X axis belt ...

Страница 47: ...erly so they won t restrict movement during printing Pict 34 Cables to be wrapped in a spiral wrap 12 6 Loose heatbed zipties Make sure that the zipties under the heatbed are properly tightened There are three zipties in total two on the right side one on the left Pict 35 Properly tightened zipties under the heatbed ...

Отзывы: