background image


NAS System


144 

User Manual 


3.3.7   Notification 


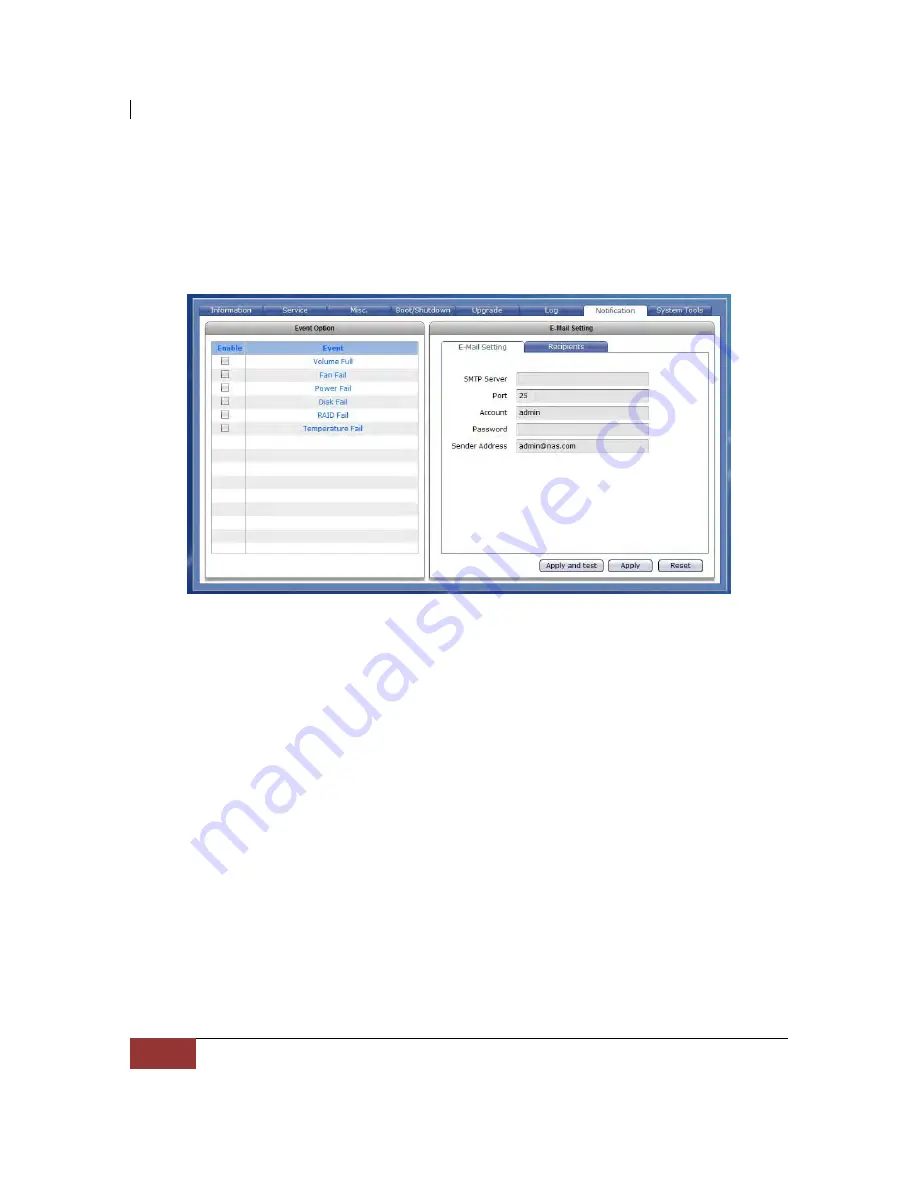
3.3.7.1   Event Option 


Use this function to enable event notification via email. 


Event Option 


Enable

 - Check the event that will be included in list of events that will be 

monitored. Once the selected event happened, the email recipient(s) 
will receive a notification mail.  


Event List: 

Volume Full 
Disk Fail 
RAID Fail 
Temperature Fail 
Fan Fail 
XFS Internal Error 

Содержание EN-1400A-ADC

Страница 1: ...NAS System User Manual Revision 1 0...

Страница 2: ...r View 14 2 2 3 Disk Tray 15 2 2 3 1 Disk Drive Status Indicator 15 2 2 3 2 Lock Indicator 16 2 2 4 LCD Panel 16 2 2 5 LCD Menu Diagram 17 2 3 Getting Started with the NAS System 18 2 3 1 NAS Hardware...

Страница 3: ...Permission to Share 63 3 1 3 3 Edit Share Folder 66 3 1 3 4 Delete Share Folder 67 3 1 3 5 Accessing Share Folder from Windows Clients via Samba 68 3 1 3 6 Accessing Share Folder from Linux UNIX Clien...

Страница 4: ...3 3 7 Notification 144 3 3 7 1 Event Option 144 3 3 7 2 Email Setting 145 3 3 8 System Tools 146 3 4 Account 150 3 4 1 Account 150 3 4 1 1 Create Account 151 3 4 1 2 Delete Account 152 3 4 1 3 Edit Ac...

Страница 5: ...5 3 6 2 2 Ordinary User Login 176 3 6 3 Folder 177 3 6 3 1 Create Folder 177 3 6 3 2 Delete Folder 178 3 6 3 3 Rename Folder 178 3 6 3 4 Set Folder Permission 179 3 6 3 5 Top 180 3 6 4 File 181 3 6 4...

Страница 6: ...reproduced stored in a retrieval system or transmitted in any form or by any means electronic mechanical photocopying recording or otherwise without the prior written consent Trademarks All products...

Страница 7: ...it not to exceed the allowed ambient temperature Before plugging in any power cords cables and connectors make sure that the power switches are turned off Disconnect first any power connection if the...

Страница 8: ...tor architecture enables true hot swap capability Built in Intel Atom Dual Core 1 8G CPU up to 4GB DDR3 800MHz SDRAM and two Gigabit Ethernet ports offers high performance NAS platform Linux based emb...

Страница 9: ...ports RAID levels 0 1 5 6 10 Linear JBOD Smart function LCD panel for RAID setting ENC status Supports hot spare and automatic hot rebuild Linux based embedded OS design Provides file access services...

Страница 10: ...s as a DHCP server Unit act as a master browser Share level security User ID security for NFS General File Server Independent Localized language support With Quick Setup Supports trunking load balance...

Страница 11: ...or data redundancy 3 6 2 Data is striped across several physical drives just like in RAID 5 and a second set of parity is calculated and written across all the drives RAID 6 provides for an extremely...

Страница 12: ...g the NAS System The package contains the following items NAS System Unit One 1 power cord Two 2 Ethernet LAN cables Installation Reference Guide NOTE If any of these items are missing or damaged plea...

Страница 13: ...NAS System User Manual 13 2 2 Identifying Parts of the NAS System The illustrations below identify the various parts of the NAS system 2 2 1 Front View...

Страница 14: ...er Supply The NAS system has one power supply 4 eSATA Port The subsystem has one external eSATA port for connecting to the host system or server 5 USB Ports The NAS system has two USB 2 0 ports 6 LAN0...

Страница 15: ...e s power is on and everything is functioning normally When the light is RED a disk error or failure has happened that requires the user s attention When disk is in rebuilding status the LED is blinki...

Страница 16: ...e for easy carrier removal 2 2 4 LCD Panel Parts Function Power LED Green LED indicates power is on Up and Down Arrow buttons Use the Up or Down arrow keys to go through the information on the LCD scr...

Страница 17: ...enu Diagram Disk Status Information S 001 means slot number 1 O means disk drive in slot is Online or detected X means no disk drive in slot or disk drive not detected R means the disk drive is rebuil...

Страница 18: ...The Power LED on the front panel will turn green 2 3 2 Installing Hard Drives This section describes the location of the hard drives in the NAS system and gives instructions on installing a hard driv...

Страница 19: ...ing screws on the bottom part to secure the drive in the disk tray d Slide the tray into a slot and push the Lock Indicator Button e Press the handle until you hear the latch click into place The HDD...

Страница 20: ...is 171SP1 20100519 to a computer that will be used to manage the NAS system 1 Extract the Qlaunch archive file 2 Open the Qlaunch folder There are three subfolders For computer with Windows OS open t...

Страница 21: ...NAS System User Manual 21 Mac OS X QLaunch application Linux OS QLaunch script 4 The QLaunch GUI will be displayed It will show all available NAS systems on the network NAS 2 0 icon...

Страница 22: ...NAS System 22 User Manual 5 Select double click the NAS system that you want to manage 6 The proNAS login page will be displayed...

Страница 23: ...DHCP server is available 3 The proNAS Login Page will be displayed 4 Enter the Login Name account and Password Refer to the default settings in the table below NAS Default Settings NOTE When the syst...

Страница 24: ...existing NAS configuration or NAS system has been configured already after login the proNAS Manager GUI will be displayed NOTE Enable Timeout is enabled by default When there is no activity in the pro...

Страница 25: ...shows default share named share which can be renamed and whose size can be changed 3 Network Adapter This is for configuring the primary Ethernet interface LAN0 eth0 network settings After changing t...

Страница 26: ...Host Name in the Host Name box b Enter the new IP address c Edit the Subnet Mask and Gateway The configuration options in Network Adaptor Host Name The Host Name is the NetBIOS name of NAS system This...

Страница 27: ...NAS System User Manual 27 4 Configure the Service options a Enable the proNAS Service options as needed 5 Click the Execute button...

Страница 28: ...Select Yes to reboot the NAS and free some memory used by the system 8 A message will be displayed Click OK 9 The NAS will restart Wait for about 3 to 4 minutes then login again If IP address was cha...

Страница 29: ...sic steps are z Create RAID Disk from Hard Disk Drives z Join RAID Disk to Volume Group s Storage Pool z Setup the Network Environment z Enable Services for Windows clients Linux UNIX clients and MAC...

Страница 30: ...will show as RAID_MEMBER When a physical disk drive is free neither a RAID member nor a hot spare its status will show UN_USED When a RAID disk is created the RAID level is assigned Select your prefe...

Страница 31: ...st one RAID disk must be joined to NASVG Storage Pool After one RAID disk is joined to Storage Pool the NASVG is initialized and the basic NAS configuration is setup All other NAS configurations can b...

Страница 32: ...D disk joined to the NASVG Storage Pool When Volume is created the Volume capacity will be taken from the available capacity of the NASVG After a Volume is created Share folders can also be created Th...

Страница 33: ...the same Volume will share or use the total capacity of the Volume It is also in the Share where account or group permission is assigned to allow read only or read write access and where different Pro...

Страница 34: ...RAID Disk Information Click the Storage Share icon then select RAID Disk Information tab The RAID Configuration and Disk Information window will be displayed NOTE The Storage Share RAID function is n...

Страница 35: ...rive slot number Size GB The capacity size of the hard disk drive Model The hard disk drive model name Status The current status of the hard disk drive Status can be RAID_MEMBER UN_USED or SPARE Disk...

Страница 36: ...create the Raid storage device without initialization RAID Level Select the RAID Level you want for the RAID configuration Available options depending on number of disk drives are JBOD 0 1 5 6 and 10...

Страница 37: ...anual 37 3 A message will be displayed A warning message is also displayed Click OK to close the warning message 4 The RAID disk will be initialized Verify in the Status information the current initia...

Страница 38: ...ool 6 Select the RAID logical disk that will be added to storage pool Click OK when done NOTE NASVG which is a Volume Group that holds the NAS configurations will be created when at least one disk RAI...

Страница 39: ...age will be displayed 9 When warning message is displayed select Yes to reboot the NAS system to free some memory used by the system The NAS system will reboot 10 Re login to the system after about 3...

Страница 40: ...how IN_USED NOTE Once a RAID disk has been joined to the NASVG Storage Pool the RAID disk can no longer be deleted Once joined the RAID disk status will be shown as IN_USED which means the NAS system...

Страница 41: ...stem is already using the RAID disk The way to delete existing RAID disks which are already joined to Storage Pool is to reset NAS to factory default in System Boot Shutdown Reboot to Default WARNING...

Страница 42: ...Edit The RAID Configuration window will be displayed 3 Click Delete A warning message will be displayed 4 Select Yes to confirm deleting selected RAID disk 5 The status of the member disks of the dele...

Страница 43: ...the RAID is busy such as when the RAID is in Initializing or Rebuilding state Wait until the RAID status becomes normal then do the RAID extension Steps to add drive s or extend an existing RAID 1 Se...

Страница 44: ...2 The RAID Configuration window will be displayed Select the disk s that will be used for extending the RAID Click Extend RAID 3 The RAID will be extended The disk that was added to the RAID will now...

Страница 45: ...3 1 1 4 Set a Spare Disk Steps to Set a Spare Disk 1 Select the hard disk drive to be made a spare disk and click Set Spare 2 The selected hard disk drive will become a Spare Disk The Status in Disk I...

Страница 46: ...an be created under a single Volume Volume List Screen There are two types of view provided to display the Volume information Detail View and Grid View Detail View has Delete Extend and iSCSI buttons...

Страница 47: ...one NOTE If a new RAID logical disk has not been created yet create first the RAID disk using the available free physical disk drives 3 The RAID logical disk will be joined to the NASVG NOTE An un use...

Страница 48: ...ew Volume dialog box enter the Volume Name and Size in MB The Free NASVG capacity will show the available capacity that can be used Click OK when done NOTE The volume name does not allow space in betw...

Страница 49: ...e sure the data in the volume and all its share folders are no longer needed or a backup has been made before deleting the volume 1 Click the Delete button of the Volume to be deleted 2 A warning mess...

Страница 50: ...re is available free space in the NASVG Steps to Extend a Volume 1 Click the Extend button of the Volume to be extended 2 A dialog box will be displayed Enter the additional capacity that will be adde...

Страница 51: ...cation then enter an Account name Enter the password in Password box and Password Confirm box Click OK when done NOTE When Authentication is used the same Account and Password must also be used in iSC...

Страница 52: ...t Yes to proceed NOTE Make sure the volume does not contain important data in its share folders Select Yes in this step will confirm formatting the volume for iSCSI use all data in this volume will be...

Страница 53: ...nect to iSCSI Target Volume from host computer with iSCSI Initiator Log on to target device Use the account and password if set in iSCSI Configuration 8 After successful connection the iSCSI device wi...

Страница 54: ...nfiguration in a Volume 1 Select the Volume with iSCSI Configuration and click the iSCSI button Remove the check mark on the iSCSI Enable box Click OK when done 2 A warning message will be displayed S...

Страница 55: ...ored as basic NAS volume all the data in the volume previously configured as iSCSI Target are deleted NOTE The iSCSI Configuration must be disabled first before the Volume can be restored as basic NAS...

Страница 56: ...NAS System 56 User Manual 3 A message will be displayed 4 The iSCSI Configuration will be removed and the volume is restored as basic NAS volume...

Страница 57: ...Windows Samba Shows the status if Samba CIFS protocol is enabled Yes or not No in the share folder UNIX Linux NFS Shows the status if NFS protocol is enabled Yes or not No in the share folder Mac AFP...

Страница 58: ...older will be created Owner Set the owner of the share folder By default admin owns all share folders Public When enabled checked the share folder is accessible to all users Share Configuration Button...

Страница 59: ...ion screen is displayed If share will be accessed by UNIX Linux clients setup the necessary options Unix Linux NFS Configuration Options Enable NFS Sharing Used to enable or disable NFS protocol When...

Страница 60: ...tocol When enabled the share folder can be accessed via AppleTalk protocol Note that newer Mac OS X versions support SMB protocol and therefore will be able to connect to NAS share folder using SMB pr...

Страница 61: ...nt can connect to this share folder and upload or download files via Rsync Read Only When checked all files within this share will be read only to any Rsync client Anonymous When checked anonymous con...

Страница 62: ...NAS System 62 User Manual 7 Click Save when done Then Share Folder will be created...

Страница 63: ...remove an account from share folder privilege Select the account then click The account will be removed from the right column By default admin account and users group group account for local NAS user...

Страница 64: ...NOTE Use the to remove a group from share folder privilege Select the group then click The group will be removed from the right column NOTE By default all local NAS accounts belong to users group and...

Страница 65: ...ow connections from your private network 192 168 100 and all other connection will be refused NOTE To remove an IP address from share folder privilege select the IP address then click IP Privilege Set...

Страница 66: ...ser Manual 3 1 3 3 Edit Share Folder Steps to Edit Share Folder 1 Select the share folder name then click Edit Share Folder 2 Change the necessary options Click Save when done NOTE The Share Name cann...

Страница 67: ...lder name then click Edit Share Folder 2 Click Delete A warning message will be displayed Select Yes to proceed The share folder will be deleted WARNING Be careful when using the Delete button Make su...

Страница 68: ...ll local NAS accounts which belong to users group have read write permission to share folders 1 To access the share folder from Windows client PC click Start then Run Enter in the Open input box as fo...

Страница 69: ...NAS System User Manual 69 NOTE If NAS is not joined to Windows domain and you will use a NAS local account enter only the NAS account name and password 3 Login to share is successful...

Страница 70: ...accessible via NFS protocol and which path will be used for mounting use the command showmount e x x x x where x x x x is the NAS IP For example showmount e 192 168 99 127 3 Create local mount point i...

Страница 71: ...NAS System User Manual 71 5 The share folder is mounted via NFS protocol To check use mount or df h command mount df h...

Страница 72: ...hare Security Share Privilege 1 To connect to share folder via SMB protocol in the Finder select Connect to Server from the Go menu The Connect to Server dialog box will be displayed 2 In Server Addre...

Страница 73: ...screen 4 Enter the Workgroup or Domain name if there is and if required and a valid user name for example NAS local account with permission to the share folder and the password for the user name 5 Cl...

Страница 74: ...o Setup Rsync A How to Setup the NAS as Rsync Server 1 In System Service enable SSH and Rsync services 2 In Storage Share Share Security select the share folder that will be used as Rsync Server targe...

Страница 75: ...NAS System User Manual 75 3 In Basic tab select Rsync in Protocol Setting Then tick Enable Rsync Remove check mark in Anonymous option Click Save...

Страница 76: ...rd and Mode Rsync Client Options IP the IP address of the remote Rsync server Remote Path the share name on the remote Rsync server Account the account name that will be required by the Rsync server f...

Страница 77: ...n during the transfer l links Copy symlinks as symlinks H hard links Preserve hard links p perms Preserve permissions This option causes the receiving Rsync to set the destination permissions to be th...

Страница 78: ...just created select the backup name from the backup List if not yet selected and then click Backup 5 When backup is finished a pop up message will be displayed Click OK NOTE The Rsync backup process...

Страница 79: ...up log from the log list and click button in the Log column 7 The Rsync log for the selected log file will be displayed Click Cancel to close 8 The Rsync backup can also be run on schedule For more in...

Страница 80: ...tion about Time Machine please visit Apple s website at http www apple com macosx what is macosx time machine html To setup Time Machine 1 In NAS management GUI select Storage Share icon Then select t...

Страница 81: ...r name for example timeshare In the Protocol Setting on the right pane select Mac AFP and then tick Enable AppleTalk Sharing and Time Machine options Click Save 4 In System Service menu make sure the...

Страница 82: ...x timeshare where x x x x is the NAS IP address and timeshare is the share folder previously configured for Time Machine use Then click Connect 7 Enter a valid Account Name and Password use account w...

Страница 83: ...setup Time Machine in Mac open Time Machine 10 If the Time Machine has not been previously setup a message will be shown as below Then select Set Up Time Machine 11 The Time Machine screen will be dis...

Страница 84: ...NAS System 84 User Manual 12 Select the timeshare disk and click Use for Backup 13 Enter the account name and account password to access the NAS share folder via Time Machine and then click Connect...

Страница 85: ...r successful connection the Time Machine is setup The available space on the NAS share folder will be shown The Next Backup time is also displayed 15 Done The Time Machine will automatically backup to...

Страница 86: ...for mapping the machine name and IP address WINS Server Enter the WINS Server IP address WINS Server is responsible for the setting NetBIOS name resolution Edit Hosts Table Use this button to edit ma...

Страница 87: ...6000 7000 8000 and 9000 MAC address Shows the MAC address of network device Enable on Boot If enabled this adapter will be active when proNAS starts up Dynamic IP BOOTP DHCP If checked this specifies...

Страница 88: ...will be used Trunking Mode Options Fault Tolerance Active Backup policy If the active Ethernet port fails the standby Ethernet port will become active This enhances the availability of access to the N...

Страница 89: ...lick Yes to proceed 4 The NAS network configuration will be restarted Re login to NAS GUI 5 The Trunking function is configured The member network devices will be shown as deactivated and cannot be co...

Страница 90: ...then click Cancel Trunking 2 A warning message will be displayed Click Yes to proceed 3 The Trunking function will be cancelled and the network configuration will be restarted Re login to NAS GUI The...

Страница 91: ...omain accounts can be imported and integrated into the NAS NOTE Some network settings required in configuring the Windows Domain Authentication option must have been configured in Network Device Confi...

Страница 92: ...s AD Domain 1 Select Network Device Configuration Enter the Domain Name and DNS Suffix A DNS Server IP can also be entered if necessary Refer to Section 3 2 1 for the Device Configuration options 2 A...

Страница 93: ...ation Use this option to enable or disable Windows Domain Authentication Host Name Indicates the NetBIOS name of NAS as configured in Network Device Configuration tab Domain Workgroup Shows the domain...

Страница 94: ...e only on WindowsNT4 with SP4 and Windows 2000 or later Default is disabled Enable Client Channel This controls whether the client offers or even demands the use of the netlogon schannel Default is au...

Страница 95: ...thentication Options Enable NIS Authentication Use this option to enable or disable NIS Domain Authentication NIS Domain Enter the NIS domain name NIS Server Enter the IP Address of NIS server Reset U...

Страница 96: ...tions IP range starting from Means the starting address of range of private IP addresses for DHCP IP range ending with Means the ending address of range of private IP address for DHCP Private Net The...

Страница 97: ...2P peer to peer file sharing protocol NOTE Enable the P2P Service System Service Also setup the P2P Service Download file location System P2P Edit Quick Setup Refer to Section 3 3 2 Service NOTE DNS s...

Страница 98: ...ownload Use this button to add download item Then select either download link or torrent file Remove Use this button to remove a selected download item Pause Use this to pause the downloading of selec...

Страница 99: ...rom server Options Connect Use this button to connect to a selected server Disconnect Use this button to disconnect to a selected server Refresh Use this to refresh current connection status NOTE You...

Страница 100: ...connections Maximum download rate Use this option to set the maximum download transfer rate Maximum upload number Use this option to set the maximum number of upload connections Maximum upload rate Us...

Страница 101: ...NAS System User Manual 101 3 2 4 4 Shares This screen displays the list of files downloaded or being downloaded in the target share...

Страница 102: ...NAS System 102 User Manual 3 2 4 5 Example of Download from Link and Torrent 1 Click New download 2 To download using link enter the download link or paste the link in the box provided Click OK...

Страница 103: ...NAS System User Manual 103 3 To download from another link enter the link or paste the link in the box then click OK 4 Two items will be displayed under Download...

Страница 104: ...NAS System 104 User Manual 5 To download using torrent click New download then select Torrent option Click select torrent file 6 Select the torrent file Click Open...

Страница 105: ...7 The download item will be added in the Download list 8 To remove an item select the item and click Remove 9 To pause downloading select an item and click Pause 10 To resume downloading select a pau...

Страница 106: ...ls 3 3 1 System Information The System Information screen shows the following Host Name Indicates the NetBIOS name of NAS as configured in Network Device Configuration Domain Workgroup Shows the domai...

Страница 107: ...UI admin will be automatically logged out after 15 minutes To disable timeout remove check mark in Enable Timeout Device Shows the device information such as Slot number system fan CPU fan CPU tempera...

Страница 108: ...s on how to configure Samba protocol setting in a Share folder NFS Provides Network File System NFS file sharing UNIX and Linux users need this service Enabled to be able to access the NAS share folde...

Страница 109: ...not in the console Rsync Provides Rsync Server function to NAS Rsync client can connect to NAS such as another NAS with Rsync client function configured Refer to Section 3 1 3 1 Step 6 for Rsync Serv...

Страница 110: ...he DHCP options Refer to Configuration Options in the succeeding pages Media Server Provides NAS DLNA multimedia File Server Allow NAS to share files to Sony PlayStation3 and XBOX360 When a share fold...

Страница 111: ...mber Default FTP port used by the NAS is 21 Max connection Specify the maximum number of allowed connections Default is 5 Telnet Option Port Use this option to set the Telnet port number Default Telne...

Страница 112: ...able SFTP in SSH SFTP Secure FTP provides secure file transfer in SSH iTunes Option Set Share as iTunes Library Select the share folder name that will be used as iTunes library from the list P2P Optio...

Страница 113: ...o enable SSL option DHCP Options IP range starting from Means the starting address of range of private IP addresses for DHCP IP range ending with Means the ending address of range of private IP addres...

Страница 114: ...re Media Server service will be enabled Please select LAN device Select the network device to be used by Media Server service The LAN device will be the dedicated path for media access Photo Options T...

Страница 115: ...tion about iTunes and how to use it please visit http www apple com itunes what is To use a NAS share folder as iTunes media folder 1 Select the iTunes service in System Service 2 Click Edit Select th...

Страница 116: ...ion to enable iTunes service 5 Copy some digital audio files to the share folder designated as iTunes Library and under the Music sub folder This can be done by accessing the NAS share folder via netw...

Страница 117: ...6 To play the digital music open iTunes application in remote PC or Mac Note that the NAS object name will appear in the SHARED list 7 Select the NAS object in the shared library list Then select the...

Страница 118: ...enable Public option on the share folder designated as WEB target share folder To use WEB service a Select the WEB service in System Service b Click Edit Configure the Target Share and select a share...

Страница 119: ...ser Manual 119 d Click Enable option to enable WEB service e To test if web service is working open web browser and enter http x x x x index html where x x x x is the NAS IP The default web page will...

Страница 120: ...ion and is saved in the WEB designated share folder under WEB sub folder Delete the default index html file g Copy your own index html file including the supporting folder files h Open web browser and...

Страница 121: ...re configuring the DHCP service make sure the network devices eth0 and eth1 are already assigned the proper IP address in Network Device Configuration To use the NAS as a DHCP server Internet Gateway...

Страница 122: ...nd must have an IP in the same subnet for example as 192 168 20 2 3 Click OK to save 4 Tick the DHCP service to enable it 5 Verify if the computers on the Private Network can get dynamic IP when confi...

Страница 123: ...A compatible players must be used to access or play the media files To use Media Server Service 1 Select the Media Server service in System Service 2 Click Edit Configure the Target Share and LAN devi...

Страница 124: ...r service to enable it 5 Copy the media file s to the share folder designated as Media Server Target Share under the MediaServer sub folder This can be done by accessing the NAS share folder via netwo...

Страница 125: ...NAS System User Manual 125 6 Open a DLNA compatible player For example Windows Media Player 12 in a PC with Windows 7 OS The NAS object name should appear in the Other Libraries list...

Страница 126: ...NAS System 126 User Manual 7 If you don t see the NAS object name in Other Libraries list of Windows Media Player please check if Media Streaming is turned on If not turn it on...

Страница 127: ...8 Play the media music 9 For other applications copy the media files to the designated Media Server share folder under the MediaServer sub folder and use other DLNA compatible players to access or co...

Страница 128: ...tab Click Edit and select the target share Enable the Photo service by selecting the Enable check box on the left of the service name 2 Open web browser and type http xxx xxx xxx xxx photo where xxx...

Страница 129: ...ks under My Photo Archive NOTE The picture files must be saved in the NAS share designated as target location of Photo service and must be inside a subfolder For example share1 Photo Samples where sha...

Страница 130: ...NAS System 130 User Manual 6 Select the admin tab to configure settings and options 7 Select my settings to configure account details...

Страница 131: ...NAS System User Manual 131 8 Select search tab for search options 9 Click the logout link to logout...

Страница 132: ...he Update Now button To enable automatic update of system time from NTP server check the Auto Update option Update Now Use this button to manually update the system time and synchronize from NTP serve...

Страница 133: ...might not work using the UPS cable from the unsupported UPS vendor model Other UPS vendor models will be added to the approved models in the future Cable Model Use this option to select the UPS cable...

Страница 134: ...ed on schedule Reboot Reboot Use the button to immediately reboot the NAS If needed you can also enable Do Filesystem Check option to perform filesystem check after reboot Shutdown Use this button to...

Страница 135: ...e Local Disk or eSATA disk with Data Backup then power on the NAS and do Reboot to Default If the Local Disk with Data Backup is in the NAS when Reboot to Default is executed the data on the Local Dis...

Страница 136: ...sk or external eSATA disk shutdown the NAS and remove the Local Disk or eSATA disk with Data Backup then power on the NAS and do Reboot to Default If the Local Disk with Data Backup is in the NAS when...

Страница 137: ...rt Config 5 A warning message will be displayed Make sure the NAS where configuration will be imported has the same environment as the NAS configuration that will be restored such as same number of di...

Страница 138: ...NAS configuration file to be imported Click Open 7 A process status message will be displayed 8 A reboot warning message will be displayed Select Yes to reboot 9 The imported configuration file will...

Страница 139: ...disable scheduled boot of NAS Set the time hour and minutes in the up down arrow boxes Select the day or days when the scheduled boot will happen Shutdown Shutdown Use the button to enable or disable...

Страница 140: ...ton to enable or disable scheduled reboot of NAS Set the time hour and minutes in the up down arrow boxes Select the day or days when the scheduled reboot will happen Reset Use this button to undo or...

Страница 141: ...or manually from local directory 3 3 5 1 Remote Upgrade Remote To upgrade remotely press the Check Updates button The available NAS firmware version will be listed Select the firmware version then cli...

Страница 142: ...de locally the NAS firmware must have been downloaded from vendor s FTP site and saved into local directory Click the Upgrade button select the NAS upgrade file tar file and click Open The NAS firmwar...

Страница 143: ...and All Type Shows the type of log Use the down arrow to select the type of log to display Options are All System Storage Share and Account Level Shows the log level Use the down arrow to select the l...

Страница 144: ...t notification via email Event Option Enable Check the event that will be included in list of events that will be monitored Once the selected event happened the email recipient s will receive a notifi...

Страница 145: ...he email account Sender Address Use this option to specify the sender s email address Recipients Options Add Use this button to add a recipient email address in the list of recipients Type in the text...

Страница 146: ...ystem 146 User Manual 3 3 8 System Tools NAS provides various system tools which help the administrator monitor the system Connection Use this button to display information about client active connect...

Страница 147: ...NAS System User Manual 147 netstat Use this button to display network connections and statistics information ps Use this button to display current running processes...

Страница 148: ...8 User Manual top Use this button to display current running processes and system usage information df Use this button to display disk free information or the amount of available disk space in mounted...

Страница 149: ...l 149 dmesg Use this button to display NAS boot up messages Get all logs Use this button to save all proNAS logs to a log file in local directory The log file will be given tar extension name Rename t...

Страница 150: ...me Type Shows the type of account which can be local Windows or NIS Enable Use this option to enable or disable an account When an account is disabled the account is prohibited to access the NAS Creat...

Страница 151: ...the account Use a valid UID starting from 500 If this option is not set UID is 0 the system will automatically assign UID starting from 500 Domain accounts will have UID from 10000 to 30000 Quota GB U...

Страница 152: ...to create an Account without an existing VG a warning message will be displayed 3 4 1 2 Delete Account Steps to Delete Account 1 In the Account list check the Delete option for the account to be delet...

Страница 153: ...count 1 Double click the Account name in the Account List 2 Edit the necessary options NOTE Only the Full Name Quota Password and Password Confirm can be changed Account Name cannot be changed 3 Click...

Страница 154: ...Account Steps to Import Account 1 Click Import button 2 An input box will displayed Type the account information using the following format UID Name Password FullName Quota Click OK when done 3 The ne...

Страница 155: ...account members Create Account Use this button to create a user account Create Group Use this button to create a group account Delete Use this button to delete the selected user account or group accou...

Страница 156: ...adm etc are reserved names and cannot be used as account name Type Displays the account type shows Group for group account GID Use this option to manually assign a GID for the group Use a valid GID st...

Страница 157: ...3 4 2 2 Delete Group Steps to Delete Group 1 In the Group list check the Delete option for the group to be deleted 2 Click the Delete button 3 A warning message will be displayed Select Yes to proceed...

Страница 158: ...Edit Group Steps to Edit Group 1 Double click the Group name in the Group List 2 Edit the necessary options NOTE Only the Group Name and Group Members can be changed 3 Click OK when done The group wil...

Страница 159: ...ata to remote destination or to local disk drive NOTE The Data Backup function is not available in the iSCSI target Volume Only share folders created under non iSCSI Volume can be included in the back...

Страница 160: ...NAS System 160 User Manual 3 5 1 1 Create Backup Plan Steps to Create a Backup Plan 1 Click the Create button The screen below will be shown 2 Configure the necessary options...

Страница 161: ...r Options Destination Select the destination option for the backup Options can be Local Disk or Remote Local Disk is an un used disk drive Remote is a remote CIFS Samba share or NFS file system Local...

Страница 162: ...e remote Rsync server Remote Path Type here the share name on the remote Rsync server Account Type here the account name that will be required by the Rsync server for authentication Password Type here...

Страница 163: ...Select Use this option to select a completed backup then delete or restore the backup Name Show the backup name Status Shows the status of the particular backup Status can be Incomplete or Complete L...

Страница 164: ...eate Immediate Backup Steps to Create Immediate Backup 1 Select the particular backup plan from the Backup List Click the Backup button 2 A message will be displayed The backup is completed and a back...

Страница 165: ...t button 3 Click the Delete button 4 A warning message will be displayed Select Yes to delete the backup plan 3 5 1 4 Edit Backup Plan Steps to Edit a Backup Plan 1 Select the particular backup plan f...

Страница 166: ...ete button A warning message will be displayed 3 The backup will be deleted from backup destination and removed from log list 3 5 1 6 Restore a Backup Steps to Restore a Backup 1 Select check the part...

Страница 167: ...Backup Method as is In the Destination option select Local Disk The Disk option will display the available free or un used local disk Select the disk you want as destination for backup if more than o...

Страница 168: ...ther warning message will be displayed Select Yes to continue 5 The backup process will be started When backup is completed a message will be displayed Click OK 6 The backup to local disk is done A lo...

Страница 169: ...his option to display available backup tasks on the current time Selected Use this button to edit a scheduled backup task Select first the scheduled backup task then click this button New Used this bu...

Страница 170: ...Schedule Setting Options Backup List Select the backup plan from the list Time Set the hour and minutes when the backup will be run Day Select the day or days when the backup will be run OK Use this b...

Страница 171: ...eduled Backup Task Steps to Edit Scheduled Backup Task 1 Move the scroll bar then locate the scheduled backup task to be changed or click Now to see current scheduled backup 2 Select the backup task t...

Страница 172: ...NOTE It is not allowed to have duplicated or overlapping backup time Only one backup process can be running at a time A scheduled backup is set to run within 30 minutes time frame Scheduling another...

Страница 173: ...folder A browser s upload window will show up and user needs to locate the file from local computer to be uploaded to the current folder Download a file User needs to have at least read permission to...

Страница 174: ...NAS System 174 User Manual Admin is logged in Local user testuser is logged in...

Страница 175: ...Manual 175 3 6 2 Login to File Manager 3 6 2 1 Admin Login Admin can login to File Manager while in proNAS Manager GUI Select the File Manager icon on the upper right corner The File Manager window wi...

Страница 176: ...NAS System 176 User Manual 3 6 2 2 Ordinary User Login Ordinary user can login to File Manager from main login screen After login the File Manager window will be displayed...

Страница 177: ...te permission to the share folder sub folder in order to create a new sub folder NOTE Some characters such as and are not allowed to be used as folder name To create a folder or sub folder 16 Select t...

Страница 178: ...essage is displayed click Yes to confirm deletion 3 The folder will be deleted 3 6 3 3 Rename Folder NOTE User needs to have read and write permission to the share folder and the sub folder itself in...

Страница 179: ...folder 1 Select the folder or sub folder whose permission will be set then select Folder menu and click Set Folder Permission 2 The Set folder permission window will be displayed Modify the permissio...

Страница 180: ...folder use the Apply Permission button 3 6 3 5 Top Use the Top option in the Folder menu to go up to the top most level of share folder list from the current sub folder You can also use the Top and Ba...

Страница 181: ...are folder and the sub folder itself in order to upload a file NOTE The file size limit for uploading file via File Manager is 25MB only To upload a file 1 Select a folder or sub folder where a file w...

Страница 182: ...the file 3 Select File menu and click Download 4 Save or open the file 3 6 4 3 Rename File NOTE User needs to have read and write permission to the share folder sub folder and to the file itself in or...

Страница 183: ...sion to the share folder sub folder and to the file itself in order to delete the file To delete a file 1 Select a folder or sub folder where the file to be deleted is located 2 Select the file 3 Sele...

Страница 184: ...ile itself in order to set file permission To set file permission 1 Select a folder or sub folder where the file is located 2 Select the file 3 Select File menu and click Set File Permission 4 The Set...

Страница 185: ...displayed in the File List on the right pane NOTE Use the Filter function to display specific files For example if you want to display files with characters volume enter the word volume in the Filter...

Страница 186: ...d Logout 3 6 5 1 Preview Function The Preview function enables the user to see a sample view of a picture file on the left lower pane The supported file format is JPEG Image JPG By default the Preview...

Страница 187: ...NAS System User Manual 187 3 6 5 2 Logout Use the Logout function to logout from File Manager To logout 1 Select System menu and click Logout 2 A message will be displayed Click Yes to confirm logout...

Отзывы: