


GB
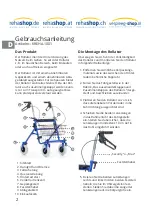
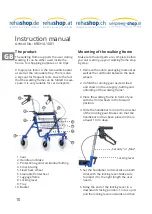
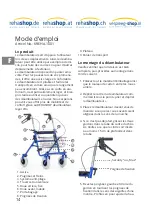
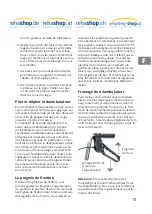
The basket
The basket makes your shopping truly com-
fortable. lt can be attached via hooks below
the seat.
Attention: The basket is only suitable for the
transport of groceries and similar things. lt
is not suitable to place children or animals
in. The maximum loading weight is 5 kg. lt
is highly recommended not to overload the
basket since this can cause accidents and
damage the basket.
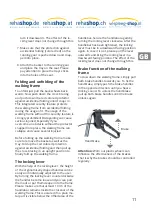
The seat
The seat is made of plastic. lt allows the
user to have brakes while walking and to
take the burden off of the legs. Attention:
Do not use the tray as a seat and make sure
that the handbrake on the left and the right
side have been fully pressed down. You can
find a detailed description of how to use the
handbrake in the category „brake function of
the walking frame“.
Make sure that the only pressure on the
seat is from above. Do not lean against the
seat or the walking frame because it is no
substitute for a chair. The walking frame
requires an even, solid ground in order to
use the seat.
The cane holder
The walking frame is equipped with a cane
holder. The cane holder is placed on the
right side and consists of a clip, which is on
the same level as the seat, as well as plastic
box, which is on the same level as the lugga-
ge rest. lf using the cane holder make sure
that the cane is fixed and secured.
Cleaning and maintenance
To clean the walking frame, simply use water
and if you wish a mild cleanser. You can re-
move tough dirt by using a car cleanser. No
water should enter the walking frame tubes
during the cleaning process which is why it
should only be cleaned in a fully mounted
position. lf needed, have your walking frame
checked and maintaind by a professional
or replace a worn out one with a new one.
Make sure to contact your specialist dealer,
when you find any defects while checking the
braking force on a regular basis.
lt is not allowed to operate the walking frame
without professional maintenance.
Warranty
We grant warranty on this product according
to european provision of the law. Warranty
is valid for the first 12 month. This warranty
is valid for production and mounting defects.
We are not liable for wear and tear as well as
careless or improper use. The warranty loses
its validation if changes or reparations were
done by non authorized dealers or people.
lt does not include costs for troubleshoo-
ting, freight, usage, loss of earnings, needed
drives and similar costs. Furthermore the
warranty does not include damages and
injuries which were caused by improper use,
abuse or disregard of the instruciton manual.
lt is forbidden to make any technical changes
to this product.
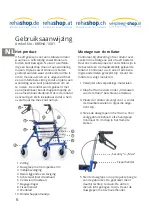
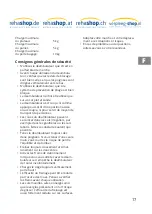
Technische Daten
Total width:
66,5 cm
Total length:
60 cm
Width between
frontwheels:
38 cm
Seat height:
61 cm
Height of the
handlebars:
79 - 94 cm
Width between
the handlebars:
40 cm
Total weight:
10,5 kg
Diameter wheels:
20 cm
Max. weight loading:
130 kg
Max. weight loading
tray:
5
kg
Max. weight loading
basket:
5 kg
Max. weight loading
luggage rest:
10 kg
12
Содержание REHASHOP KREHA-1001
Страница 18: ...NOTES 18...