background image

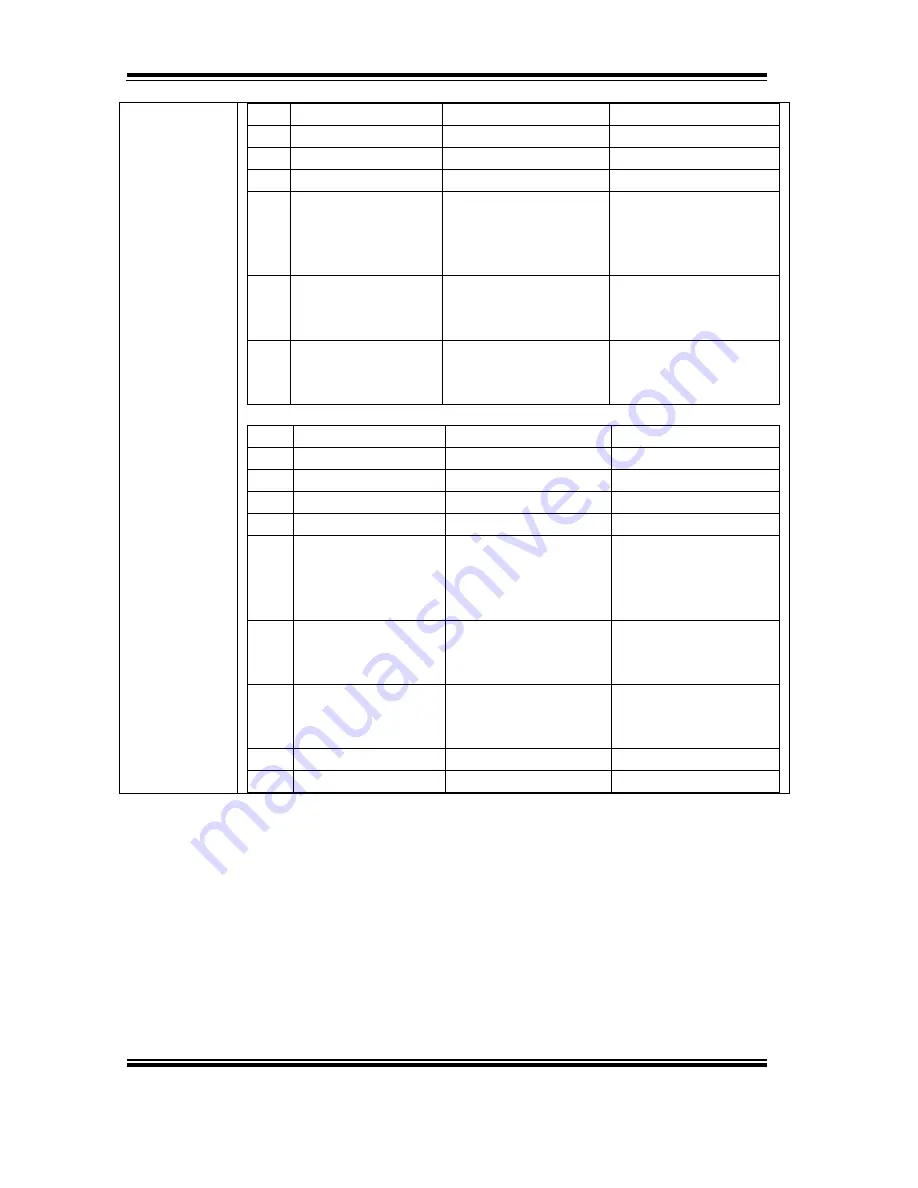
Chapter    6  Command  List 


MP-1060 USER

S MANUAL 

Page:6-43


UPC-A 

11 

 k 

 12 

48 

 d 

 57 

UPC-E 

11 

 k 

 12 

48 

 d 

 57 

JAN13 (EAN13) 

12 

 k 

 13 

48 

 d 

 57 

JAN8 (EAN8) 

 k 

 8 

48 

 d 

 57 

CODE39 

 k 

 255 

48 

 d 

 57, 65 

 d 


90, 
32, 36, 37, 43, 45, 46, 
47 

ITF 

 k 

 254 (How-

ever, this is an even 
number.) 

48 

 d 

 57 

CODABAR 

 k 

 255 

48 

 d 

 57, 65 

 d 


68, 
36, 43, 45, 46, 47, 58 

  2: 

Bar Code Type 

Defined region of n 

Defined region of d 

65 

UPC-A 

11 

 n 

 12 

48 

 d 

 57 

66 

UPC-E 

11 

 n 

 12 

48 

 d 

 57 

67 

JAN13 (EAN13) 

12 

 n 

 13 

48 

 d 

 57 

68 

JAN8 (EAN8) 

 n 

 8 

48 

 d 

 57 

69 

CODE39 

 n 

 255 

48 

 d 

 57, 65 

 d 


90, 
32, 36, 37, 43, 45, 46, 
47 

70 

ITF 

 n 

 254    (How-

ever, this is an even 
number.) 

48 

 d 

 57 

71 

CODABAR 

 n 

 255 

48 

 d 

 57, 65 

 d 


68, 
36, 43, 45, 46, 47, 58 

72 

CODE93 

 n 

 255 

 d 

 127 

73 

CODE128 

 n 

 255 

 d 

 127 


Содержание MP-1060

Страница 1: ...USER S MANUAL MP 1060 Thermal Receipt Printer MP 1060 M1 ...

Страница 2: ...ir respective owners This manual is copyrighted in June 2015 You may not reproduce or transmit in any form or by any means electronic or mechanical including photocopying and recording DISCLAIMER This operation manual is meant to assist you in using the printer board The information contained in this document is subject to change without any notice ...

Страница 3: ...taching and Removing the Connector Cover 2 11 2 6 Attaching and Removing the Splash Proof Cover 2 13 2 7 Attaching and Removing the Paper Guide 2 13 CHAPTER 3 INSTALL AND SETUP 3 1 Install the printer 3 2 3 2 Setting the DIP Switch 3 3 3 3 DIP Switches functions 3 4 3 4 Adjusting the Paper near end sensor 3 8 CHAPTER 4 HEXADECIMAL DUMPING SELF TESTING 4 1 Hexadecimal dumping 4 2 4 2 Self Testing 4...

Страница 4: ...ils 6 4 6 3 Kanji Control Command Details 6 5 6 4 Standard Command Details 6 6 CHAPTER 7 LANGUAGES 7 1 Ank Codes 7 2 7 2 International Characters 7 5 7 3 Japanese Language Codes Shift JIS Codes 7 6 7 4 Taiwanese Language Codes 7 14 7 5 Simplified Chinese Language Codes 7 6 Korean Language Codes 7 29 7 41 ...

Страница 5: ...gives you the information for MP 1060 It also outlines the system specifications Sections include About This Manual System Specifications Safety Precautions Experienced users can jump to chapter 2 on page 2 1 for a quick start CHAPTER 1 ...

Страница 6: ...you how to install and set up the whole system It contains five chapters The user can refer the user s manual for configuration according to the following chapters Chapter 1 Introduction This chapter introduces you to the background of this manual and the specifications for this printer board The final page of this chapter will indicate how to avoid damaging this board Chapter 2 Parts and Basic Op...

Страница 7: ...ean characters Support digital LOGO printing saved in FLASH ROM Modularized design of printer head Multiple interface for USB Serial and Ethernet Port Auto paper cutter for full cut and partial cut available Paper near end detector sensor and LED Buzzer warring indicator EPSON command and other emulation 1D 2D barcode printing supported Easy to set and high volume capacity of paper Spectacular val...

Страница 8: ...er Full Partial Tear bar Paper Type Receipt Thermal paper Thickness 0 06mm 0 09mm Roll diameter Max 80 0mm Reliability Printing head 100 km MCBF 60 million lines Auto cutter 1 5 million cuts Performance Interface USB Virtual COM Serial Ethernet Optional Receive Buffer 4KB Logo size 64K Software Emulation ESC POS CMD compatible Driver WinXP Win7 Win8 32bits 64bits OPOS Physical Dimensions 142mm x 1...

Страница 9: ...12 x 24 default Font B 9 x 17 Font C 24 x 24 No char per line Font A 36 C L Font B 48 C L Font C 18 C L Barcode 1D UPC A UPC E JAN8 EAN8 JAN13 EAN13 CODE39 ITF Interleaved 2 of 5 CODABAR NW 7 CODE93 CODE128 2D QR Code Environment Operating Temp 10 to 50 C 35 C In case of Printing rate over 10 Storage Temp 30 to 60 C Operating Temp 10 to 90 RH Storage Temp 10 to 90 RH expect for paper Accessories 2...

Страница 10: ... cold winter day c Bear in mind that the operating ambient temperature is from 5 C up to 35 C d Avoid moving the system rapidly from a hot place to a cold place or vice versa because condensation may come from inside of the system e Place MP 1060 against strong vibrations which may cause hard disk failure f Do not place the system too close to any radioactive device Radio active device may cause i...

Страница 11: ...Page 2 1 PARTS AND BASIC OPERATION CHAPTER 2 Helpful information describes the parts and operation of MP 1060 Sections include Unpacking Part Structure Connectors ...

Страница 12: ...Chapter 2 Parts and Operations Page 2 2 MP 1060 USER S MANUAL 2 1 UNPACKING 2 1 1 Main parts Printer body 1 User s CD ROM 1 External power supply unit 1 ...

Страница 13: ...e Configuration MP 1060 USER S MANUAL 2 1 2 Options Cable cover Splash proof cover 2 Paper guide 2 3 Wall mount kits Hanging bracket set Chapter 2 Hardware Configuration Page 2 3 plash proof cover 3 10M Test Roll paper ...

Страница 14: ...Chapter 2 Parts and Operations Page 2 4 MP 1060 USER S MANUAL External Interface Cables USB Serial LAN ...

Страница 15: ...Chapter 2 Hardware Configuration MP 1060 USER S MANUAL Page 2 5 2 2 Part Structure 2 2 1 Main body ...

Страница 16: ...ly is on Goes out when the power supply is turned off ERROR Red Lights when an error occurs Goes out during regular operation PAPER Yellow Lights when there is no more roll paper Goes out when there is a sufficient amount of roll paper remaining Flashes when paper near end sensor is enabled and there is little remaining ...

Страница 17: ...ding this button down and feeds the roll paper continuously 2 2 4 Power Switch The power switch is located at the bottom right front of the printer Turn the printer on or off The marks on the switch 0 on 1 off indicate the printer switch position CAUTION Before turning on the printer be sure to check that the AC adapter is connected to the power supply ...

Страница 18: ...cables are connected to the connector panel on the lower rear of the printer Drawer kick out connector for connecting the cash drawer Power supply connector for connecting the power supply unit Interface connector to connect the printer to the host computer interface serial USB LAN ...

Страница 19: ...ll Paper CAUTION Be sure to use roll paper that meets printer specifications Do not use roll paper whose trailing end is glued to the roll paper core Installing Roll Paper 1 Make sure the host has not sent a printing command to the printer and press the cover open button to open the printer cover ...

Страница 20: ...R S MANUAL 2 Load the roll paper Horizontal position Vertical position CAUTION When loading the roll paper pay attention to the direction that the roll paper is fed out of the printer 3 Pull out the roll paper toward you and then close the printer cover ...

Страница 21: ... Attaching and Removing the Connector Cover These instructions apply if a cable is packed with your printer to protect your cables To attach it follow the steps below 1 First connect all the cables and use cable clip and screw to fix the cables as shown in illustration ...

Страница 22: ...and Operations Page 2 12 MP 1060 USER S MANUAL 2 Position the two hooks on the connector cover so that they hook the printer case as shown in illustration 3 Push the connector cover down to click onto the printer case ...

Страница 23: ...d Removing the Splash Proof Cover 1 Position the two hooks on the right and left side at the bottom so that they could hook the printer case as shown in illustration 2 7 Attaching and Removing the Paper Guide 1 Open the front door and insert the paper guide as shown in illustration ...

Страница 24: ... USER S MANUAL 2 Position the top hook point of the paper guide into the corresponding hole of the printer as shown in illustration 3 Position the left hook point of the paper guide into the corresponding hole of the printer as shown in illustration ...

Страница 25: ...ALL AND SETUP This chapter comprises the information of install and setup for MP 1060 Sections include Install the printer Setting the DIP Switch DIP Switches functions Adjusting the Paper near end sensor CHAPTER 3 ...

Страница 26: ...t horizontal or vertical position Avoid locations susceptible to dust and other foreign matter Be sure to avoid bumping so that the printer is not exposed to strong impact during operation Avoid placing the printer on top of the power supply or other cables or other objects 3 1 2 Precautions for Wall Installation Make the following settings on the printer when you hang it on a wall 1 Set the print...

Страница 27: ...UTION Always change DIP switch settings only when the printer is turned off Change made with the power on have no effect and then on again 1 Make sure the power supply for the printer is turned off 2 Unscrew the screw to remove the DIP switch cover from the base of the printer 3 Set the DIP switches as desired using the tip of a tool such as a small screwdriver 4 Attach the DIP switch cover and sc...

Страница 28: ... OFF DTR DSR OFF 4 Word length 7 bits 8 bits OFF 5 Parity check Yes No OFF 6 Parity selection EVEN ODD OFF 7 Baud rate selection Refer to Table 1 Baud Rate Selection OFF 8 OFF DIP Switch 2 SW Function ON OFF Default 1 Code Page Selection Table 3 Code Page Selection OFF 2 OFF 3 OFF 4 Internal bell control Enable Disable ON 5 Ethernet Interface Enable Disable OFF 6 Near End Sensor Status Enable Disa...

Страница 29: ...FF 3 Reserved OFF 4 Reserved OFF 5 Reserved OFF 6 Reserved OFF 7 Reserved OFF 8 Reserved OFF DIP Switch 2 SW Function ON OFF Default 1 Code Page Selection Table 3 Code Page Selection OFF 2 OFF 3 OFF 4 Internal bell control Enable Disable ON 5 Ethernet Interface Enable Disable OFF 6 Near End Sensor Status Enable Disable OFF 7 Select Print Density Refer to Table 2 Density Selection OFF 8 OFF ...

Страница 30: ... 3 Reserved OFF 4 Reserved OFF 5 Reserved OFF 6 Reserved OFF 7 Reserved OFF 8 Reserved OFF DIP Switch 2 SW Function ON OFF Default 1 Code Page Selection Table 3 Code Page Selection OFF 2 OFF 3 OFF 4 Internal bell control Enable Disable ON 5 Ethernet Interface Enable Disable ON 6 Near End Sensor Status Enable Disable OFF 7 Select Print Density Refer to Table 2 Density Selection OFF 8 OFF ...

Страница 31: ... OFF 9600 ON ON Table 2 Density Selection Print Density SW2 7 SW2 8 Note 1 Light OFF ON 60 2 ON OFF 80 3 OFF OFF 100 4 Dark ON ON 120 Table 3 Code Page Selection Code Page SW1 1 SW1 2 SW1 3 CP 437 OFF OFF OFF Katakana character OFF OFF ON CP 850 OFF ON OFF CP 852 OFF ON ON CP 860 ON OFF OFF CP 863 ON OFF ON CP 865 ON ON OFF WPC 1252 ON ON ON ...

Страница 32: ...exactly Use roll paper with a core inner diameter of 12 mm and outer diameter of 18 mm so the paper detector can detect the remaining paper as accurately as possible Follow the procedure below to adjust the roll paper detector position 1 Open the roll paper cover and remove the roll paper 2 Bend the adjustment lever to reposition paper sensor Adjustment positions are as follows 3 After adjustment ...

Страница 33: ...aper outer diameter mm Lv 3 Vertical 3 Horizontal 2 Vertical 2 Horizontal 4 7 65mm 7 68mm 7 39mm 7 41mm 7 77mm 7 80mm 7 35mm 7 47mm 3 7 05mm 7 08mm 6 86mm 6 90mm 7 49mm 7 57mm 6 93mm 7 08mm 2 6 92mm 6 97mm 6 13mm 6 15mm 6 99mm 7 00mm 6 12mm 6 18mm 1 6 36mm 6 45mm 6 02mm 6 06mm 6 39mm 6 46mm 5 75mm 5 99mm ...

Страница 34: ...Page 4 1 HEXADECIMAL DUMPING SELF TESTING This chapter shows hexadecimal dumping and self testing of MP 1060 Sections include Hexadecimal dumping Self Testing CHAPTER 4 ...

Страница 35: ... send data to printer The printer will then print out the data in two rows and hexadecimal format Turn off 1 After the printing is complete turn off the printer The printer will resume normal printing mode after restart 4 2 THE SELF TESTING Explanation Printing the FW Version and DIP Switch How to Print 1 Click on the Feed to open Power switch when the computer is off 2 Data will be printed and pa...

Страница 36: ...ATION Helpful information that describes the settings for the display and you ll know how to install MP 1060 Utility step by step in this chap ter Sections include Ethernet Interface Card Setting Printer Driver Setting CHAPTER 5 ...

Страница 37: ... Open your Browser and Input default IP 192 168 1 100 If you could not open the web page please reset the interface card IP return to the default value Default Setting IP Address 192 168 1 100 Netmask 255 255 255 0 Gateway 192 168 2 254 BaudRate 115200 bps Local port 9100 3 Enter your settings IP Address Netmask Gateway BaudRate BaudRate setting value must be 921600 bps ...

Страница 38: ... USER S MANUAL Page 5 3 4 Press the Send button wait for the browser connection error 5 Input new IP in the browser If you could open the web page this configuration was successful If you could not open the web page please go back to step 2 ...

Страница 39: ...Chapter 5 Software Configuration MP 1060 USER S MANUAL Page 5 4 5 2 PRINTER DRIVER SETTING 1 Printer Driver Installation 2 Setting Ports a Serial Port USB Interface Select the Serial Port COM1 ...

Страница 40: ...Chapter 5 Character Code Table MP 1060 USER S MANUAL Page 5 5 Configure Port b Ethernet Interface ...

Страница 41: ...Chapter 5 Software Configuration MP 1060 USER S MANUAL Page 5 6 Add Port ...

Страница 42: ...Chapter 5 Character Code Table MP 1060 USER S MANUAL Page 5 7 Standard TCP IP port Type in IP address 192 168 1 100 and Port Name IP_192 168 1 100 ...

Страница 43: ...Chapter 5 Software Configuration MP 1060 USER S MANUAL Page 5 8 Configure port Protocol Raw Port Number 9100 ...

Страница 44: ...Chapter 5 Character Code Table MP 1060 USER S MANUAL Page 5 9 3 Print Test Page ...

Страница 45: ...acter codes Note All the tables only show the character configurations They do not show the actual print pattern Sections include Standard Command List Two Dimensional Bar Code Command Details Kanji Control Command Details Standard Command Details CHAPTER 6 ...

Страница 46: ... position ESC 1B 2A Select bit image mode ESC 1B 2D Turn underline mode on off ESC 2 1B 32 Select default line spacing ESC 3 1B 33 Set line spacing ESC 1B 3D Select peripheral device ESC 1B 40 Initialize printer ESC D 1B 44 Set horizontal tab position ESC E 1B 45 Turn emphasized mode on off ESC G 1B 47 Turn double strike mode on off ESC J 1B 4A Print and feed paper ESC L 1B 4C Select page mode Ign...

Страница 47: ... 2A Define download bit images GS A 1D 28 41 Execute test print Disabled GS K 1D 28 4B Set print density Disabled GS 1D 2F Print download bit image GS B 1D 42 Turn white black reverse printing mode on off GS H 1D 48 Select printing position of HRI characters GS I 1D 49 Transmit printer ID Disabled GS L 1D 4C Set left margin Disabled GS P 1D 50 Set basic calculated pitch GS V 1D 56 Cut paper GS W 1...

Страница 48: ...lect Kanji character mode FS 1C 2D Turn underline mode on off for Kanji characters FS 1C 2E Cancel Kanji character mode FS S 1C 53 Set Kanji character spacing FS W 1C 57 Turn quadruple size mode on off for Kanji characters Command classification Executing Printer executes the command which does not then affect the following data Setting Printer uses flags to make settings and those settings affect...

Страница 49: ... ESC D Set cancel horizontal tab position When the print position is at the print region 1 position and this command is received the current line buffer full is printed and a hori zontal tab is executed from the top of the next line The initial value of the horizontal tab position is every 8 characters of Font A the 9th 17th 25th positions etc LF Name Print and line feed Format ASCII LF Hex 0A Dec...

Страница 50: ...arriage return Format ASCII CR Hex 0D Decimal 13 Range N A Description When an automatic line feed is enabled this command functions in the same way as LF print and line feed When the automatic line feed is disabled this command is ignored This command is ignored with serial interface models Sets the print position to the beginning of the next line after execution CAN Name Cancel print data in pag...

Страница 51: ...HIGH 3 Off 00 0 On line On 08 8 Off line 4 On 10 16 Not used Fixed to On 5 Off 00 0 Not used Fixed to Off 6 Off 00 0 Not used Fixed to Off 7 Off 00 0 Not used Fixed to Off n 2 Off line status Bit On Off Hex Decimal Function 0 Off 00 0 Not used Fixed to Off 1 On 02 2 Not used Fixed to On 2 Off 00 0 Cover is closed On 04 4 Cover is open 3 Off 00 0 Not used Fixed to Off 4 On 10 16 Not used Fixed to O...

Страница 52: ...mal Function 0 Off 00 0 Not used Fixed to Off 1 Off 02 2 Not used Fixed to On 2 Off 00 0 No paper near end stop On 04 4 Printing stops due to paper near end 3 Off 00 0 No paper near end stop On 08 8 Printing stops due to paper near end 4 On 10 16 Not used Fixed to On 5 Off 00 0 No paper end stop On 20 32 Printing stops due to paper end 6 Off 00 0 No paper end stop On 40 64 Printing stops due to pa...

Страница 53: ...ed n 2 Recover from error after clearing the reception buffer and print buffer This command is enabled even when the printer specification is disabled by ESC select Peripheral devices DLE DC4 n m t Name Real time output of specified pulse Format ASCII DLE DC4 n m t Hex 10 14 n m t Decimal 16 20 n m t Range n 1 m 0 1 1 t 8 Description This outputs a signal specified by t to the connector pin specif...

Страница 54: ...d only in page mode Holds the following information after printing a Expanded data b Character print direction selection in page mode ESC T c Set print region ESC W in the page mode d Character expansion position ESC SP n Name Set right side character spacing Format ASCII ESC SP n Hex 1B 20 n Decimal 27 32 n Range 0 n 255 Initial Value n 0 Description This command sets the size of space to right o...

Страница 55: ...ion 0 Off 00 0 Character font A selected On 01 1 Character font B selected 1 Off 00 0 Not used Fixed to Off 2 Off 00 0 Not used Fixed to Off 3 Off 00 0 Emphasized mode not selected On 08 8 Emphasized mode selected 4 Off 00 0 Double height mode not selected On 10 16 Double height mode selected 5 Off 00 0 Double width mode not selected On 20 32 Double width mode selected 6 Off 00 0 Not used Fixed to...

Страница 56: ...ct bit image mode Format ASCII ESC m nL nH d1 dk Hex 1B 2A m nL nH d1 dk Decimal 27 42 m nL nH d1 dk Range m 0 1 32 33 0 nL 255 0 nH 3 0 d 255 Description Selects a bit image mode in mode m for the number of dots specified by nL and nH m 1 33 nL nH 256 576 3 inch nL nH 256 432 2 inch m 0 32 nL nH 256 288 3 inch nL nH 256 216 2 inch m Mode Number of Vert Dir Dots Density of Vert Dir Dots Density of...

Страница 57: ...ode set at 1 dot thick 2 Turns on underline mode set at 2 dot thick ESC 2 Name Select default line spacing Format ASCII ESC 2 Hex 1B 32 Decimal 27 50 Range N A Description This command sets the default line spacing The default line spacing is approximately 4 25 mm which is equivalent to 34 dots ESC 3 n Name Set line spacing Format ASCII ESC 3 n Hex 1B 33 n Decimal 27 51 n Range 0 n 255 Initial Val...

Страница 58: ...n Selects the peripheral device for which the data is effective from the host computer Bit Function 0 1 7 Undefined 6 Undefined 5 Undefined 4 Undefined 3 Undefined 2 Undefined 1 Undefined 0 Printer Invalid Valid ESC Name Initialize printer Format ASCII ESC Hex 1B 40 Decimal 27 64 Range N A Description Clears data from the print buffer and sets the printer to its default settings ...

Страница 59: ...al Value n 0 Description This command turns emphasized mode on or off by toggling the least significant bit of n like following When the LSB of n is 0 emphasized mode is turned off When the LSB of n is 1 emphasized mode is turned on ESC G n Name Turn double strike mode on off Format ASCII ESC G n Hex 1B 47 n Decimal 27 71 n Range 0 n 255 Initial Value n 0 Description Specifies or cancels double pr...

Страница 60: ...tion unit y In page mode this command functions as follows depending on the starting position of the printable area 1 When the starting position is set to the upper left or lower right of the printable area using ESC T the vertical motion unit y is used 2 When the starting position is set to the upper right or lower left of the print able area using ESC T the horizontal motion unit x is used The m...

Страница 61: ... the page mode command This command switches the settings for the following commands the values of which can be set independently in standard mode and page mode to those for page mode a Set space amount ESC SP FS S b Set line feed amount ESC 2 ESC 3 The following commands are enabled only when in page mode a ESC V Specify cancel character 90 degree clockwise rotation b ESC a Position alignment c E...

Страница 62: ...d 1 Character font B selected ESC R n Name Select an international character set Format ASCII ESC R n Hex 1B 52 n Decimal 27 82 n Range 0 n 16 Initial Value n 0 Description This command specifies international characters according to n values n Character set 0 USA 1 France 2 Germany 3 UK 4 Denmark I 5 Sweden 6 Italy 7 Spain 8 Japan 9 Norway 10 Denmark II 11 Spain II 12 Latin America 13 Korea 14 Ru...

Страница 63: ...andard mode and page mode to those for standard mode a ESC SP Set character right space amount b FS S Set Chinese character space amount c ESC 2 Set default line spacing d ESC 3 Set line feed amount The following commands are effective only when in standard mode a ESC W Set print region in page mode b ESC T Select character print direction in page mode The following commands are ignored in standar...

Страница 64: ...tion Selects the character printing direction and starting point in page mode n Print Direction Starting Point 0 48 Left to Right Upper Left A in the figure below 1 49 Bottom to Top Lower Left B in the figure below 2 50 Right to Left Lower Right C in the figure below 3 51 Top to Bottom Upper Right D in the figure below ESC V n Name Turn 90 degree clockwise rotation mode on off Format ASCII ESC V n...

Страница 65: ...commands are given If 90 degree clockwise rotation is specified double wide and double tall commands in the 90 rotation mode enlarges characters in the opposite directions to double wide and double tall commands This command only affects printing in standard mode In page mode this command is only effective for the setting This command is effective for ANK and Chinese characters n Function 0 48 Tur...

Страница 66: ...pitch Vertical direction starting point yL yH x 256 x basic calculated pitch Horizontal direction length dxL dxH x 256 basic calculated pitch Vertical direction length dyL dyH x 256 basic calculated pitch X Dx 1 576 3 inch basic calculated pitch 1 X Dx 1 432 2 inch basic calculated pitch 1 Y Dy 1 768 basic calculated pitch 1 If horizontal starting position printing area width exceeds the printable...

Страница 67: ...This sets the position from the current position to nL nH x 256 x basic calculated pitch for the next print starting position Specifications exceeding the print range are ignored ESC a n Name Select justification Format ASCII ESC a n Hex 1B 61 n Decimal 27 97 n Range 0 n 2 Initial Value n 0 Description This command specifies position alignment for all data in one line in standard mode using n as f...

Страница 68: ...ndefined 1 Paper roll near end detector Invalid Valid 0 Paper roll near end detector Invalid Valid ESC c 4 n Name Select paper sensor s to stop printing Format ASCII ESC c 4 n Hex 1B 63 34 n Decimal 27 99 52 n Range Specification 0 n 3 Initial Value n 0 Description Selects the paper out detector to stop printing when paper has run out Bit Function 0 1 7 Undefined 6 Undefined 5 Undefined 4 Undefine...

Страница 69: ...ches are disabled ESC d n Name Print and feed n lines Format ASCII ESC d n Hex 1B 64 n Decimal 27 100 n Range 0 n 255 Description Prints the data in the print buffer and performs a paper feed of n lines Sets the print position to the beginning of the next line after printing Paper is fed approximately 150 mm if the n x basic calculated pitch exceeds approximately 150 mm 5 9 inches ESC i Name Full ...

Страница 70: ...ncut in standard mode ESC p m t1 t2 Name General pulse Format ASCII ESC p m t1 t2 Hex 1B 70 m t1 t2 Decimal 27 112 m t1 t2 Range 0 m 1 48 m 49 0 t1 255 0 t2 255 Description This outputs a signal specified by t1 and t2 to the connector pin specified by m Drawer kick on time is set to t1 x 2 ms off time is set to t2 x 2 ms m Connector Pin 0 48 Drawer kick connector pin 2 1 49 Drawer kick connector p...

Страница 71: ...ing mode on off Format ASCII ESC n Hex 1B 7B n Decimal 27 123 n Range 0 n 255 Initial Value n 0 Description Specifies or cancels upside down printing Cancels upside down printing when n 0 H Specifies upside down printing when n 1 H n is effective only when it is the lowest bit This command is effective only when input at the top of the line when standard mode is being used This command has no affe...

Страница 72: ... using mode m n specifies the NV bit image number m specifies the bit image mode NV bit image is a bit image defined in non volatile memory by FS q and printed by this command This command is ignored when the specified NV bit image n is unde fined This command is effective only when no data exists in the print buffer in standard mode m Mode 0 48 Nornal 1 49 Double width 2 50 Double height 3 51 Qua...

Страница 73: ... xL xH yL yH d1 dk 1 xL xH yL yH d1 dk n Range 1 n 255 1 xL xH 256 54 0 xL 54 xH 0 for 2 inch 1 xL xH 256 72 0 xL 72 xH 0 for 3 inch 1 yL yH 256 96 0 yL 96 yH 0 0 d 255 k xL xH 256 yL yH 256 8 Description Defines the specified NV bit image n specifies the number of NV bit images to define xL and xH specify the horizontal direction for one NV bit image xL xH x 256 x 8 dots yL and yH specify the ver...

Страница 74: ...s normal font size in the vertical direction Refer to Table 2 Enlarged in vertical direction 1 2 3 4 Specifies the number of times normal font size in the horizon tal direction Refer to Table 1 Enlarged in horizontal direction 5 6 7 Table 1 Enlarged in horizontal direction Hex Decimal Enlargement 00 0 1 time standard 10 16 2 times 20 32 3 times 30 48 4 times 40 64 5 times 50 80 6 times 60 96 7 tim...

Страница 75: ...direction position for the data expansion starting position using the absolute position based on the starting point in page mode The position of the character vertical direction for the next data expansion starting position is the position specified by nL nH x 256 x basic calculated pitch from the starting point When not in page mode this command is ignored Specifications for absolute positions th...

Страница 76: ...Y 96 0 d 255 Description Defines the download bit image of the number of dots specified by X and Y X specifies the number of bytes in the horizontal direction Y specifies the number of bytes in the vertical direction Horizontal direction dot count is X x 8 dots Vertical direction dot count is Y x 8 dots d indicates the bit image data Bits that correspond to the dots to print are 1 and the bits tha...

Страница 77: ... command is ignored in page mode Specifies the parameter count following pL and pH in pL pH x 256 bytes n specifies the paper to be tested n Paper Type 0 48 Basic sheet paper roll 1 49 2 50 Paper Roll m specifies a test pattern m Type of Test Print 2 50 Printer Status Self Print 3 51 Rolling Pattern Print GS K pL pH n m Name Set print density Format ASCII GS A pL pH n m Hex 1D 28 4B pL pH n m Deci...

Страница 78: ...t downloaded bit image Format ASCII GS m Hex 1D 2F m Decimal 29 47 m Range 0 m 3 48 m 51 Description This command prints the downloaded bit image defined by GS accord ing to the mode denoted by m m Mode Vertical dot density DPI Horizontal dot density DPI 0 48 Normal 203 203 1 49 Double width 203 101 2 50 Double height 101 203 3 51 Quadruple 101 101 GS B n Name Turn white black reverse printing mod...

Страница 79: ...tive only when it is the lowest bit Internal characters and download characters are targeted for black and white inverted printing This command is effective for ANK and Chinese characters GS H n Name Select printing position of HRI characters Format ASCII GS H n Hex 1D 48 n Decimal 29 72 n Range 0 n 3 48 n 51 Initial Value n 0 Description Selects the printing position of HRI characters when printi...

Страница 80: ...Model ID MB 1030 or MP 1060 2 50 Type ID 1030 XX or 1060 XX 3 51 ROM Version ID Depends on the ROM version 65 Firmware Version Depends on the firmware version 66 Manufacturer Name MB 1030 System or MP 1060 System 67 Model Name MB 1030 or MP 1060 68 Serial Number Depends on the serial number 69 Chinese Character Types Taiwan Language Characters TW_BIG5 Japanese Language Characters JP_SJIS Chinese L...

Страница 81: ... y Name Set basic calculated pitch Format ASCII GS P x y Hex 1D 50 x y Decimal 29 80 x y Range 0 x 255 0 y 255 Initial Value x 203 y 203 EPSON targeted model print head 203 DPI Description Sets the horizontal basic calculated pitch to approximately 25 4 xmm 1 x inch and the vertical basic calculated pitch to approximately 25 4 ymm 1 y inch x 0 Returns the horizontal basic calculated pitch to its d...

Страница 82: ...sition n x basic calculated pitch and performs a full cut 66 Feeds paper to cutting position n x basic calculated pitch and performs a partial cut one point uncut GS W nL nH Name Set printing area width Format ASCII GS W nL nH Hex 1D 57 nL nH Decimal 29 87 nL nH Range 0 nL 255 0 nH 255 Description Sets the print region width specified by nL and nH Print region width is nL nH x 256 x basic calculat...

Страница 83: ...direction position for the data expansion starting position using the relative position based on the current point in page mode This sets the position moved from the current position to nL nH x 256 x basic calculated pitch for the next data expanding starting position When not in page mode this command is ignored GS a n Name Enable disable Automatic Status Back ASB Format ASCII GS a n Hex 1D 61 n ...

Страница 84: ...ion transmitted is comprised of 4 bytes as follows First byte printer information Bit Off On Hex Decimal Function 7 Off 00 0 Not used Fixed to Off 6 Off 00 0 Paper is not being fed by the paper feed button On 40 64 Paper is being fed by the paper feed button 5 Off 00 0 Cover is close On 20 32 Cover is open 4 On 10 16 Not used Fixed to On 3 Off 00 0 On line On 08 8 Off line 2 Off 00 0 Drawer kick o...

Страница 85: ...ot used Fixed to Off 5 Off 00 0 Not used Fixed to Off 4 On 00 0 Not used Fixed to Off 2 3 Off 00 0 Paper end sensor paper pre sent On 0C 12 Paper end sensor no paper present 0 1 Off 00 0 Paper near end sensor paper adequate On 03 3 Paper near end sensor paper near end Fourth byte paper sensor information Bit Off On Hex Decimal Function 7 Off 00 0 Not used Fixed to Off 6 Off 00 0 Black mark sensor ...

Страница 86: ...Decimal 29 104 n Range 1 n 255 Initial Value n 162 Description Sets bar code height to n dots 1 GS k m d1 dk NUL 2 GS k m n d1 dk Name Print bar code Format 1 ASCII GS k m d1 dk NUL Hex 1D 6B m d1 dk NUL Decimal 29 107 m d1 dk NUL 2 ASCII GS k m n d1 dk Hex 1D 6B m n d1 dk Decimal 29 107 m n d1 dk Range 1 0 m 6 The definition region of k and d differ according to the bar code type 2 65 m 73 The de...

Страница 87: ...en number 48 d 57 6 CODABAR 1 k 255 48 d 57 65 d 68 36 43 45 46 47 58 2 m Bar Code Type Defined region of n Defined region of d 65 UPC A 11 n 12 48 d 57 66 UPC E 11 n 12 48 d 57 67 JAN13 EAN13 12 n 13 48 d 57 68 JAN8 EAN8 7 n 8 48 d 57 69 CODE39 1 n 255 48 d 57 65 d 90 32 36 37 43 45 46 47 70 ITF 2 n 254 How ever this is an even number 48 d 57 71 CODABAR 1 n 255 48 d 57 65 d 68 36 43 45 46 47 58 7...

Страница 88: ...r roll end detector Has Paper Paper out 1 Paper roll near end detector Has Paper Paper out 0 Paper roll near end detector Has Paper Paper out Drawer Kick Connector Status n 2 50 Bit Status 0 1 7 Fixed at 0 6 Undefined 5 Undefined 4 Fixed at 0 3 Undefined 2 Undefined 1 Undefined 0 Drawer kick connector pin 3 L H GS v 0 m xL xH yL yH d1 dk Name Print raster bit image Format ASCII GS v 0 m xL xH yL y...

Страница 89: ...ription Prints raster method bit images using mode m m Mode Density of Vert Dir Dots Density of Hor Dir Dots 0 48 Normal Mode 203 DPI 203 DPI xL and xH specify the horizontal direction data count for one bit im age xL xH x 256 in bytes yL and yH specify the vertical direction data count for one bit image yL yH x 256 in bytes ...

Страница 90: ...nary Level Bar Code Fine Element Width mm Thick Element Width mm 1 0 141 0 141 0 423 2 0 282 0 282 0 706 3 0 423 0 423 1 129 4 0 564 0 564 1 411 5 0 706 0 706 1 834 6 0 847 0 847 2 258 TWO DIMENSIONAL BAR CODE COMMAND DETAILS DC2 n Name QR Code Module Size Set Format ASCII DC n Hex 12 3B n Decimal 18 59 n Range 2 n 16 Initial Value n 2 Description Specifies a module size of QR Code and Data Matrix...

Страница 91: ...QRCode data based on the specified contents model Specifies a model e Selects an error correction level L 4CH M 4DH Q 51H H 48H v 0 Automatic selection A version is automatically selected depending on the number of input data 1 v 40 Fixed version up to 14 for model 1 mode Specifies a mode of data Mode Hexadecimal Mode N 4E Numerical mode A 41 Alphanumeric mode B 42 8 bit byte mode K 4B Kanji mode ...

Страница 92: ... 33 n Range 0 n 255 Initial Value n 0 Description Batch specifies the Kanji character print mode Bit Function 0 1 7 Underline Off On 6 Undefined 5 Undefined 4 Undefined 3 Double tall expanded Off On 2 Expanded wide Off On 1 Undefined 0 Undefined FS Name Select Kanji character mode Format ASCII FS Hex 1C 26 Decimal 28 38 Range N A Description Specifies Kanji character mode ...

Страница 93: ...ji character underlines 2 50 Sets to two dot width Kanji character underline and cancels Kanji character underlines FS Name Cancel Kanji character mode Format ASCII FS Hex 1C 2E Decimal 28 46 Range N A Description Cancels Kanji character mode FS S n1 n2 Name Set Kanji character spacing Format ASCII FS S n1 n2 Hex 1C 53 n1 n2 Decimal 28 83 n1 n2 Range 0 n1 255 0 n2 255 Initial Value n1 0 n2 0 Descr...

Страница 94: ...de on off for Kanji characters Format ASCII FS W n Hex 1C 57 n Decimal 28 87 n Range 0 n 255 Initial Value n 0 Description Specifies or cancels quadruple size Kanji character Cancels quadruple size when n 0 B Specifies quadruple size when n 1 B n is effective only when it is the lowest bit ...

Страница 95: ...e tables only show the character configurations They do not show the actual print pattern Sections include Ank Code Page INTERNATIONAL CHARACTERS Japanese Language Codes Shift JIS Codes Taiwanese Language Codes Simplified Chinese Language Codes Korean Language Codes CHAPTER 7 ...

Страница 96: ...Chapter 7 Languages MP 1060 USER S MANUAL Page 7 2 7 1 Ank Codes ...

Страница 97: ...Chapter 7 Languages MP 1060 USER S MANUAL Page 7 3 ...

Страница 98: ...Chapter 7 Languages MP 1060 USER S MANUAL Page 7 4 ...

Страница 99: ...Chapter 7 Languages MP 1060 USER S MANUAL Page 7 5 7 2 International Characters ...

Страница 100: ...Chapter 7 Languages MP 1060 USER S MANUAL Page 7 6 7 3 Japanese Language Codes Shift JIS Codes ...

Страница 101: ...Chapter 7 Languages MP 1060 USER S MANUAL Page 7 7 ...

Страница 102: ...Chapter 7 Languages MP 1060 USER S MANUAL Page 7 8 ...

Страница 103: ...Chapter 7 Languages MP 1060 USER S MANUAL Page 7 9 ...

Страница 104: ...Chapter 7 Languages MP 1060 USER S MANUAL Page 7 10 ...

Страница 105: ...Chapter 7 Languages MP 1060 USER S MANUAL Page 7 11 ...

Страница 106: ...Chapter 7 Languages MP 1060 USER S MANUAL Page 7 12 ...

Страница 107: ...Chapter 7 Languages MP 1060 USER S MANUAL Page 7 13 ...

Страница 108: ...Chapter 7 Languages MP 1060 USER S MANUAL Page 7 14 7 4 Taiwanese Language Codes ...

Страница 109: ...Chapter 7 Languages MP 1060 USER S MANUAL Page 7 15 ...

Страница 110: ...Chapter 7 Languages MP 1060 USER S MANUAL Page 7 16 ...

Страница 111: ...Chapter 7 Languages MP 1060 USER S MANUAL Page 7 17 ...

Страница 112: ...Chapter 7 Languages MP 1060 USER S MANUAL Page 7 18 ...

Страница 113: ...Chapter 7 Languages MP 1060 USER S MANUAL Page 7 19 ...

Страница 114: ...Chapter 7 Languages MP 1060 USER S MANUAL Page 7 20 ...

Страница 115: ...Chapter 7 Languages MP 1060 USER S MANUAL Page 7 21 ...

Страница 116: ...Chapter 7 Languages MP 1060 USER S MANUAL Page 7 22 ...

Страница 117: ...Chapter 7 Languages MP 1060 USER S MANUAL Page 7 23 ...

Страница 118: ...Chapter 7 Languages MP 1060 USER S MANUAL Page 7 24 ...

Страница 119: ...Chapter 7 Languages MP 1060 USER S MANUAL Page 7 25 ...

Страница 120: ...Chapter 7 Languages MP 1060 USER S MANUAL Page 7 26 ...

Страница 121: ...Chapter 7 Languages MP 1060 USER S MANUAL Page 7 27 ...

Страница 122: ...Chapter 7 Languages MP 1060 USER S MANUAL Page 7 28 ...

Страница 123: ...Chapter 7 Languages MP 1060 USER S MANUAL Page 7 29 7 5 Simplified Chinese Language Codes ...

Страница 124: ...Chapter 7 Languages MP 1060 USER S MANUAL Page 7 30 ...

Страница 125: ...Chapter 7 Languages MP 1060 USER S MANUAL Page 7 31 ...

Страница 126: ...Chapter 7 Languages MP 1060 USER S MANUAL Page 7 32 ...

Страница 127: ...Chapter 7 Languages MP 1060 USER S MANUAL Page 7 33 ...

Страница 128: ...Chapter 7 Languages MP 1060 USER S MANUAL Page 7 34 ...

Страница 129: ...Chapter 7 Languages MP 1060 USER S MANUAL Page 7 35 ...

Страница 130: ...Chapter 7 Languages MP 1060 USER S MANUAL Page 7 36 ...

Страница 131: ...Chapter 7 Languages MP 1060 USER S MANUAL Page 7 37 ...

Страница 132: ...Chapter 7 Languages MP 1060 USER S MANUAL Page 7 38 ...

Страница 133: ...Chapter 7 Languages MP 1060 USER S MANUAL Page 7 39 ...

Страница 134: ...Chapter 7 Languages MP 1060 USER S MANUAL Page 7 40 ...

Страница 135: ...Chapter 7 Languages MP 1060 USER S MANUAL Page 7 41 7 6 Korean Language Codes ...

Страница 136: ...Chapter 7 Languages MP 1060 USER S MANUAL Page 7 42 ...

Страница 137: ...Chapter 7 Languages MP 1060 USER S MANUAL Page 7 43 ...

Страница 138: ...Chapter 7 Languages MP 1060 USER S MANUAL Page 7 44 ...

Страница 139: ...Chapter 7 Languages MP 1060 USER S MANUAL Page 7 45 ...

Страница 140: ...Chapter 7 Languages MP 1060 USER S MANUAL Page 7 46 ...

Отзывы: