background image

11

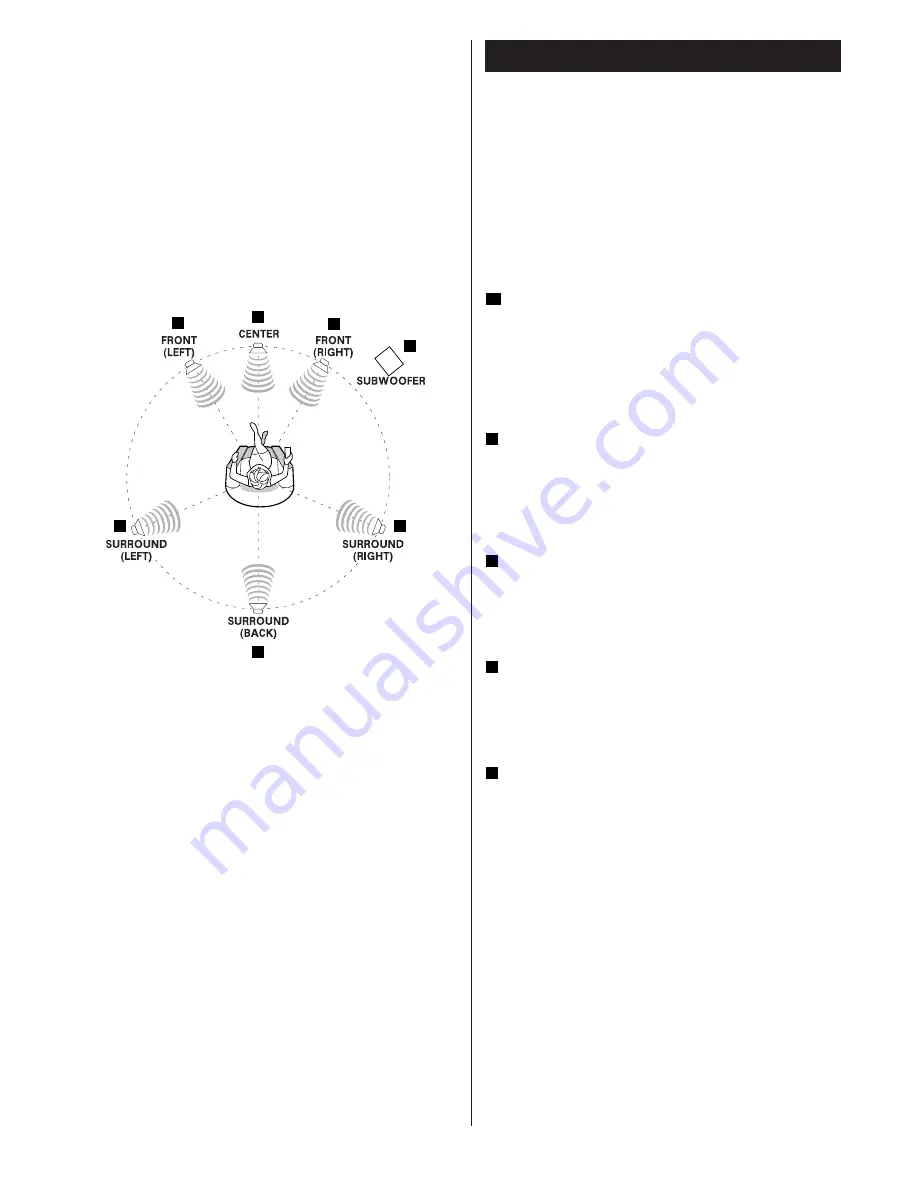
Positioning of the Speakers

The positioning of speakers differs according to the size
and acoustics of the listening room. While actually listening
to a program source, try various speaker positions to
determine which layout provides the best surround effect.

• Ideally, position all the speakers in a circle, with the same

distance from your listening position.

• Place the speakers connected to “L” to your left, and “R” to

your right.

Front speakers
Use magnetically shielded speakers, if you are using them
near your TV.
Place the front speakers in front of the listening position, to
the left and right of a TV.
Front speakers are required for all surround modes.

Center speaker
Use a magnetically shielded speaker if you are using it near
your TV. Place a center speaker between the front
speakers, on or below the TV. This speaker stabilizes the
sound image. 

Surround Left and Right speakers
Install these speakers above the level of the listener’s ears,
directly to the left and right (or slightly behind) of your
listening position. 

Surround Back speaker
Place the surround back speaker at the back of the listening
position facing the front at a slightly higher position than the
surround left and right speakers. Point slightly downward.

Subwoofer
Reproduces powerful and deep bass sounds.
Use a sub-woofer with built-in amplifier referred to as a
“powered sub-woofer”. Subwoofers are most effective when
placed on or near the floor and in a corner of the room.
Refer to the instructions that came with your sub-woofer for
placement suggestions.

E

D

C

B

A

C

C

E

B

A

A

D

Содержание RV2600 DTS

Страница 1: ...OWNER S MANUAL RV2600 DTS AV Digital Home Theater Receiver ...

Страница 2: ...12 Battery Installation 15 Speaker Configuration 16 Basic Operation 20 Dubbing from VIDEO 2 or 3 to VIDEO 1 24 Dubbing the audio and video signals separately 24 Surround Mode 25 DOLBY PRO LOGIC IIx MUSIC parameters 29 Dynamic Range Compression 30 Tuner 31 Preset Tuning 32 RDS 34 RDS Search 35 PTY Programs 36 Troubleshooting 37 Specifications 38 CAUTION The product shall not be exposed to dripping ...

Страница 3: ...ler or service company When removing the power plug from the wall outlet always pull directly on the plug never yank the cord Do not attempt to clean the unit with chemical solvents as this might damage the finish Use a clean dry or slightly damp cloth Keep this manual in a safe place for future reference How to Reset the Settings to the FACTORY DEFAULTS Memory Backup If the power supply is interr...

Страница 4: ...hing transformer as shown After completing connection plug the transformer into the FM 75Ω socket Extend the top of the T and tune the tuner to your favorite station see page 31 Adjust the antenna in a suitable location like a window frame or wall until the reception is best and then affix the antenna in that position using thumb tacks push pins or any other suitable means FM Outdoor Antenna In an...

Страница 5: ...irection which gives the best reception Keep all other wires such as power cords speaker wires or interconnect wires as far away as possible from the antenna If the AM loop antenna provided does not deliver sufficient reception often due to being too far from the transmitter or in a concrete building etc it may be necessary to use an outdoor AM antenna Use either a high quality commercial AM anten...

Страница 6: ...at you do not force the plug because this could result in damage to the protective shutter the cable or the unit itself AUDIO IN OUT jacks Analog 2 channel audio signal is input or output from these jacks Connect the component with commercially available RCA cables Make sure to connect white plug white jack L left channel red plug red jack R right channel EXTERNAL IN jacks If your DVD player or de...

Страница 7: ... be mixed For example the signal input into the COMPONENT IN jacks is output from the COMPONENT OUT jacks only Be sure to connect all the components via the same kind of jacks F E AC OUTLET switched Not available for AUSTRALIA UK model This outlet is active only when the unit is on Caution Make sure that the total power consumption of all equipment connected to the outlet s does not exceed 100 wat...

Страница 8: ...8 Example Connection to a DVD player ...

Страница 9: ...9 Example Connection to Video Cassette Recorders ...

Страница 10: ...s of the outer insulation Removing too much insulation may lead to a short circuit if the bared wired should come in contact with each other Twist the strands of the stripped wires tightly together Caution The metal portions of the two separate wires should not touch or an electrical short can occur Shorted wires can create a fire hazard or induce a failure in your equipment How to connect 1 Turn ...

Страница 11: ...magnetically shielded speaker if you are using it near your TV Place a center speaker between the front speakers on or below the TV This speaker stabilizes the sound image Surround Left and Right speakers Install these speakers above the level of the listener s ears directly to the left and right or slightly behind of your listening position Surround Back speaker Place the surround back speaker at...

Страница 12: ...12 Names of Each Control 1 Front Panel Remote Control Unit ...

Страница 13: ...en you don t use them leave the cap in place Buttons for RDS function European models only In FM tuner mode use these buttons for RDS function RDS is available in European countries only b a Z Y X W V U T S R Q P O POWER Press this switch to turn the unit standby or off STANDBY ON When the POWER switch of the main unit is depressed use this button to turn the unit on or standby SPEAKER Use this bu...

Страница 14: ...MUTING Use this button to mute the sound temporarily PRESET SCAN Use this button to scan preset channels ENTER Use this button to save speaker setup DIMMER Use this button to dim or turn off the display Numeric buttons In tuner mode use these buttons to select a preset channel Note To simplify explanations instructions refer to names of buttons and controls on the front panel making no mention of ...

Страница 15: ...ned correctly 3 Close the cover Battery Replacement If the distance required between the remote control unit and main unit decreases the batteries are exhausted In this case replace the batteries with new ones Precautions concerning batteries Be sure to insert the batteries with correct positive and negative polarities Use batteries of the same type Never use different types of batteries together ...

Страница 16: ...ting Front speaker size setting Center speaker size setting Surround speaker size setting Surround Back distance Front Left distance Front Right distance Center distance Surround Left distance Surround Right distance Surround Back Crossover Frequency The SPEAKER SETUP button will not work when the SPEAKER button is set to off In that case press the SPEAKER button to turn the speakers on and then p...

Страница 17: ...rom the front speakers N None Select this when no speaker is connected The sound is output from the front or surround speakers Depending on your selection settings available for each speaker changes When the surround left and right speakers are set to SURR N none the surround back speaker is also set to SURR B N none automatically Distance front center surround Input the distance from your listeni...

Страница 18: ...he EXTERNAL IN button to turn it off Press the T TONE button The test tone is emitted from each speaker in the following order at 2 5 second intervals FL C FR SR SB SL SW If certain speakers are not being used for example no center speaker the noise sequencer will automatically skip over that channel Adjust the master volume to the normal listening level Adjust the volume of each speaker so that t...

Страница 19: ... or when the SPEAKER button is set to off only the front speakers will appear on the display Within 5 seconds press the LEVEL buttons to change the level The level of speakers can be adjusted in 1 dB steps from 15 dB to 15 dB The LFE level can be adjusted in 1 dB steps from 10 dB to 0 dB The default setting is 0 dB Lower the LFE level if necessary Repeat step and to change other settings When all ...

Страница 20: ...terminal c2 Select this when the source is connected to DIGITAL IN COAXIAL 2 terminal A Select this when the source is connected to analog AUDIO IN jacks DIGITAL indicator blinks when the unit cannot perceive the digital signal In that case connect a digital device to the DIGITAL IN terminal switch it on and select the terminal by pressing the DIGITAL INPUTS button You can hear the sound from the ...

Страница 21: ...iver to minimum Then insert the plug from your headphones into the PHONES jack and adjust the volume by turning the VOLUME knob If you want to cut off the sound from speakers press the SPEAKER button to turn it off When the SPEAKER button is set to off the multi channel sound is downmixed to 2 channel automatically When EXTERNAL IN is selected only the front left and right channels are output from...

Страница 22: ...ing any button will turn the display on This function will be cancelled when the STANDBY ON or the POWER switch is pressed When you set the sleep timer the display is dimmed automatically E D Basic Operation 3 D MUTING E C EXTERNAL IN 7 channel direct input If the source is connected to EXTERNAL IN jacks press the EXTERNAL IN button EXT IN appears on the display and up to 7 discrete analog signals...

Страница 23: ...lled The TONE MODE button will not work when EXTERNAL IN is selected 2 If the tone mode is off press the LEVEL button to turn it on 3 Press the TONE MODE button to select BASS or TRBL Each time the TONE MODE button is pressed the mode is changed as follows To adjust the level of low frequency sound range select BASS To adjust the level of high frequency sound range select TRBL treble 4 Press the L...

Страница 24: ... While dubbing the video signal of VIDEO 2 or 3 you can replace the sound from VCR with the sound from an audio source such as CD Select the video source to be recorded VIDEO 2 or 3 using the INPUT SELECTOR buttons of the remote control unit Select the audio source to be recorded CD TAPE etc using the INPUT SELECTOR buttons of the remote control unit Do not turn the INPUT SELECTOR buttons of the m...

Страница 25: ...will blink and no sound will be heard Select the desired surround mode by pressing the DSP button Each time the DSP button is pressed the surround mode changes When Dolby Digital signals are input and IN AUTO is selected the surround mode is set to DOLBY DIGITAL automatically If you press the DSP button you can select one of the following surround modes When the source is Dolby Digital EX DOLBY DI...

Страница 26: ... None Dolby Pro Logic II appears instead of Dolby Pro Logic IIx DOLBY DIGITAL or DOLBY DIGITAL EX can be selected only during playback of a DVD disc recorded in DOLBY DIGITAL format The DSP indicator lights when THEATER HALL or STADIUM is selected DSP Digital Signal Processor D C STEREO Press the STEREO button to select the stereo mode STEREO is scrolled and sound is output from front speakers and...

Страница 27: ... is selected Surround Mode 4 DTS NEO 6 With the high precision digital matrix decoder used for DTS ES Matrix 6 1 DTS NEO 6 gives you 6 1 multi channel surround sound from any stereo source DTS NEO 6 will not work on monaural source DTS NEO 6 Cinema This mode is optimized for movies Decoding is performed with emphasis on separation performance to achieve the same atmosphere with 2 channel sources a...

Страница 28: ...seamless wraparound surround effect Dolby Dimension creates a deeper or shallower surround sound field DOLBY PRO LOGIC IIx and DOLBY PRO LOGIC II will not work on monaural source Dolby Pro Logic Dolby Pro Logic is a matrix decoder that decodes the four channels of surround sound front left center front right and surround that have been encoded onto the stereo soundtracks of Dolby Surround encoded ...

Страница 29: ... exciting wraparound effect with side wall imaging Select ON or OFF The default setting is OFF C WID center width control This adjusts the center image so it may be heard only from the center speaker only from the left right speakers as a phantom image or from all three front speakers to varying degrees The adjustable range is from 0 to 7 The default setting is 0 DIMEN dimension control This adjus...

Страница 30: ...ence During playback of DVD press the DYNAMIC RANGE button repeatedly until desired setting appears on the display DYNR 0 0 off Audio with uncompressed dynamic range Select this when you don t want to compress the dynamic range DYNR 0 5 Audio with partially compressed dynamic range DYNR 1 0 Audio with fully compressed dynamic range The default setting is DYNR 0 0 This function is effective only wh...

Страница 31: ...mode AUTO indicator lights on the display Manual tuning mode no indicator Preset tuning mode PRESET indicator lights Select the Manual tuning mode or the Automatic tuning mode When using the remote control unit you can skip this step Press the TUNING PRESET button to tune in a station In the Automatic tuning mode the unit starts searching for a station When a station is tuned in the tuning process...

Страница 32: ...l Memory Presetting Tune in a station you want to listen to see steps to of page 31 Press the MEMORY ENTER button While the MEM indicator is blinking select a preset channel to store the station using the TUNING PRESET buttons or the PRESET buttons of the remote control unit and then press the MEMORY ENTER button You can also use the numeric buttons to select a preset channel Example 3 2 4 1 1 Tun...

Страница 33: ...tion you want to listen to is found press the PRESET SCAN button again to stop scanning How to select preset stations If PRESET indicator isn t lit press the TUNING MODE button to select the preset tuning mode When using the remote control unit you can skip this step Select a preset channel using the TUNING PRESET buttons or the numeric buttons of the remote control unit 2 1 1 2 ...

Страница 34: ... button Each time the RDS button is pressed the RDS mode is changed as follows PS Programme Service name displays PS or a station s name If there is no PS data NO NAME will be displayed PTY Programme Type displays the programme type If there is no PTY data NO PTY will be displayed CT Clock Time displays the information about times provided from the station If there is no time data NO TIME will be ...

Страница 35: ...blinking If no RDS station is found NO RDS will be displayed TP search Select TP SRCH by pressing the SEACH MODE button and within 8 seconds press the SELECT button The unit starts searching for a station offering the traffic programme and TP SRCH blinks If no station is found or the signal is too weak NO TRAFF will be displayed PTY search 1 Select PTY SRCH by pressing the SEACH MODE button 2 With...

Страница 36: ...pular songs and sale volume of discs etc ROCK M practical modern music generally composed and played by young musicians EASY M popular music usually lasting for less than 5 minutes LIGHT M classical music instrumental music chorus and light music favored by non professionals CLASSICS orchestra including great operas symphony chamber music and so on OTHER M other music styles Rhythm Blues Reggae et...

Страница 37: ...cords and speaker cables are as far away from the AC supply as possible DIGITAL indicator blinks The unit cannot perceive the digital signal see page 20 Select the proper decoding mode by pressing the AUTO button see page 25 No picture Check that the system is connected properly Turn on the TV Make sure you have selected the proper video input on the TV so that you can view the pictures Select the...

Страница 38: ...p p 75 Ω PB PR Output level 0 7 Vp p 75 Ω Jacks RCA jacks FM Tuner Section Without notes 100 1 MHz 65 dBf Tuning Range 87 5 MHz to 108 0 MHz 50 kHz steps Total Harmonic Distortion 1 kHz Mono 0 5 Stereo 0 8 Frequency Response 30 Hz to 15 kHz 3 dB Stereo Separation 1 kHz 40 dB Signal to Noise Ratio Mono 70 dB Stereo 65 dB AM Tuner Section Tuning Range 522 kHz to 1 611 kHz 9 kHz steps Usable Sensitiv...

Страница 39: ...5707 21128 041 0 ...

Отзывы: