Proson RV 2200 Скачать руководство пользователя страница 18

17

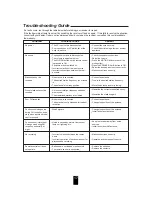
Troubleshooting Guide

PROBLEM

POSSIBLE CAUSE

REMEDY

If a fault occurs, run through the table below before taking your receiver for repair.
If the fault persists, attempt to solve it by switching the receiver off and on again.  If this fails to resolve the situation,
consult with your dealer. Under no circumstances should you repair the receiver yourself as this could invalidate
the warranty.

No power

No sound

Stations cannot be
received

Preset stations cannot be
received

Poor FM reception

Continuous hissing noise
during FM reception, espe-
cially when a stereo broad-
cast is received.

Continuous or intermittent
hissing noise during AM
reception, especially at
night.

No recording

Remote control unit does
not operate.

• The AC input cord is disconnected.
• Poor connection at AC wall outlet or the

outlet is inactive.

• The speaker cords are disconnected.
• The volume is adjusted too low.
• The MUTING button on the remote control

is pressed to ON.

• Speakers are not switched on.
• Incorrect selection of the input source.
• Incorrect connections between the com-

ponents.

• No antenna is connected.
• The desired station frequency is not tuned

in.

• The antenna is in wrong position.

• An incorrect station frequency has been

memorized.

• The memorized stations are cleared.

• No antenna is connected. 
• The antenna is not positioned for the best

reception.

• Weak signals.

• Noise is caused by motors, fluorescent

lamps or lightning, etc.

• Incorrect selection between the compo-

nents.

• Incorrect operation of each component for

playback and recording.

• Batteries are not loaded or exhausted.
• The remote sensor is obstructed.

• Connect the cord securely.
• Check the outlet using a lamp or another

appliance.

• Check the speaker connections.
• Adjust the volume.
• Press the MUTING button to cancel the

muting effect.

• Press the SPEAKER A or B button to ON.
• Select the desired input source correctly.
• Make connections correctly.

• Connect an antenna.
• Tune in the desired station frequency.

• Move the antenna and retry tuning.

• Memorize the correct station frequency.

• Memorize the stations again.

• Connect an antenna.
• Change the position of the antenna.

• Change the position of the antenna.
• Install an outdoor antenna.

• Keep the receiver away from noise

sources.

• Install an outdoor AM antenna.

• Make connections correctly.

• Operate each component correctly.

• Replace the batteries.
• Remove the obstacle.

Содержание RV 2200

Страница 1: ...5707 21128 047 0S...

Страница 2: ...OWNER S MANUAL RV 2200 AM FM Stereo Receiver...

Страница 3: ...Installer This reminder is provided to call the CATV system installer s attention to Article 820 40 of the NEC that provides guidelines for proper grounding and in particular specifies that the cable...

Страница 4: ...y does not imply that the power point is earthed and that the installation is completely safe For your safety if in any doubt about the effective earthing of the power point consult a qualified electr...

Страница 5: ...ystem Connections 5 Front Panel Remote Controls 7 REMOTE CONTROL OPERATION RANGE 9 LOADING BATTERIES 9 Operations LISTENING TO A PROGRAM SOURCE 10 LISTENING TO RADIO BROADCASTS 12 LISTENING TO RDS BRO...

Страница 6: ...on Disconnect the indoor antenna before replacing it with the outdoor one Place the AM loop antenna as far as possible from the receiver TV set speaker cords and the AC input cord and set it to a dire...

Страница 7: ...6...

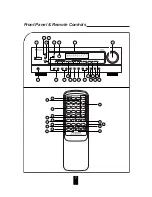
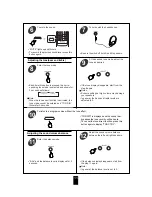
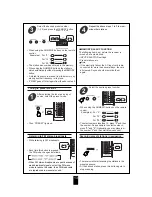
Страница 8: ...7 Front Panel Remote Controls...

Страница 9: ...e Each time this button is pressed the tone mode is changed to bass or treble BALANCE BUTTON When adjusting the sound volume balance press this button to enter the balance mode MEMORY BUTTON Press thi...

Страница 10: ...a range of about 7 meters 23 feet and angles of up to 30 degrees aiming at the remote sensor Remove the cover 2 Remove the batteries when they are not used for a long time Do not use the rechargeable...

Страница 11: ...te control is pressed the band is changed to AM or FM Select the desired input source 3 When the POWER button on the remote control is pressed this unit is turned on to enter the operat ing mode In th...

Страница 12: ...levels are adjusted to 0 At the desired tone mode adjust the tone as desired 9 Adjusting the tone bass and treble BAL and the balance level is displayed for 3 seconds Enter the balance mode 11 If the...

Страница 13: ...when you already know the frequency of the desired station Perform the steps 1 and 2 in Auto tuning procedure and press the TUNING PRESET UP or DOWN button repeatedly until the right frequency has be...

Страница 14: ...top scanning When using the NUMERIC buttons on the remote control Examples For 3 For 15 For 30 To select numbers less than 10 press 0 and then the number As an example to select number 5 press 0 and 5...

Страница 15: ...CHILDREN SOCIAL RELIGION PHONE IN TRAVEL LEISURE JAZZ COUNTRY NATION M OLDIES FOLK M DOCUMENT TEST ALARM NONE When PTY SRCH is not displayed repeat again from the above step 1 Each time this button is...

Страница 16: ...RT 3 The tuner automatically searches a station offering PTY services If no station is found NO PTY is displayed RECORDING The volume tone bass treble and balance settings have no effect on the recor...

Страница 17: ...e fluorescent display changes together as follows Adjusting the brightness of the fluores cent display OTHERFUNCTIONS 16 Start recording on the VIDEO 2 Recording with VIDEO Start play on the desired i...

Страница 18: ...antenna is connected The desired station frequency is not tuned in The antenna is in wrong position An incorrect station frequency has been memorized The memorized stations are cleared No antenna is...

Страница 19: ...ty THD 3 S N 30 dB 15 dBf 50 dB quieting sensitivity mono stereo 25 2 45 2 dBf Signal to noise ratio 65 dBf mono stereo 68 65 dB Total harmonic distortion 65 dBf 1 kHz mono stereo 0 5 0 8 Frequency re...

Отзывы: