
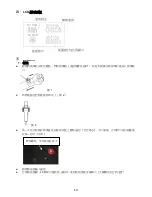


27
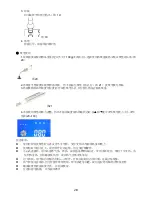
图
15
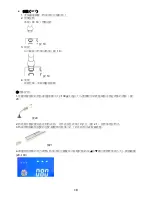
警告:
1.
气泵停止前请不要拔掉插头;
2.
不要用手接触刚刚拔掉插头的极片,以免产品内部放电造成对人体电击
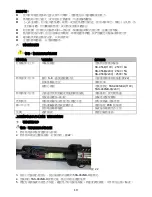
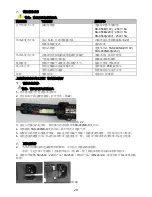
8.
SMD.
吹焊作业
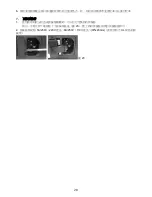
●
取下(
QFP
)
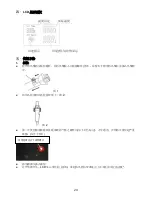
1.
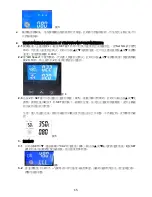
调整风速及温度按键
安装起拔器
(
选配
) ,
将起拔器套入元器件底下(图
16
)如果元器件宽度不适合起拔钢线尺寸
,
可挤
压钢线宽度以适应之。
PLCC
,集成电路电阻等部件,请用小镊子拆下。
图
16
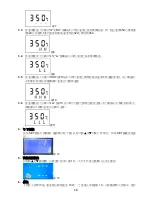
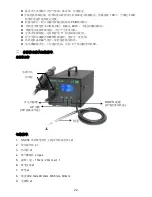
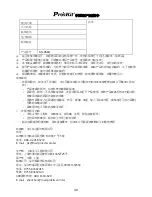
2.
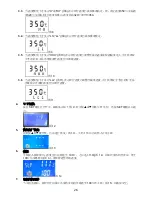
加热
将热风枪放在集成电路正上面,热风嘴对准所要熔化焊锡部份,吹出热风熔化焊锡。热风嘴不可
触及元器件引线
3.
拆下部件
焊锡熔化时,拉起起拔器移开部件(图
17
)
图
17
4.
清除焊锡
移开部件后,使用吸锡器或除锡工具清除残余焊锡
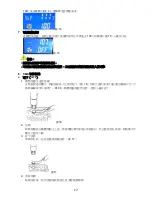
●
安装(
QFP
)
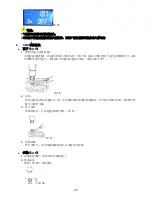
1.
涂抹适量锡膏,将部件放在线路板上
2.
预备加热
参阅(图
18
)预热部件
图
18
Содержание SS-956
Страница 12: ...11 SS 956 SS 956 LCD 480 C 896 F SS 956 SS 956 SS 956 600W SMD CPU...
Страница 13: ...12 100 PCB 200 3 1 SS 956 x1 2 x1 3 x1 4 x 3pcs 5 15mm 20mm x 1 6 x1 7 x1 8 12 5mm 10mm 6 5mm 3mm 9 x1 UP DOWN...
Страница 15: ...14 LCD 1 1 3 1 2 2 LCD 3...
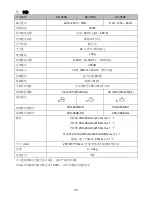
Страница 16: ...15 3 2 2 1 4 SET 1 Set Temp 0 480 2 2 AIR Speed 20 100 2 4 2 3 2 SET 5 1 SET 5 3 3 1 SET CAL 6 SET 1 6 3 2 7...
Страница 17: ...16 7 3 3 H HH 8 350 320 3 1 320 350 8 3 4 L LL 9 9 3 5 HHH 10 10 3 6 LLL 11 11 4 SET SET 12 5 13 1 13 6 100 14...
Страница 18: ...17 100 3 14 7 100 15 15 1 2 8 SMD QFP 1 16 PLCC 16 2 3 17 17 4...
Страница 19: ...18 QFP 1 2 18 18 3 19 19 4 1 100g 20 20 2 21 3 21 4 20 100...
Страница 21: ...20 6 1 23 2 5A 250V 220V 8A 250V 110V 5x20mm UL 23...
Страница 22: ...21 SS 956 SS 956 LCD 480 C 896 F SS 956 SS 956 SS 956 600W SMD CPU...
Страница 23: ...22 100 PCB 200 3 1 SS 956 x1 2 x1 3 x1 4 x 3pcs 5 15mm 20mm x 1 6 x1 7 x1 8 12 5mm 10mm 6 5mm 3mm 9 x1 UP DOWN...
Страница 25: ...24 LCD 1 1 3 1 2 2 LCD 3...
Страница 26: ...25 3 2 2 1 4 SET 1 Set Temp 0 480 2 2 AIR Speed 20 100 2 4 2 3 2 SET 5 1 SET 5 3 3 1 SET CAL 6 SET 1 6 3 2 7 7...
Страница 28: ...27 15 1 2 8 SMD QFP 1 16 PLCC 16 2 3 17 17 4 QFP 1 2 18 18...
Страница 29: ...28 3 19 19 4 1 100g 20 20 2 21 3 21 4 20 100...


