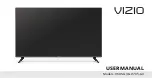
background image

CONNECTIONS

CONNECTING


A


TV


ANTENNA

 / 

CABLE

 / 

SATELLITE

To


view


television


channels


correctly

a


signal


must

be


received


from


one


of


the


following


sources

:

An


indoor


or


outdoor


aerial


antenna

A


cable


system

A


satellite


system

For


receiving


over

-

the

-

air


TV


broadcasts

we

recommend


that


you


use


an


external


fixed


antenna

.

Should


you


require


the


use


of


a


temporary


antenna

,

please


ensure


that


you


purchase


an


antenna


with

sufficient


ability


to


receive


in


weak


signal


areas

.

Only


when


you


are


in


close


proximity


to


a


transmitter

will


a


temporary


antenna


reproduce


a


signal


as

strongly


as


a


fixed


antenna

.

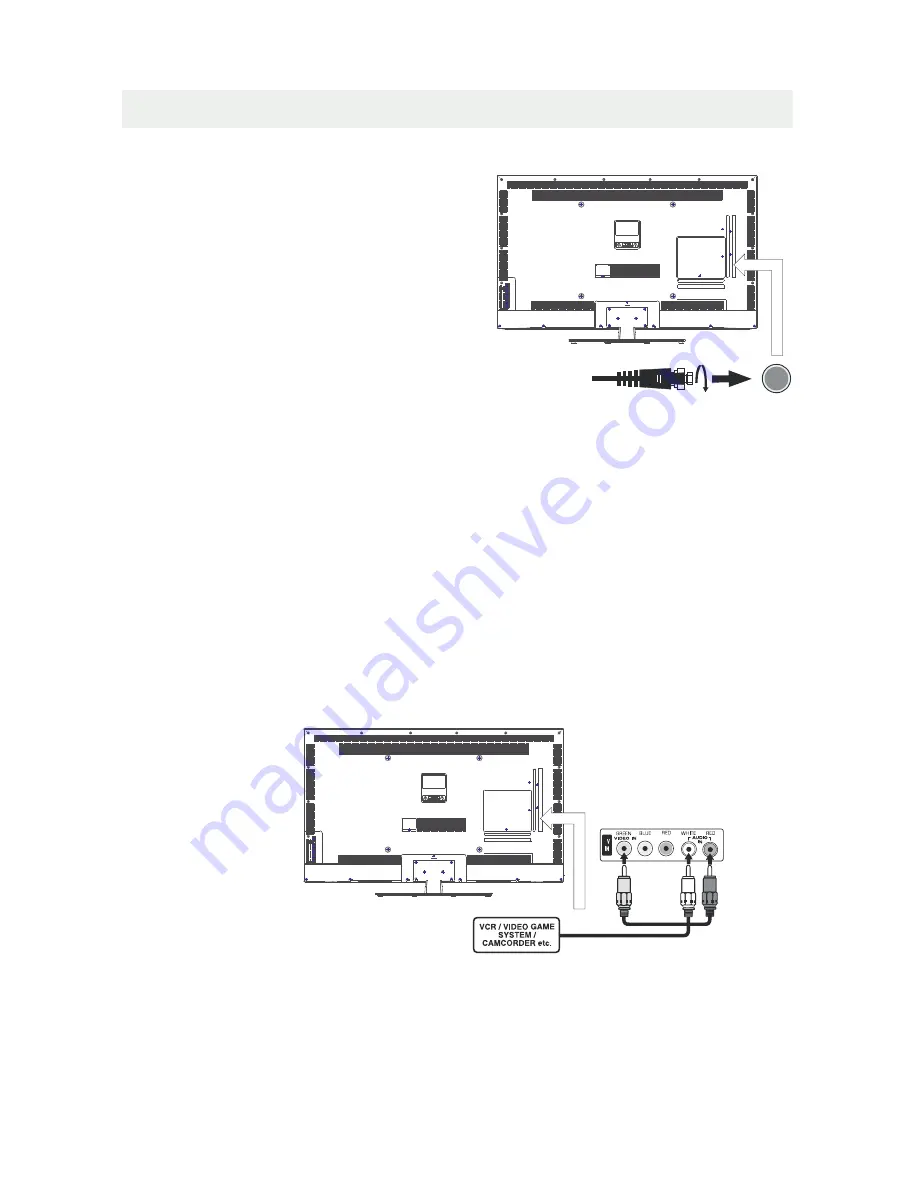
To connect to other equipment such as a VCR, camcorder, satellite system or cable, etc.

CONNECTING


AN


A

/

V


DEVICE

NOTE

CONNECTING


DEVICES


WITH


A


COMPOSITE

 (

YELLOW


RCA

-

TYPE

)

VIDEO


OUTPUT

Connecting


to


a


VCR

 / 

Video


Game


System

 / 

Camcorder

AUDIO

VIDEO


OUT

NOTE

To


connect


A

/

V


devices


such


as


a


VCR

video


game


system


or


camcorder

.

Connect


the


AUDIO

 / 

VIDEO


cable

 (

not


included

as


shown

.

Make


sure


you


connect


the


cable


from


the


other


equipment

 (

and

to


this


unit

Please


refer


to


the


user


manual

for


the


other


equipment


for

more


information

.

Satellite

cable


or


TV


antenna

cable


to


TV


ANTENNA

terminal

 (

cable


not


included

)

6

(

AV


in

)

To 

AUDIO 

VIDEO

IN jacks

To AUDIO / VIDEO
OUT jacks

Pb

Y

Pr

L

R

A

Содержание PLDED5066A

Страница 1: ...Model LDED5066A B P EP4008554 ...

Страница 2: ...w Antenna Connection AV Connection Y Pb Pr Connection HDMI Connection VGA Connection Headphone Connection Power Cord Connection Coax SPDIF Connection Putting The Unit On A Proper Place Turning The Unit On For The First Time Source selection Picture Menu Audio Menu Time Menu Setup Menu LOCK Parental Menu TV CHANNEL Menu Zoom Function 1 English 9 6 8 13 15 17 18 21 24 25 11 GETTING STARTED 8 7 4 ...

Страница 3: ...CONTENTS 26 28 29 DISPLAY MODE SPECIFICATION TROUBLE SHOOTING GUIDE PC Formats Video Formats TV Symptom SAFETY CLASS This is an IEC safety class ǁ product 27 11 10 9 ...

Страница 4: ... vase ne doit être placé sur l objet La prise du secteur est utilisé pour déconnecter le système La prise du secteur ne doit pas être obstruée ou doit être facilement accessible pendant son utilisation Pour être complètement déconnecté de l alimentation d entrée la prise doit être débranchée du secteur Des pressions acoustiques excessives provenant découteurs ou de casques peuvent provoquer des pe...

Страница 5: ...emote operation is about 16 feet 5 meters When the batteries become weak the operating distance of the remote control is greatly reduced and you will need to replace the batteries If the remote control is not going to be used for a long time remove the batteries to avoid damage caused by battery leakage corrosion Do not mix old and new batteries Do not mix ALKALINE standard CARBON ZINC or recharge...

Страница 6: ...N LEFT RIGHT Moves the cursor upward downward to the left to the right when making a selection 18 MENU Displays the OSD Menu of the TV 21 No function 7 MTS To change among STEREO MONO and SAP If there is no second language available for the signal received LCD Display audio will output to mono 20 ENTER Press to confirm selections on a menu screen 19 Exit Press this button to exit the on screen dis...

Страница 7: ...e The unit is turned ON 3 Remote Sensor Do not block this sensor or the remote control will not work 4 Speakers 4 1 Power cord 2 HDMI IN Jack 3 PC AUDIO IN Jack 4 VGA IN Jack 5 Coax OUT Jack 6 TV ANTENNA Terminal 7 AV VIDEO AUDIO R L IN 8 COMPONENT IN Jack 9 Service Port 10 Headphone Jack 2 4 4 1 3 SERVICE PORT Y PR PB R L AUDIO RF EARPHONE VIDEO AV IN VGA PC AUDIO HDMI2 HDMI1 HDMI3 ...

Страница 8: ...CONTROL REFERENCE GUIDE 5 VOL VOL CH CH MENU SOURCE STANDBY Press to select the input source of the TV 2 VOL Button 3 VOL Button 4 CH Button 5 CH Button 6 MENU Button 7 SOURCE Button 1 STANDBY Button ...

Страница 9: ...rary antenna reproduce a signal as strongly as a fixed antenna To connect to other equipment such as a VCR camcorder satellite system or cable etc CONNECTING AN A V DEVICE NOTE CONNECTING DEVICES WITH A COMPOSITE YELLOW RCA TYPE VIDEO OUTPUT Connecting to a VCR Video Game System Camcorder AUDIO VIDEO OUT NOTE To connect A V devices such as a VCR video game system or camcorder Connect the AUDIO VID...

Страница 10: ... audio on a single digital connection for use with DVD players DTV set topboxes and other digital AV devices HDMI was developed to provide the technologies of High Bandwidth Digital Content Protection HDCP as well asDigital Visual Interface DVI in one specification HDCP is used to protect digital content transmitted and received by DVI compliant or HDMIcompliant displays HDMI has the capability to...

Страница 11: ...electrical shock Do not use any power cord other than that provided with this TV This may cause fire or electrical shock Do not damage the power cord A damaged cord may cause fire or electrical shock Do not move the TV with the cord plugged in the socket outlet Do not place a heavy object on the cord or place the cord near a high temperature object Do not twist the cord bend it excessively or stre...

Страница 12: ...corporates a digital coaxial input Connect an optional digital cable directly to the television s Coax audio output to listen through all inputs except VGA The VGA does not support digital audio How To Setup Digital Output Press the MENU button on the remote control Press the right arrow button to select AUDIO Press the down arrow button to highlight SPDIF type right Raw or PCM Coax SPDIF OUT 9 Se...

Страница 13: ... a soft cushioned material such as a pillow or thick piece of foam beneath the screen 3 To remove the base stand loosen screws off the holes then pull downwards to release the base stand 4 To install the base stand put the stand into the hole at the bottom of the TV then insert screws to the holes and tighten MOUNTING ON THE WALL NOTE Remove the base stand before mounting the unit on the wall This...

Страница 14: ... options and run Channels will be stored in the TV tuner Press the button on the remote control Press the button to highlight AIR CABLE Channel Auto Scan Channel Auto Scan MENU Using the buttons scroll to highlight mode TV SOURCE SELECTION 1 Press the SOURCE button on the remote control 2 the ENTER button Note 1 Before watching please make sure all necessary cables and devices are connected Use or...

Страница 15: ...e Picture Audio Cable System AUTO MENU Start to Scan Move Next Setup MENU Picture Audio 12 6 e m i T RF CH Found 7 4 CHANNEL CHANNEL CHANNEL CHANNEL CHANNEL Press the button to highlight Using the button to highlight CABLE Press the button to select AUTO SCAN then press the button to start Channel Auto Scan Press the button to select AUTO SCAN Press the ENTER button and the cursor will move up and...

Страница 16: ...trast brightness color tint sharpness and color mode How to Navigate Press the MENU button on the remote control Navigate using the buttons to select PICTURE Press the button to highlight then press the button to select your viewing preference from 4 factory options STANDARD DYNAMIC MILD USER The STANDARD setting is recommended for most viewing environments Depending on the ambient light level in ...

Страница 17: ...lor tint sharpness and color mode Press the MENU button on the remote control Navigate using the buttons to select PICTURE Use the button to highlight Color Navigate using the buttons to increase or decrease color intensity Use the button to highlight Tint Navigate using the buttons to adjust colors toward green or reddish tint Use the button to highlight Sharpness Navigate using the buttons to so...

Страница 18: ...ss treble balance surround SPDIF Type and audio language Press the button to highlight SoundMode then press the button to select your sound preference from 4 factory options STANDARD MUSIC MOVIE USER The STANDARD setting is recommended for most sound environments Depending on the surroundings in the room you may find one of the other options more pleasing To make more critical audio adjustments ba...

Страница 19: ...the Menu button Use the button to highlight Balance Navigate using the buttons to adjust sound towards the right or left speaker Use the button to highlight Surround Navigate using the button to turn the dimensional surround effect ON or OFF for built in speakers only Use the button to highlight Audio Language Navigate using the buttons to select to listen to an alternative language broadcast if a...

Страница 20: ...to Navigate The TIME menu includes adjustment of settings for your local time zone and daylight savings time The clock will adjust automatically after the initial Channel Auto Scan of available broadcast channels in your area Note When adjustments are completed you may select another menu by pressing the Menu button Use the button to highlight SleepTimer then press the button to select among 5min ...

Страница 21: ...ge Transparency Zoom Mode Noise Reduction Advanced Close Caption XVS Restore Default English MENU Picture Off Normal Off Setup Audio On Are you sure No Yes Press the MENU button on the remote control Navigate using the buttons to select SETUP How to Navigate In the SETUP menu you may change the initial set up of preferences that include settings for language menu display computer monitoring closed...

Страница 22: ...On 12 6 Time Menu Language Transparency Zoom Mode Noise Reduction Advanced Close Caption XVS Restore Default English Move Next MENU Picture Off Normal Off Setup Audio On The SETUP menu includes adjustments for activating the Closed Caption feature for display on the television and customizing CC display types and font styles How to Navigate Press the MENU button on the remote control Navigate usin...

Страница 23: ... connect an input signal from your PC Recommended resolution is 1920 x 1080 If your PC system uses a standard signal mode the screen will adjust automatically Connect an optional 3 5mm audio cable for stereo sound How to Navigate After connecting to a PC press the SOURCE button and highlight VGA then press the ENTER button Press the MENU button on the remote control and navigate using the buttons ...

Страница 24: ...d select your preferences within the LOCK PARENTAL menu make certain your input is set to TV Press the MENU button on the remote control Navigate using the buttons to select LOCK How to Navigate Press the button to highlight Enter Password Enter your 4 digit code factory default code is 0000 unless previously changed Use the numeric buttons to input a new 4 digit code by two times To change the pa...

Страница 25: ... within the LOCK Parental menu make certain your input is set to TV How to Navigate Press the MENU button on the remote control Navigate using the buttons to select LOCK Parental Press the button to highlight ENTER PASSWORD Enter your 4 digit code factory default code is 0000 unless previously changed To set parental controls for television programming or DVD movies press the buttons to highlight ...

Страница 26: ...vigate using t he buttons to select LOCK Press the button to highlight ENTER PASSWORD Enter your 4 digit code factory default code is 0000 unless previously changed To set parental controls for television programming or DVD movies press the buttons to highlight Canada Navigate using the buttons to highlight Canada English Canada French menu Navigate using the button to highlight CANADA ENGLISH the...

Страница 27: ...ion to receive TV channels store your favorites add or skip channels and label them by their call letters How to Navigate Press the MENU button on the remote control Navigate using the buttons to select TV Press the button to highlight your preferences Highlight FAVORITE to add channels to your Favorites List Navigate using the buttons to select channels to be added or deleted from your list Press...

Страница 28: ... and horizontally to fill the screen when viewing widescreen content The zoom effect will crop images somewhat When viewing 4 3 content Cinema mode will fill the entire screen eliminating the side black bars It may also eliminate or reduce black bars on certain widescreen movies 25 Lock 12 6 Time Channel Menu Language Transparency Zoom Mode Noise Reduction Advance Close Caption XVS Restore Default...

Страница 29: ...he display mode not listed above In order to achieve the best display effect please select the above listed 5 display modes input signal Because of the difference of display drivers output signal especially non standard signal output the display image may appear little disturbance which can be adjusted on the PC menu To prolong this unit s service life please set your computer to power management ...

Страница 30: ...0 p 720 p 1080 i e i R solut on X X X X The above listed formats are also related to the AV devices you are about to connect Before you connect this unit with others please read all instructions carefully and make sure all necessary cables are connected This unit may be incompatible with some other formats which are not meet the above conditions NOTE 1920 1080 X X 1920 1080 X 1920 1080 X 1080 p 10...

Страница 31: ... 75 ohms B 0 7Vp p 75 ohms R 0 7Vp p 75 ohms Power Requirement Input Output Jacks Systems Power Sound System M Audio System MTS L RSpeaker 8W 8W Composite Video Input Component YPbPr Input Sound Input PC AUDIO For PC RGB Audio input 500mV rms Impedance 20k ohms PROSCAN Y 1 0 Vp p 75 ohms 0 3V negative sync Pb 0 7Vp p 75 ohms Pr 0 7Vp p 75 ohms 100 240V 50 60Hz 176 H 176 V 130W This manual is only ...

Страница 32: ... the product may malfunction and require usertopowerreset Unplugand re plug theAC power cord TROUBLESHOOTING GUIDE Checkto make sure the program you are watching is broadcast in Color and not Black White Check whether the mute function has been activated on the Remote Control The display monitor s panel goes hot LEDTV takes inside lighten phosphor It may increase the temperature of the screen in s...

Отзывы: