Pro's Kit GE-634 Скачать руководство пользователя страница 31

28

20

20

20

20

16

16

Claw

Right Han

d

70

160

特點說明


Product Features

液壓系統


Hydraulic System

調整旋鈕 

Rotary Knob

爪型 

Claw

右手


Right Hand

拇指角度可調整

Adjustable Thumb

指頭關節角度可調整 

Adjustable Finger Joints

手指可向上張開

Extension

拇指可卸除/變更位置


Detachable Thumb

左手 

Left Hand

左手操作

右手操作

右手操作

爪型

爪型

Содержание GE-634

Страница 1: ...GE 634 Manual Assembly Instruction...
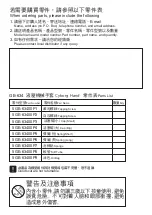
Страница 2: ......

Страница 3: ...t Assembly Installation for Right hand users How To Operate Product Features Product Introduction Tools You May Need Mechanical Parts List Plastic Parts Read It Before Assembly Warning Exercises and T...

Страница 4: ...ower for mechanical transmission without electricity It allows every finger joint to adjust at different angles for a precisely closed fist or open palm This fun wearable device can be used perfectly...

Страница 5: ...B 4 7 8 9 MADE IN TAIWAN 1 2 3 5 5 5 10 11 C 2 2 2 5 6 4 7 8 9 1 1 1 3 MADE IN TAIWAN 10 10 11 13 12 14 A 2 3 4 5 6 7 8 9 10 12 11 14 13 16 15 MADE IN TAIWAN 1 Plastic Parts Cut the plastic parts when...

Страница 6: ...fastened tightly enough parts may come off The product may consequently not work Repeat until screws are tightly fastened Correct Incorrect It happens a lot some burrs are left at the edge of plastic...

Страница 7: ...1 1 P2x2 D8 D9 Front View Operation Bar Assembly Do not press hand or you may break it OPERATION BAR Top View Correct Incorrect Correct Incorrect Correct Incorrect Correct Incorrect C8 Push C8 to the...

Страница 8: ...5 1 2 3 4 5 Palm Assembly D4 E B7 B5 B5 B5 P7 1 P7 1 A6 A4 A5 P7 4 PALM P7 5 P7 3 P2 P2 C7 A16 A10 1 1 3 1 4 5 P7 Sponge Correct Incorrect Incorrect 3 x3 3 x3...

Страница 9: ...1 1 Fingers Assembly 90 Correct Incorrect Correct Incorrect Incorrect Correct 90 Incorrect Correct 6 1 2 3 4 6 5 P2 F18 F18 D12 D13 C4 C5 A3 D15 D14 1 1 P2 C10 F18 C10 F18 1 1 C10 C10...

Страница 10: ...14 B8 B9 C1 D11 P2 1 1 2 2 F2 F2 1 1 1 2 4 3 P7 3 P7 6 3 6 01 Finger 01 Correct Incorrect Correct Incorrect P7 Sponge Correct Correct Correct Correct Incorrect Incorrect Incorrect Incorrect C2 C1 Asse...

Страница 11: ...1 1 1 2 2 F2 F2 1 1 1 2 4 3 P7 3 P7 6 3 6 02 Finger 02 P7 Sponge A14 Ensure the right dirction of A14 C2 C1 Assemble C2 first and then C1 Correct Correct Correct Correct Correct Incorrect Correct Inco...

Страница 12: ...1 1 1 2 2 C2 D11 D10 1 2 4 3 P7 3 P7 6 3 6 P2 03 Finger 03 P7 Sponge Correct Incorrect Correct Correct Incorrect Incorrect C2 C1 Assemble C2 first and then C1 A11 Ensure the right dirction of A11 Corr...

Страница 13: ...10 21 21 22 P2 P2 1 1 02 Finger 02 01 Finger 01 03 Finger 03 03 Finger 03 01 Finger 01 1 1 1 1 P7 4 P7 4 P1x2 Fingers FINGERS 4 P7 Sponge...

Страница 14: ...Oil The Parts Correct Incorrect P8 Soft Tube 70cm Measuring Marking Cutting How To Cut The Tube Hydraulic System Assembly Approx 34 cm 13 4 inches 12 cm 4 7 inches 3 12cm Cut Tube 34cm The rest of th...

Страница 15: ...mbly F15 burr burr burr burr 1 G2 G2 Cylinder Assembly P4 A7 G2 2 1 Oil the part F8 F7 P5 F15 F16 P4 G3 F13 Cylinder G3 Oil the part 1 1 1 2 2 2 3 3 3 Click 4 F16 G3 G3 Cylinder Assembly 1 1 F13 F7 F8...

Страница 16: ...1 1 Cylinder G2 F6 F5 G1 1 2 Oil the part F3 F3 F3 Cut off the burrs before assembly F3 burr burr burr 2 1 1 F12 F11 Cylinder G1 1 1 2 3 3 x3 3 Side View Top View Correct Incorrect Incorrect Incorrec...

Страница 17: ...Pull up the piston to the top as shown below Water 2 2 3 3 Cup Water Press down the piston to the bottom Cylinder G1 Water Fill up the cylinder tube with water Cylinder G1 Cylinder G1 Cylinder G3 Tube...

Страница 18: ...4 2 Cylinder G3 Hydraulic SystemB Tube 34cm Approx 34 cm 13 4 inches 1 1 Cup Water Correct Incorrect Fill up the cylinder tube with water Press down the piston to the bottom Correct Incorrect Water Re...

Страница 19: ...3 and fill up the cylinder with water B 15 1 3 If hydraulic system B experiences above failures back to page 15 step 1 3 and fill up the cylinder with water 1 1 Scale 1 1 1 1 Scale 1 1 Cylinder G2 Cyl...

Страница 20: ...17 1 2 3 4 A15 F14 A9 P2 D5 B11 C12 D3 B10 D18 D6 P2 B3 C13 C13 1 2 3 1 2 1 1 1 1 P7 4 1 2 1 4 Thumb Assembly P7 Sponge Correct Incorrect...

Страница 21: ...18 5 6 7 Cylinder G3 1 1 2 THUMB Hydraulic System B F2 F2 P7 7 THUMB 1 2 3 4 P7 6 2 2 7 6 P7 Sponge Correct Incorrect Correct Incorrect Correct Incorrect...

Страница 22: ...Module Assembly F20 F20 F17 F19 Supporting Pads Assembly P7 2 Long Pad Short Pad P7 Sponge 2 Correct Incorrect Incorrect Incorrect F20 Notice Do not turn F20 upside down F20 Notice Do not turn F20 ups...

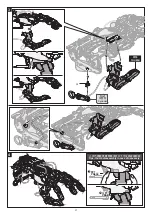
Страница 23: ...20 1 2 3 5 6 4 Complete unit Assembly C14 B1 B2 P1 P2x2 F4 B4 1 2 1 1 A8 1 1 FINGERS PALM...

Страница 24: ...21 7 8 D16 P2 1 1 10 9 1 2 2 1 2 2 A12 A13 1 2 2 Push Push F1 Cylinder G1 Cylinder G3 Hydraulic System A F1 will break Correct Incorrect...

Страница 25: ...22 11 12 13 1 1 2 2 2 2 1 2 2 Cylinder G1 Cylinder G3 Hydraulic System A Cylinder G3 Hydraulic System A Push Push F1 F1 will break Correct Incorrect...

Страница 26: ...23 14 15 16 17 1 2 2 Cylinder G1 OPERATION BAR Correct Incorrect Push Push F1 F1 will break Correct Incorrect...

Страница 27: ...end F10 1 1 1 1 1 2 1 2 3 2 ROTATE 2 ROTATE ROTATE D17 C6 ROTATE 2 ROTATE 2 ROTATE Long Pad Fasten Short Pad to the end Short Pad Installation for Right hand Users Optional left hand users go to page...

Страница 28: ...25 3 4 F9 1 3 Cylinder G2 1 2 THUMB Tips thumb disassembly in case of necessary PULL PULL PRESS PRESS 2 1 2...

Страница 29: ...device fix the thumb to the hook 2 3 Slide up or down the operation bar to fit your fingers lengths D9 D8 Have your fingers clasp the hooks try a push pull by your fingertips for smooth operation How...

Страница 30: ...27 4 5 Finish Adjust and fasten both supporting pads to fit your palm at a comfortable middle position Middle Middle Middle Correct Incorrect Incorrect...

Страница 31: ...28 20 20 20 20 16 16 Claw Right Hand 70 160 Product Features Hydraulic System Rotary Knob Claw Right Hand Adjustable Thumb Adjustable Finger Joints Extension Detachable Thumb Left Hand...

Страница 32: ...Cyborg hand with care and do not mistreat as shown below 2 Do not grip or lift objects that exceed the maximum weight limits shown below Maximum Lift 600g Gripping Maximum Lift 60 g Single Finger Corr...

Страница 33: ...ly adjust finger joints 4 cause the tubes to slip or water to leak 1 2 3 1 2 3 1 2 3 1 2 1 2 1 2 1 2 1 2 3 Do not bend the joints over the limited phasing angle it might cause the fingers broken 1 2 1...

Страница 34: ...e 1 Gripping A Thumb adjustment 1 Insert Thumb at the R position 2 Adjust Thumb angle as shown below B Fingers joints adjustment Adjust finger joints to positions below C Turn the knob clockwise to ma...

Страница 35: ...positions below C Turn the knob in a counterclockwise direction to make the fingers lift up to the highest position More than examples featured above now using your imagination having some fun exerci...

Страница 36: ...steps accordingly Check if all tubes are correctly aligned and not twisted during assembly refer to page 19 step 8 Check if the cylinders are installed correctly refer to pages12 13 Check if palm and...

Страница 37: ...orrect 1 G3 Push the piston to the end to release excess air in G3 cylinder 2 Push the Tube to the end G1 Water leakage or slipped tubes on fingers disassemble G1 and refill with water Press down the...

Страница 38: ...ith water 2 3 3 2 Press down the piston to the bottom 2 Cylinder G3 Cylinder G3 Cylinder G2 Pull Up Put in 1 G3 Push the piston to the end to release excess air in G3 cylinder 2 Push the Tube to the e...

Страница 39: ...36 1 2 Installation for Left Hand Users F10 1 1 2 ROTATE 2 ROTATE 1 1 1 1 2 2 3 2 ROTATE 2 ROTATE ROTATE D17 C6 1 2 ROTATE Fasten Long Pad to the end Long Pad Short Pad Fasten Short Pad to the end...

Страница 40: ...37 3 4 Tips thumb disassembly in case of necessary PULL PULL PRESS PRESS F9 3 Cylinder G2 1 2 THUMB 1 1 2 2...

Страница 41: ...telephone number and email address 2 Model name and model number Part number part name and quantity 3 Please contact local distributor if any query When ordering parts please include the following Pa...

Страница 42: ......

Страница 43: ......

Страница 44: ......

Отзывы: