background image

9

Connections

Connect 

TOUCH OUT

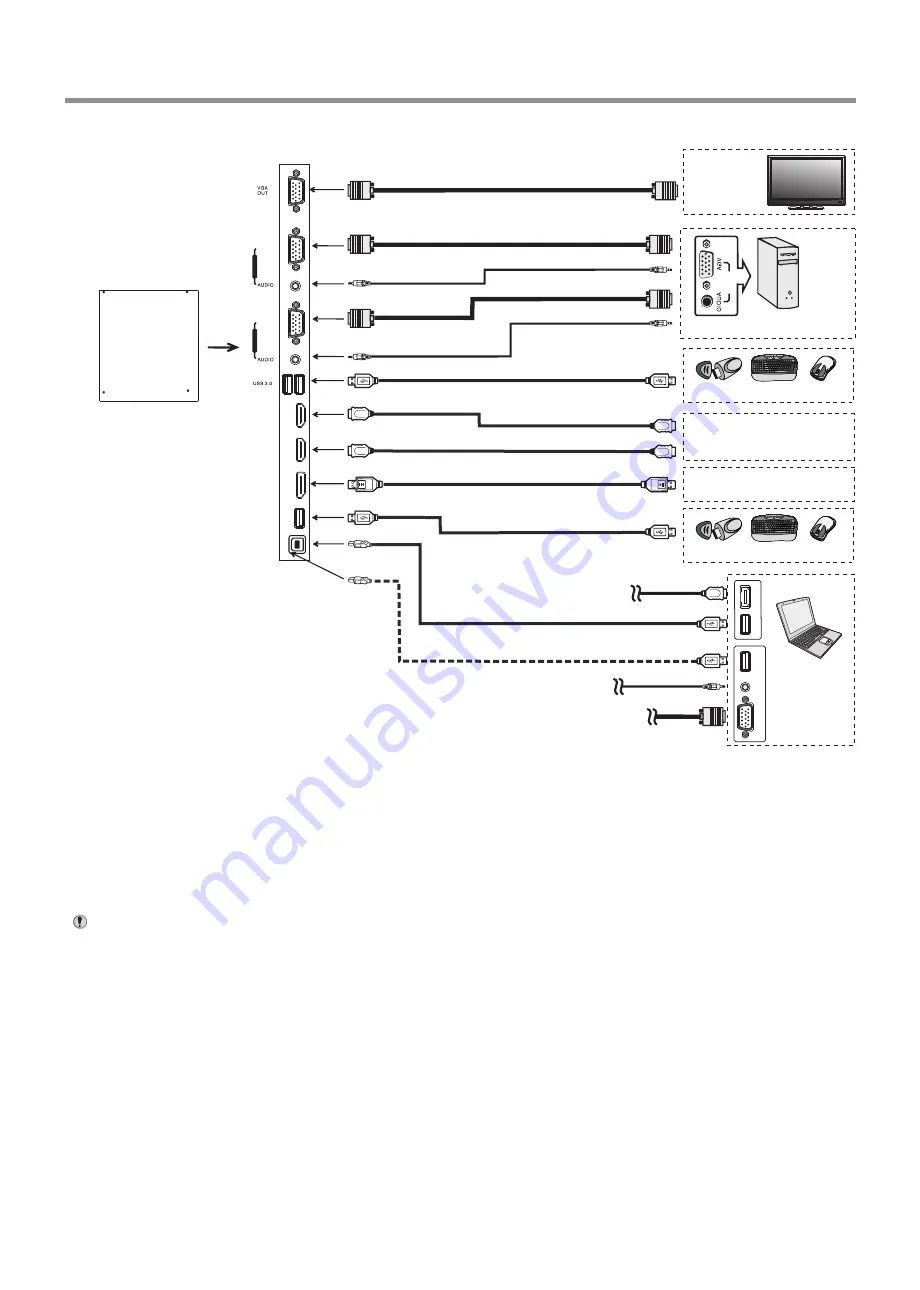
 with USB cable to PC USB port.

Connect PC with VGA cable or HDMI cable. Please choose the proper method 
of connection based on your device.

Note:

  After  installation  of  the  driver,  it  can  control  the  external  computer  by 

native touch control. 

(Only for PC

HDMI signal)

TOUCH  OUT  2  takes  precedence  over  TOUCH  OUT  1  in  default.  You 

can define it to in

 Lock

 menu

Notes

:  1.The  totem  is  multiple  USB  port  designed(3.0,  2.0),  when  connect  with  USB  device,  please  select  the 

appropriate port.

2.The VGA output is signal of what has been currently selected from PC1/2/3.

HDMI  cable

USB  cable

USB  devices

PC
 OUT

VGA  cable

Audio


cable

VGA  cable

HDMI devices

PC, etc.
VGA devices

Monitor

Audio


cable

VGA  cable

V

G

A


O

U

T

A

U

D

IO

O

U

T

U

S

B

Computer

U

S

B

H

D

M

I

DP devices

USB  cable

USB  devices

HDMI  cable

DP  cable

USB  cable

USB  cable

3.0

2.0

HDMI 1

(MHL) 

HDMI 2

(ARC)

VGA 1

P

C I
N 1

VGA 2

P

C I
N 2

DP IN

USB 2.0

TOUCH

OUT 1

Main

board

Содержание Totem Focus

Страница 1: ...otemfocus 55 10 TOUCH TOTEM FOCUS INSTRUCTION MANUAL PM TOTEM2A 55 CAM Before connecting operating or adjusting this product please read the manual completely Please keep this manual for future reference ...

Страница 2: ...1 Important Safety Precautions 2 Identification of Controls 4 Remote Control 6 Connections 8 Basic Operations 11 Device Settings 13 Network Settings 14 Menu List Troubleshooting 26 Specifications 27 20 Using USB Multi Media Player 22 ...

Страница 3: ...ring both the furniture and the totem to a suitable support Educating children about the dangers of climbing on furniture to reach the totem or its controls Do not use immediately after moving from a low temperature to high temperature environment as this causes condensation which may result in fire electric shock or other hazards To avoid possible condensation it is recommended to not use the dev...

Страница 4: ... extension cords or convenience receptacles on other equipment as this can result in a risk of fire or electric shock 9 Entering of objects and liquids Never insert an object into the product through vents or openings High voltages are present in the product and inserting an object can cause electric shock and or short internal parts For the same reason do not spill water or liquid on the product ...

Страница 5: ...by other objects Be careful not to be injured by broken glass pieces in case the display panel breaks 21 Pixel defect The display panel is a very high technology product giving you finely detailed pictures Occasionally a few non active pixels may appear on the screen as a fixed point of blue green or red Please note that this does not affect the performance of your product WARNING For continued sa...

Страница 6: ... SWITCH AC IN 4 5 Camera Note It can perfectly support camera s up to 720p Open the back cover with the key Note 1 Cut off power before opening the back cover 2 Make sure that the back cover is locked before turning on power 70 498 87 4 15 70 87 The totem must be secured to building structure before operation As illustrated in figure positioning 4 holes on the earth and drill the holes at the corr...

Страница 7: ...ice RS232 control and the other uses 8 WAN IN The built in router input port Connect to the external network 9 LAN OUT The built in router output port Connection to another computer or other Internet enabled devices 10 AV IN Connect an AV device to this jack 11 S PDIF digital audio output Connect a digital sound system to this jack 12 Connect headphones to this jack The totem is the current audio ...

Страница 8: ...screenshot and stores the data onto your connected USB storage device If there is no USB storage the screenshot will be stored on the built in storage Select sound mode Return to previous menu or exit the on screen menu Mute the sound Coloured buttons RED GREEN YELLOW BLUE Red Screen off on Blue Call or exit recent application list Switch to HDMI mode Switch to VGA mode Display OPS on the screen P...

Страница 9: ...s sunshine fire or the like Open the battery cover 1 Insert twoAAAbatteries into the battery compartment Make sure that the and symbols on the batteries match the and symbols in the battery compartment 2 Replace the cover 3 To install remote control batteries Aiming the remote control Use the remote control by pointing it towards the remote sensor on the front of your totem Objects between the rem...

Страница 10: ...A cable AV cable AV adapter Network cable Computer etc Internet devices Network connection S PDIF cable Audio cable Camcorder Satellite signal receiver Computer etc Network cable Set top box Y W R Y W R VGA OUT AUDIO OUT USB Computer USB HDMI Connect TOUCH OUT with USB cable to PC USB port Connect PC with VGA cable or HDMI cable Please choose the proper method of connection based on your device No...

Страница 11: ... in Lock menu Notes 1 The totem is multiple USB port designed 3 0 2 0 when connect with USB device please select the appropriate port 2 The VGA output is signal of what has been currently selected from PC1 2 3 HDMI cable USB cable USB devices P C O U T VGA cable Audio cable VGA cable HDMI devices PC etc VGA devices Monitor Audio cable VGA cable V G A O U T A U D I O O U T U S B Computer U S B H D ...

Страница 12: ...rophone etc VGA cable DISPLAY PORT cable HDMI cable USB cable Notes 2 The signal ofAudio or Video output are OPS generated 1 The OPS is multiple USB port designed 3 0 2 0 when connect with USB device please select the appropriate port 3 0 2 0 2 0 USB cable USB cable Headphone cable Network cable Audio cable USB device Monitor Audio input device OPS ...

Страница 13: ...wer Switch on the totem 1 2 3 Turning the totem on or off Operating the Float menu The first time installation Connect to power source and turn on the totem the below installation menu page will display on the totem Select desired menu language then press START and go to next page Select location and go to next page 1 Slide up from bottom of the screen center by two or more fingers to call Press a...

Страница 14: ...d drag the shortcut to X for shortcut deleted Note When using the app Camera store the data onto your connected USB device If USB device is not connected store the data onto the built in storage Show all applications Shortcuts you created on Home page Go to your USB Drive Go to your web Browser Call the divice Settings menu ES File Explorer Long press on the screen will call the wallpapers and wid...

Страница 15: ...tions To set default input method To set Android keyboard AOSP Note To manually set date and time you should toggle Automatic Date time to OFF To set on screen language To set Date and time Automatic search for Bluetooth devices Network Setting Show all apps Display system Storage Display information of the unit ...

Страница 16: ...n press Login button IP settings Proxy settings Change the UserName and Password Select Management then Password Internal routing setting Reset Internal Router by hardware Password is required for this operation and is the same password to access Lock menu The default password is 0000 Ethernet setting Set the Built in WiFi ...

Страница 17: ...ISP then choose Static IP Ethernet Point to Protocol Your ISP will provide you with Login ID and password Usually this option is applicable to DSL service Point to Point Tunneling Protocol Your ISP will provide you with Login ID and password Layer 2 Tunneling Protocol Your ISP will provide you with Login ID and password Usually this option is applicable to DSL service DHCP Client Static IP PPPOE P...

Страница 18: ...connection Automatically obtain IP information from your ISP Password Setting Format Recommended to select AP Input the default UserName admin skip the default password setting as there is no default password then press Login button Select Advanced Mode Select Setup Wizard Next Next WiFi Password of Internal Router in the totem Password should be set at least 8 characters Get IP address Setting su...

Страница 19: ...tton There are five methods to connect with network choose your preferred one Recommended to select the DHCP Client connection Automatically obtain IP information from your ISP Password Setting Format WiFi Password of Internal Router in the totem Password should be set at least 8 characters Successfully connected to return Confirm Site Survey Select your desired WiFi signal Connect Input Password ...

Страница 20: ...lect the DHCP Client connection Automatically obtain IP information from your ISP Next Next Finished Next Successfully connected return to Site contents Select Wireless then Site Survey Confirm Site Survey Select your desired WiFi signal Connect Input Password Method 2 Advanced mode Input the default UserName admin skip the default password setting as there is no default password then press Login ...

Страница 21: ...work Setting Built in WiFi card Connect to WPS WiFi Protected Setup router Add a new network manually Scanning WiFi direct device Setting Portable WiFi hotspot Setting Mcast Turn on or off the built in WiFi Display all of the WiFi sites avaible ...

Страница 22: ...re If you select User you can set the level of the Red Green Blue as your desired Brightness Adjust the brightness Contrast Adjust the contrast Saturation Adjust the color saturation Hue Adjust the image hue Only for NTSC system Sharpness Adjust the sharpness Picture Screen The backlight brightness is decreased Energy Save Zoom Mode Clock Adjust the screen size Phase Adjust the focus of stable ima...

Страница 23: ...tting in MEMORY mode when the totem powered on it will automatically switch to the source when it powered off last time otherwise it is in setting mode Restore To Default Reset all settings to factory defaults Select On to turn on enable HDMI_ARC Select On to automatically switch to the MHL input when it connected Select color range Only for HDMI mode TouchOut is there to define which touch signal...

Страница 24: ...se exit USB mode first For instructions on using your USB device refer to the user s manual of your USB device Please name your files in English Otherwise the file names can not be shown correctly Certain types of USB device may not be compatible with this totem Your totems USB menu may look different to the interface shown in this manual Using USB multi media player 22 USB multi media interface i...

Страница 25: ...hoto viewer you can view compatible photos in JPG BMP or PNG format Also you can zoom rotate photo etc Note You can also use Play Pause STOP Previous Next on the remote control to operate Previous photo Play pause Next photo Show information Zoom in Zoom out ...

Страница 26: ...Note You can also use Play Pause STOP Previous Next on the remote control to operate Previous song Pause Play Show information Show playlist Repeat mode select Next song repeat to play single music repeat to play all music files in current folder when it plays to the end no repeat when it plays to the end Select sound mode ...

Страница 27: ...ie in MPG MKV DAT MP4 MOV or VOB format Now AB repeat starts To cancel highlight Section replay and toggle it to OFF Playing settings Previous movie Play pause Next movie Fast reverse Fast forward AB Section repeat Show playlist Show information Skip to specific point by input time Adjust the volume ...

Страница 28: ...setting Good picture no sound The sound may be muted Press MUTE again to cancel Audio noise Communication problems may occur if infrared communication equipment e g infrared cordless headphones is used near the totem Move the infrared communication equipment away from the totem until the noise is eliminated General Problem Possible Solutions Some items can t be accessed If a setting option appears...

Страница 29: ...and dimensions shown are approximate 3 Specifications and external appearance may be changed for the sake of improvement Design and specifications are subject to change without notice Due to different standby conditions the standby power consumption of some models could be higher than 0 5W DP Input 820 X 450 X 1900 2 4 A 0 5 W 68 kg Net 55 inches diagonal PM TOTEM2A 55 A 1 3 1 2 3 1 1 1 1 1 2 1 Un...

Страница 30: ...PRINTED ON RECYCLED PAPER ...

Отзывы: