background image

15

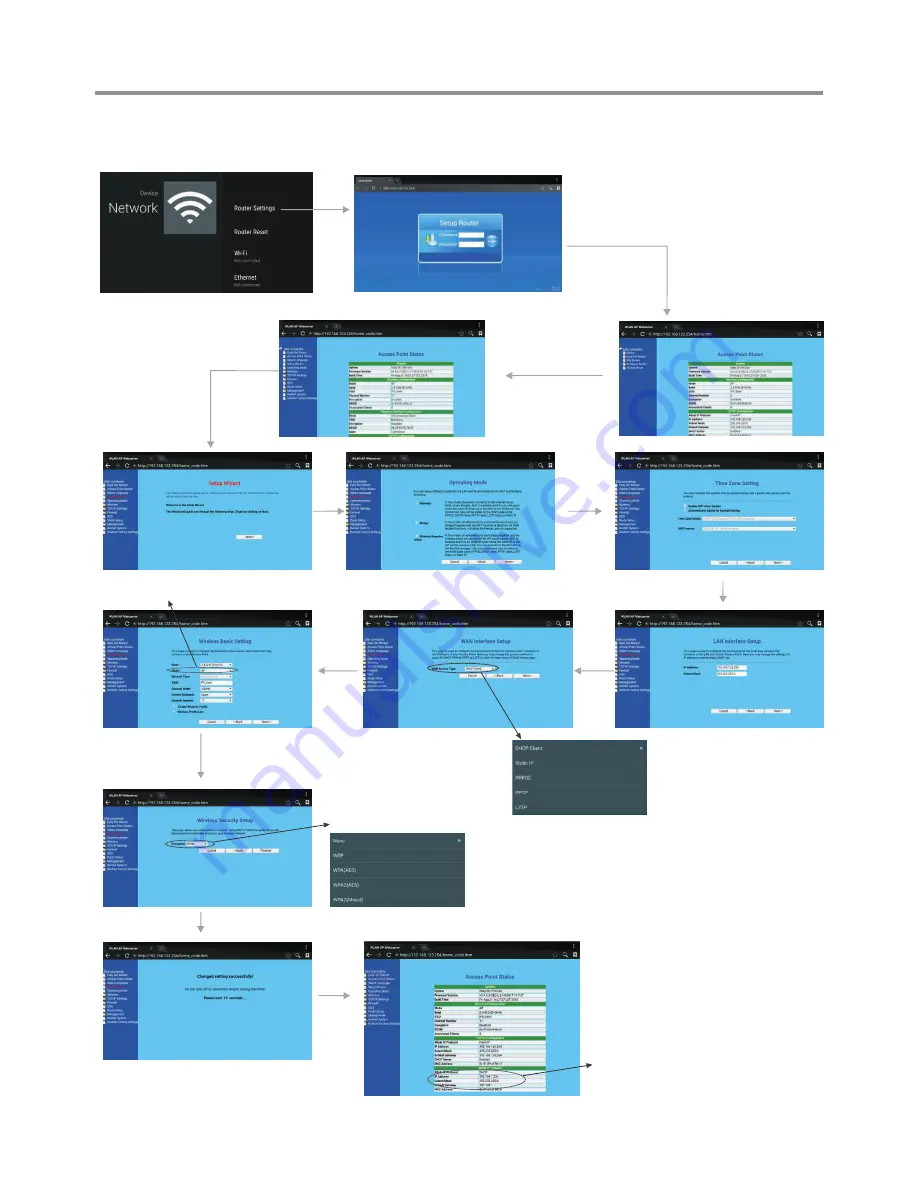
Wired


Network


Setting


(

)

Internal router

Network Settings(Continued)

Select 

Gateway

Next

Next

Finished

There are five methods to 
connect with network, 
choose your preferred one.
Recommended to select 
the 

DHCP


Client


connection. Automatically 
obtain IP information from 
your ISP. 

Passward Setting Format

Method 2: Professor model

Recommended to select  

AP

Input the default UserName:

 admin

, skip


the


default


password


setting


as


there


is


no


default


password, then press 

Login


button login. 

Select

Professor Model

Select 

Setup Wizard

Next

Next

WiFi Password of 
Internal Router in the 
screen. (Password 
should be set at least 8 
characters. )

Get IP address,
Setting successfully.

Next

Next

Содержание PM-TS43A/32

Страница 1: ...ressly approved by the party responsible for compliance could void the user s authority to operate the equipment This User s Manual includes detailed usage instructions for your product Please read this manual thoroughly Figures and illustrations in this User Manual are provided for reference only and may differ from actual equipment appearance Equipment design and specifications may be changed wi...

Страница 2: ...ng or adjusting this product please read the manual completely Please keep this manual for future reference PM TS43A 32 Interactive Touch Screen INSTRUCTION MANUAL PM TS55A 32 PM TS65A 32 PM TS65A4K 32 PM TS75A 32 PM TS84A4K 32 ...

Страница 3: ...ty Precautions 2 Important Notice 4 Identification of Controls 5 Remote Control 6 Setting Up 7 Connections 8 Basic Operations 10 Device Settings 12 Network Settings 13 Menu List Troubleshooting 24 Specifications 25 19 Using USB Multi Media Player 21 ...

Страница 4: ...crease children s awareness of danger caused by falling down of the or being hurt by bumping into the s Do not use immediately after moving from a low temperature to high temperature environment as this causes condensation which may result in fire electric shock or other hazards We recommend that the product packaging can not be opened at once before using this product it can be opened to using af...

Страница 5: ... extension cords or convenience receptacles on other equipment as this can result in a risk of fire or electric shock 9 Entering of objects and liquids Never insert an object into the product through vents or openings High voltages are present in the product and inserting an object can cause electric shock and or short internal parts For the same reason do not spill water or liquid on the product ...

Страница 6: ...ct from the wall outlet before cleaning Do not use liquid cleaners or aerosol cleaners Use a soft cloth for cleaning 20 Ventilation Do not block any ventilation openings Install the in accordance with the manufacturer instructions The vents and other openings in the cabinet are designed for ventilation Do not cover or block these vents and openings since insufficient ventilation can cause overheat...

Страница 7: ...is is not a malfunction and the unit will recover when the temperature returns to normal Do not leave the unit in a hot or cold location Also do not leave the unit in a location exposed to direct sunlight or near a heater or in high humidity as this may cause the cabinet to deform and the to malfunction and affect the screen s performance screen Environment condition Operating temperature 5 C 35 C...

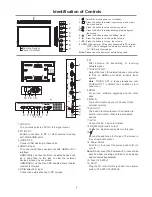
Страница 8: ...DP DisplayPort Input Connect an external device to DP out jack 6 WIFI antenna for transmitting or receiving network signal 7 TOUCH1 2 OUT Output the touch for external devices connected to PCx or HDMIx port which support touch system Note TOUCH OUT 2 takes precedence over TOUCH OUT 1 in default You can define it to in Lock menu 8 RS232 For service software upgrades and the other uses 9 WAN IN The ...

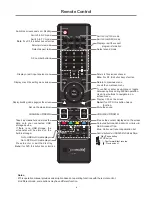
Страница 9: ... screenshot and stores the data onto your connected USB storage device If there is no USB storage the screenshot will be stored on the built in storage Select sound mode Return to previous menu or exit the on screen menu Mute the sound Coloured buttons RED GREEN YELLOW BLUE Red Screen off on Blue Call or exit recent application list Switch to HDMI mode Switch to VGA mode Display OPS on the screen ...

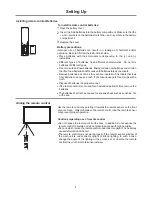
Страница 10: ... heat such as sunshine fire or the like Open the battery cover 1 Insert twoAAAbatteries into the battery compartment Make sure that the and symbols on the batteries match the and symbols in the battery compartment 2 Replace the cover 3 To install remote control batteries Aiming the remote control Use the remote control by pointing it towards the remote sensor on the front of your screen Objects be...

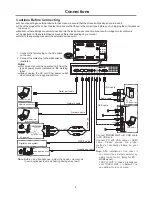
Страница 11: ...iver Computer etc Network cable Set top box Y W R Y W R VGA OUT AUDIO OUT USB Computer USB HDMI Connect TOUCH OUT with USB cable to PC USB port Connect PC with VGA cable or HDMI cable Please choose the proper method of connection based on your device Note After installation of the driver it can control the external computer by native touch control Only for PC HDMI signal TOUCH OUT 2 takes preceden...

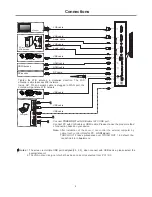
Страница 12: ...river it can control the external computer by native touch control Only for PC HDMI signal TOUCH OUT 2 takes precedence over TOUCH OUT 1 in default You can define it to in Lock menu Tighten the WiFi antenna in clockwise direction The WiFi antenna is able to access WiFi network Inside AP When network cable is plugged in WAN port the antenna will generate WiFi network Notes 1 The screen is multiple ...

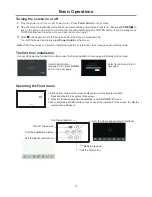
Страница 13: ...wer Switch on the screen 1 2 3 Turning the screen on or off Operating the Float menu The first time installation Connect to power source and turn on the screen the below installation menu page will display on the screen Select desired menu language then press START and turn to next page Select location and turn to next page 1 Slide up from bottom of the screen center by two or more fingers to call...

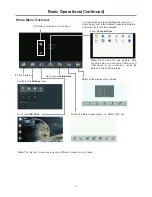
Страница 14: ...nd drag the icon to on Home page for shortcut created press and drag the shortcut to X for shortcut deleted Note When using the app Camera store the data onto your connected USB device If USB device is not connected store the data onto the built in storage Show all applications Switch to the display menu screen Shortcuts you created on Home page Go to your web Browser Call the divice Settings menu...

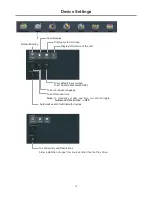
Страница 15: ...tions Network Setting Show all apps Display system Storage Display information of the unit To set default input method To set Android keyboard AOSP Note To manually set date and time you should toggle Automatic Date time to OFF To set on screen language To set Date and time Automatic search for Bluetooth devices ...

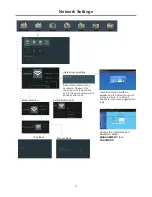
Страница 16: ...assword then press Login button login IP settings Proxy settings Change the UserName and Password Select MANAGEMENT then PASSWORD Internal routing setting Reset Internal Router by hardware Password is required for this operation and is the same password to access Lock menu Ethernet setting Set the Built in WiFi ...

Страница 17: ...en choose Static IP Ethernet Point to Protocol Your ISP will provide you with Login ID and password Usually this option is applicable to DSL service Point to Point Tunneling Protocol Your ISP will provide you with Login ID and password Layer 2 Tunneling Protocol Your ISP will provide you with Login ID and password Usually this option is applicable to DSL service DHCP Client Static IP PPPOE PPTP L2...

Страница 18: ...ally obtain IP information from your ISP Passward Setting Format Method 2 Professor model Recommended to select AP Input the default UserName admin skip the default password setting as there is no default password then press Login button login Select Professor Model Select Setup Wizard Next Next WiFi Password of Internal Router in the screen Password should be set at least 8 characters Get IP addr...

Страница 19: ...ton login There are five methods to connect with network choose your preferred one Recommended to select the DHCP Client connection Automatically obtain IP information from your ISP Passward Setting Format WiFi Password of Internal Router in the screen Password should be set at least 8 characters Successfully connected to return Confirm Site Survey Select your desired WiFi signal Connect Input Pas...

Страница 20: ...DHCP Client connection Automatically obtain IP information from your ISP Next Next Finished Next Successfully connected return to Site contents Select Wireless then Site Survey Confirm Site Survey Select your desired WiFi signal Connect Input Password Method 2 Professor model Input the default UserName admin skip the default password setting as there is no default password then press Login button ...

Страница 21: ...ireless Network Setting Built in WiFi card Select your desired Wi Fi signal Add new network Scanning Wi Fi direct device Setting Portable WiFi hotspot Turn on enable Mcast Turn on off the built in WiFi Display of all the Wi Fi signal ...

Страница 22: ...ou can set the level of the Red Green Blue as your desired Brightness Adjust the brightness Contrast Adjust the contrast Saturation Adjust the color saturation Hue Adjust the image hue Only for NTSC system Sharpness Adjust the sharpness Picture Screen The backlight brightness is decreased Energy Save Zoom Mode Clock Adjust the screen size Phase Adjust the focus of stable images H Position Move the...

Страница 23: ... and rename it as boot0 jpg 2 Insert the USB stick into the USB port on the Android board Power on Source Power on Source Setting in MEMORY mode when the screen powered on it will automatically switch to the source when it powered off last time otherwise it is in setting mode System ID Restore To Default Reset all settings to factory defaults Select On to turn on enable HDMI_ARC Select On to autom...

Страница 24: ... exit USB mode first For instructions on using your USB device refer to the user s manual of your USB device Please name your files in English Otherwise the file names can not be shown correctly Certain types of USB device may not be compatible with this screen Your screens USB menu may look different to the interface shown in this manual Using USB multi media player 21 USB multi media interface i...

Страница 25: ...y Pause STOP Previous Next on the remote control to operate Note You can also use Play Pause STOP Previous Next on the remote control to operate Previous song Pause Play Show information Show playlist Repeat mode select Next song repeat to play single music repeat to play all music files in current folder when it plays to the end no repeat when it plays to the end Previous photo Play pause Next ph...

Страница 26: ...I MPG MPEG DAT MP4 TS RM RMVB or MKV MOV format Now AB repeat starts To cancel highlight Section replay and toggle it to OFF Adjust the volume Playing settings Previous movie Play pause Next movie Fast reverse Fast forward AB Section repeat Show playlist Show information Skip to specific point by input time ...

Страница 27: ...from noise sources such as cars neon signs or hair dryers Good picture no sound The sound may be muted Press MUTE again to cancel Audio noise Communication problems may occur if infrared communication equipment e g infrared cordless headphones is used near the screen Move the infrared communication equipment away from the screen until the noise is eliminated General Problem Possible Solutions Some...

Страница 28: ...04 kg Net 6 2 A 0 5 W 1 3 1 2 3 1 1 1 1 1 2 43 inches diagonal 65 inches diagonal 84 inches diagonal Current Max 1749 X 105 3 X 1029 86 kg Net 5 2 A 0 5 W 1 3 1 2 3 1 1 1 1 1 2 75 inches diagonal Specifications Notes 1 prior notice 2 Weight and dimensions shown are approximate 3 Specifications and external appearance may be changed for the sake of improvement Correct specifications depend on the a...

Страница 29: ...PRINTED ON RECYCLED PAPER 5944041960 ...

Отзывы: