background image


Promethean, Company Confidential 

35


C

ATEGORY


I

TEM


I

NPUT

-L

ENGTH


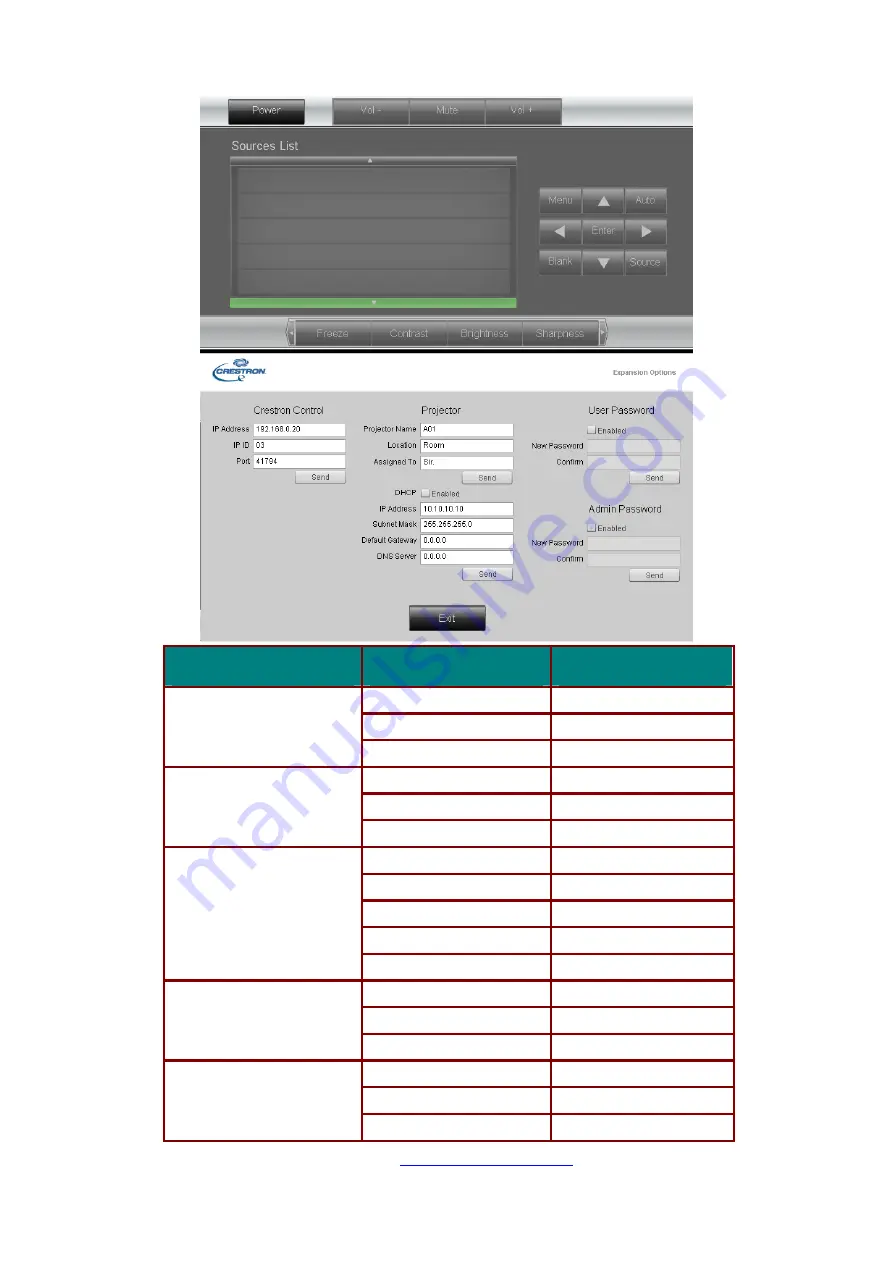
IP Address 

14 

IP ID 

Crestron Control 

Port 5 

Projector Name 

10 

Location 10 

Projector 

Assigned To 

10 

DHCP (Enabled) 

(N/A) 

IP Address 

15 

Subnet Mask 

15 

Default Gateway 

15 

Network Configuration 

DNS Server 

15 

Enabled (N/A) 

New Password 

10 

User Password 

Confirm 10 

Enabled (N/A) 

New Password 

10 

Admin Password 

Confirm 10 

For more information, please visit 

http://www.crestron.com/

Содержание UST-P1

Страница 1: ...Multimedia Projector MODEL Owner s Manual PROJECTOR UST P1 UST P1C UST P1V1 UST P1CV1 UST P1G PROMETHEAN LTD PROMETHEAN HOUSE LOWER PHILIPS ROAD BLACKBURN BB1 5TH UNITED KINGDOM 44 1254 298 598...

Страница 2: ...edia Interface are trademarks or registered trademarks of HDMI Licensing LLC in the United States and other countries All other product names used in this manual are the properties of their respective...

Страница 3: ...desktop and ceiling mount otherwise lamp life could decrease dramatically Allow at least 50 cm clearance around the exhaust vent Ensure that the intake vents do not recycle hot air from the exhaust v...

Страница 4: ...posed of properly Recycle or dispose in accordance with local state or federal Laws For more information contact the Electronic Industries Alliance at WWW EIAE ORG For lamp specific disposal informati...

Страница 5: ...7 IMAGE MENU 18 Advanced Feature 19 Color Manager 20 COMPUTER MENU 21 U VIDEO MENU 22 INSTALLATION I MENU 23 ActivBoard Installation 24 Advanced Feature 25 INSTALLATION II MENU 26 Advanced Feature 27...

Страница 6: ...CE VS PROJECTION SIZE 50 Projection Distance and Size Table 50 TIMING MODE TABLE 51 PROJECTOR DIMENSIONS 54 REGULATORY COMPLIANCE 55 FCC WARNING 55 CANADA 55 SAFETY CERTIFICATIONS 55 Promethean Compan...

Страница 7: ...WITH TWO AAA BATTERIES CD ROM THIS USER S MANUAL POWER CORD EU POWER CORD US POWER CORD UK Contact your dealer immediately if any items are missing appear damaged or if the unit does not work It is r...

Страница 8: ...cts images 4 Lens Projection Lens 5 Focus ring Focuses the projected image TEMP LED Red Error code LAMP LED Amber Error code Flashing Error code System warm up Cooling 6 POWER LED Green Power On Ready...

Страница 9: ...IN Connect the POWER cable 9 8 VGA 2 Connect the RGB cable from a computer and components 9 VGA 1 Connect the RGB cable from a computer and components 10 VGA OUT Connect the RGB cable to a display Loo...

Страница 10: ...Listed ceiling mounts For ceiling installations use approved mounting hardware and M4 screws with a maximum screw depth of 12 mm 0 47 inch The construction of the ceiling mount must be of a suitable...

Страница 11: ...pt remote control operation 2 Be sure nothing obstructs the path between the remote control and the projector If the path between the remote control and the projector is obstructed you can bounce the...

Страница 12: ...e unfreezes the on screen picture 13 Blank Makes the screen blank 14 Source Detects the input device 15 Auto Auto adjustment for phase tracking size position 16 Menu Opens the OSD 17 Status Opens the...

Страница 13: ...ding the remote perpendicular to the sides or the rear of the projector the remote will function well within a radius of about 7 meters 23 feet and 15 degrees above or below the projector level If the...

Страница 14: ...n of the arrow 2 Insert the battery with the positive side facing up 3 Replace the cover Caution 1 Only use AAA batteries Alkaline batteries are recommended 2 Dispose of used batteries according to lo...

Страница 15: ...ord Security Lock on page 10 if security lock is enabled 4 If more than one input device is connected press the SOURCE button of the remote and use to scroll among devices Component is supported throu...

Страница 16: ...and Setting the OSD Language on page 15 for help on using OSD menus Important Keep the password in a safe place Without the password you will not be able to use the projector If you lose the password...

Страница 17: ...an use any combination including the same arrow five times but not less than five Press the cursor buttons in any order to set the password Push the MENU button to exit the dialog box 7 The password c...

Страница 18: ...tand should be level and sturdy Position the projector so that it is perpendicular to the screen Ensure the cables are in a safe location You could trip over them To adjust the angle of the picture tu...

Страница 19: ...Focus and Keystone 1 Use the Image focus control on the projector only to sharpen the projected image 2 Use the KEYSTONE buttons the remote control to correct image trapezoid wider top or bottom effe...

Страница 20: ...re five menus Press the cursor button to move through the menus 3 Press the cursor button to move up and down in a menu 4 Press to change values for settings 5 Press MENU to close the OSD or leave a s...

Страница 21: ...your preference before continuing 1 Press the MENU button Press the cursor button to navigate to Installation I 2 Press the cursor button until Language is highlighted 3 Press the cursor button until...

Страница 22: ...ortugu s Italiano Norsk Svenska Nederlands Suomi T rk e Portugu s do Brasil Vi t Dansk Display Mode Brilliant Color Presentation Bright Game Movie TV sRGB User Auto Off Fill 4 3 16 9 LetterBox Native...

Страница 23: ...Promethean Company Confidential 17 OSD Sub Menu Overview...

Страница 24: ...e cursor button to adjust the Brilliant Color value Brightness Press the cursor button to adjust the display brightness Contrast Press the cursor button to adjust the display contrast Sharpness Press...

Страница 25: ...move up and down in the Advanced menu ITEM DESCRIPTION Color Space Press the cursor button to adjust the color space Range Auto RGB YUV Color Temperature Press the cursor button to adjust the color te...

Страница 26: ...olor Manager Press the buttons to adjust the Hue Saturation and Gain Cyan Select to enter the Cyan Color Manager Press the buttons to adjust the Hue Saturation and Gain Magenta Select to enter the Mag...

Страница 27: ...es for settings ITEM DESCRIPTION Horizontal Position Press the cursor button to adjust the display position to left or right Vertical Position Press the cursor button to adjust the display position to...

Страница 28: ...the buttons to adjust the video saturation Video Tint Press the buttons to adjust the video tint hue Film Mode Press the buttons to select a different film mode Video Overscan Press the buttons to en...

Страница 29: ...r button to select different color to blank the screen Projection Press the cursor button to choose from four projection methods Aspect Ratio Press the cursor button to adjust the video aspect ratio N...

Страница 30: ...lect different White Board aspect ratios for the projected image Note Aspect Ratio will be grayed out when White Board settings are in use Test Pattern Press button to select different test pattern fo...

Страница 31: ...disable wall color function Off Light Yellow Pink Light Green Blue Blackboard Presentation Timer Press Enter to go to the Presentation Timer Menu See Presentation Timer below Digital Zoom Press the cu...

Страница 32: ...on to enable or disable automatic power On when AC power is supplied Fan Speed Press the cursor button to toggle between Normal and High fan speeds Note Recommend selecting high speed when the altitud...

Страница 33: ...e Peripheral Test menu See page 28 for more information on Peripheral Test Lamp Hour Reset After replacing the lamp this item should be reset See page 29 for more information on Lamp Hour Reset Low Po...

Страница 34: ...d translucent level Menu Display Press button to select OSD timeout delay Peripheral Test ITEM DESCRIPTION Remote Control Test Press Enter to test the IR remote controller for diagnostic Color Test Pr...

Страница 35: ...he Lamp on page 42 to reset the lamp hour counter 3D ITEM DESCRIPTION 3D Press to select Off DLP Link or IR 3D Sync Invert Press to turn 3D Sync Invert On or Off 3D Format Press to enable or disable 3...

Страница 36: ...the IP Address Subnet Mask Gateway and DNS fields IP Address Enter a valid IP address if DHCP is turned off Subnet Mask Enter a valid Subnet Mask if DHCP is turned off Gateway Enter a valid Gateway ad...

Страница 37: ...llective projector management on a network but also management from a control panel on a PC or Laptop browser screen Crestron is a registered trademark of Crestron Electronics Inc of the United States...

Страница 38: ...LAN RJ45 1 Connect an RJ45 cable to RJ45 ports on the projector and the PC Laptop 2 On the PC Laptop select Start Control Panel Network Connections Promethean Company Confidential 32...

Страница 39: ...Promethean Company Confidential 33 3 Right click on Local Area Connection and select Properties 4 In the Properties window select the General tab and select Internet Protocol TCP IP 5 Click Properties...

Страница 40: ...0 0 0 0 DNS Server 0 0 0 0 10 Press Enter to confirm settings 11 Open a web browser for example Microsoft Internet Explorer with Adobe Flash Player 9 0 or higher 12 In the Address bar input the IP ad...

Страница 41: ...ctor Name 10 Location 10 Projector Assigned To 10 DHCP Enabled N A IP Address 15 Subnet Mask 15 Default Gateway 15 Network Configuration DNS Server 15 Enabled N A New Password 10 User Password Confirm...

Страница 42: ...alled RS232 by TELNET for LAN RJ45 interface Quick Start Guide for RS232 by TELNET Check and get the IP Address on OSD of the projector Make sure that laptop PC can access the web page of the projecto...

Страница 43: ...lnet Connection ready and user can have RS232 command input then Enter key pressed the RS232 command will be workable How to have TELNET enabled in Windows VISTA 7 By default installation for Windows...

Страница 44: ...ction ready 5 Limitation 1 for Telnet Control there is only one connection for Telnet Control in one projector Limitation 2 for Telnet Control there is less than 50 bytes for successive network payloa...

Страница 45: ...Security Lock Status Press the cursor button to move up and down in the Installation II menu Select the Installation II sub menu and press Enter to enter the Status sub menu ITEM DESCRIPTION Active S...

Страница 46: ...ntains a small amount of mercury b Do not dispose this product with general household waste c Disposal of this product must be carried out in accordance with the regulations of your local authority Wa...

Страница 47: ...n the module handle to remove the lamp module 6 Reverse steps 1 to 5 to install the new lamp module While installing align the lamp module with the connector and ensure it is level to avoid damage Not...

Страница 48: ...2 Press the cursor button to move to the Installation II menu Press the cursor button to move down to Advanced 3 Press the cursor button to move down to Lamp Hour Reset 4 Press the cursor or Enter bu...

Страница 49: ...vent scratching the mirror when subsequently wiped 2 Gently wipe with a lens cleaning cloth or alternatively use a lens cleaning tissue in conjunction with a small amount of lens cleaning fluid Cautio...

Страница 50: ...brasive alcohol based cleaners Warning 1 Be sure to turn off and unplug the projector at least 30 minutes before cleaning Failure to do so could result in a severe burn 2 Use only a dampened cloth whe...

Страница 51: ...s on purchasing a suitable Kensington security cable The security lock corresponds to Kensington s MicroSaver Security System If you have any comment contact Kensington 2853 Campus Drive San Mateo CA...

Страница 52: ...e attached device is turned on Ensure a connected PC is not in suspending mode Ensure a connected notebook computer is configured for an external display This is usually done by pressing a Fn key comb...

Страница 53: ...n the remote control or projector 2 Ensure the projector to screen distance is within the 340 3mm 10mm for 16 10 87 or 421 9mm 10mm for 16 9 95 specified range 3 Check that the projector lens is clean...

Страница 54: ...or and have the projector serviced Remote Control Problems Problem The projector does not respond to the remote control 1 Direct the remote control towards remote sensor on the projector 2 Ensure the...

Страница 55: ...HDTV 480i 576i 480p 576p 720p 1080i 1080p Video compatibility NTSC NTSC 4 43 PAL B G H I M N 60 SECAM H Sync 15 30 91 4 kHz V Sync 24 30 47 120 Hz Safety certification FCC B UL CB CE CCC KC PSB GOST S...

Страница 56: ...on Distance and Size Table WXGA XGA 16 9 16 10 4 3 Distance 421 9 20mm 340 3 20mm 372 1 20mm Diagonal 95 87 78 Image Width 2089mm 1880mm 1566mm Image height 1175mm 1175mm 1175mm H 327 6 50mm 300 2 50m...

Страница 57: ...5 734 60 0 O PAL SECAM 15 625 50 0 O 720 x 400 37 9 85 04 640 x 480 31 5 60 0 640 x 480 37 9 72 8 640 x 480 37 5 75 0 640 x 480 43 3 85 0 800 x 600 35 2 56 3 800 x 600 37 9 60 3 800 x 600 46 9 75 0 80...

Страница 58: ...119 9 1280 x 1024 64 0 60 0 1280 x 1024 80 0 75 0 1280 x 1024 91 1 85 0 1280 x 960 60 0 60 0 1280 x 960 85 9 85 0 1360 x 768 47 7 60 0 1400 x 1050 65 3 60 0 1440 x 900 55 5 59 9 1440 x 900 55 9 59 9...

Страница 59: ...80p 56 3 50 0 O O O Frequency supported Frequency not supported 3D note It means the timing can support non 3D and 3D signal with Frame Sequential and Top Bottom format It means the timing can support...

Страница 60: ...Projector Dimensions 160 0 122 58 374 51 Promethean Company Confidential 54...

Страница 61: ...d in accordance with the instruction manual may cause harmful interference to radio communications Operation of this equipment in a residential area is likely to cause harmful interference in which ca...

Отзывы: