Proline PROline GVN9500SVPS-A Скачать руководство пользователя страница 6

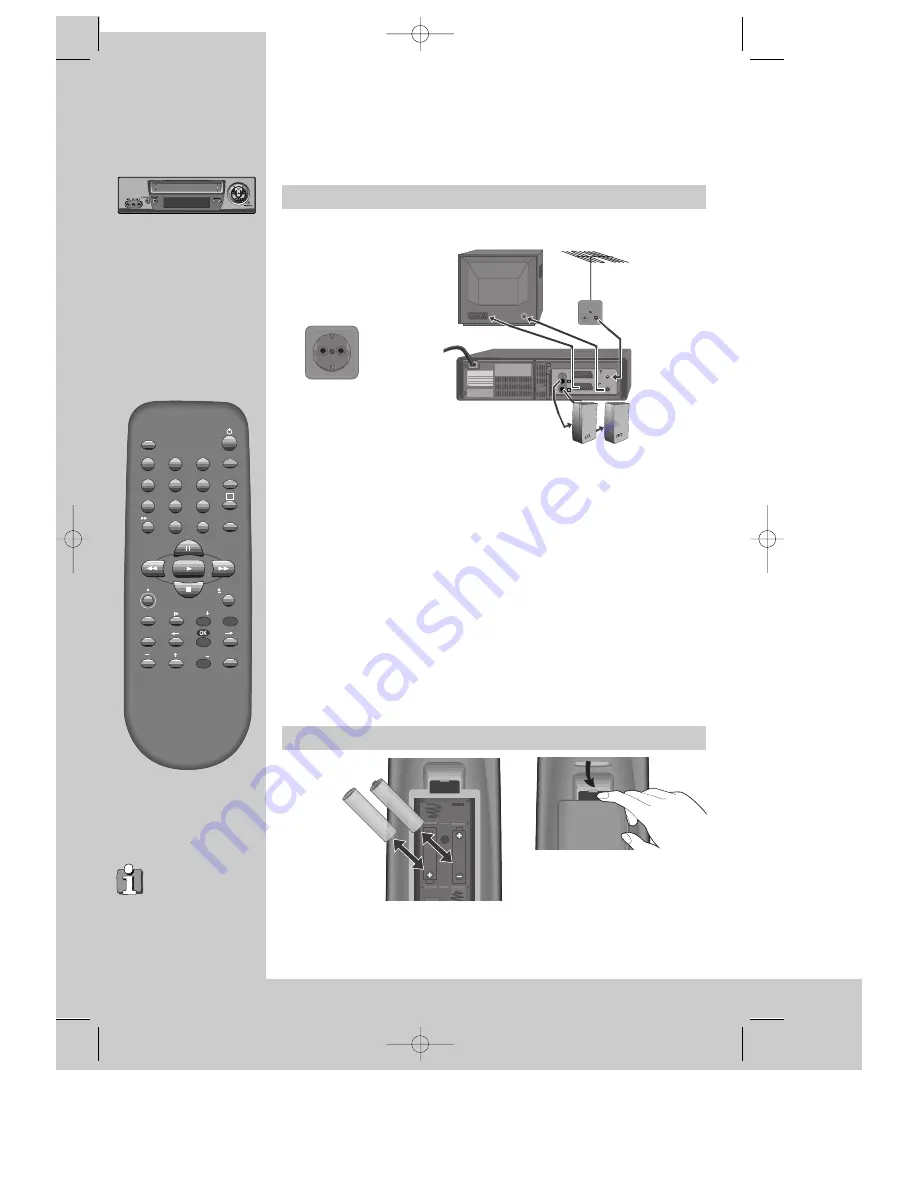
Connecting up the video recorder

Fitting the remote control's batteries

INSTALLATION

I

n

i

t

i

a

l

4

Place your video 

horizontally on a flat, steady base so that air can circulate around it for ventilation.

away from humidity and heat, magnetic fields, such as those from loudspeakers
etc., and with no heavy objects placed on top.

Switch off all components when connecting or disconnecting cables.

Unplug the aerial cable from your TV and plug it into the "ANT.
IN" socket of the video.
Plug the short coaxial cable provided into the "ANT.OUT" socket
of the video and the aerial socket of the TV.

Plug an EURO AV (SCART) cable into the "EURO AV1” socket of
the video and the AV socket on the TV if available.

This connection will provide best picture and sound quality.
Ask your dealer for an appropriate cable if you do not have one.

Without a SCART cable

, you need to follow the steps described under "If

you are not using a SCART cable" (right page and page 21).

Make sure the rating of the household mains supply matches the rating
shown on the back of the video.

Now plug in the mains lead. The display of the video should
now light.

Plug a phone cable into “Audio L, R” jack on the rear panel and into
the Audio jack on any audio amplifier, if needed. 

Fit the batteries as shown by
the pictures in the bay.

EURO AV1

ANT

.

 OUT

ANT

.

 IN

EURO AV2 /DECODER

AUDIO

L

R

+

Ð

+

Ð

1.5 V (AAA)

AC 230 V~ ,  
50 Hz

Protect your environment by returning used batteries to your dealer. Since
batteries contain toxic substances they require special disposal methods.

Make sure the batteries are always of the same type and age, and remove them
from the remote control if you are not using it for a long period.

The buttons to use
are marked on the
following pages.

TV/VCR

SV/V+

PR

PR

MENU

EJECT

PAL/SEC

A.SEL

A.D

AV

SP/LP

Q.S    

INDEX

1

2

3

4

5

6

7

8

9

0

30

A

DV-K891D-AL_GB  01.1.29 4:8 PM  ˘

`

4

Содержание PROline GVN9500SVPS-A

Страница 1: ...Instruction manual Hi Fi Video recorder GVN9500SVPS A GB English...

Страница 2: ...Make sure the recorder is placed on a steady flat surface you place the recorder where there is good ventilation all around you clean the recorder only with a soft lint free cloth do not use aggressi...

Страница 3: ...ccessing new recordings index scan 7 16 9 Wide Screen Format Playing back Recording CM Skip 8 Recording cassettes Setting time and date 9 Simple recording One touch recording OTR 10 Timer recording us...

Страница 4: ...his button is not available for this set to search the beginnings of records index a button that doubles the maximum recording time for very long recordings the record or OTR button One Touch Recordin...

Страница 5: ...press for the next step In addition some other functions appear on screen temporarily REW SP PR04 EURO front input sockets for connecting a stereo camcorder left right channels programme station sele...

Страница 6: ...one Without a SCART cable you need to follow the steps described under If you are not using a SCART cable right page and page 21 Make sure the rating of the household mains supply matches the rating...

Страница 7: ...mme locations on page 20 Else exit the basic installation function and enjoy your video recorder If you don t see this picture because you don t use a SCART cable search this picture now CH 52 with th...

Страница 8: ...still slow or search you don t hear the sound If the still picture is jittering you can steady it by using the PR buttons You can reduce horizontal interference stripes resulting from inaccurate track...

Страница 9: ...w motion speed in 6 steps 1 15 1 10 1 5 1 30 1 25 1 20 1 15 Press repeatedly PLAY switches back to normal playback Select INDEX or INDEX to search forwards or backwards The video will now wind to the...

Страница 10: ...OK confirm MENU end You can play and record the program of 16 9 Wide Screen format with this VCR 16 9 Set Auto This VCR perceives the recorded program format 16 9 Wide Screen format 4 3 normal TV form...

Страница 11: ...e in the new values Wait a few seconds after typing a one digit number Store with OK button and exit with MENU button CLOCK SET 0 9 setup hour correct MENU end Time Date CLOCK SET 0 9 setup minute cor...

Страница 12: ...to record is very long double the possible recording time with LP Long Play Up to eight hours with an E 240 cassette If you want to record from a source connected to your video see page 22 23 To cance...

Страница 13: ...ordings If you wish to record from a satellite receiver select under PR the satellite programme location or AV 1 2 depending on the connection with the antenna cable or the SCART cable Leave the satel...

Страница 14: ...using the buttons and change the setting If programme timings overlap the machine will give a warning message If you don t adjust the times the machine will record the first programme completely then...

Страница 15: ...TE 03 21 20 22 20 14 10 01 18 10 20 30 20 10 PR select OK confirm MENU end TIMER PROGRAM Once PR 03 Start Time 21 20 End Time 22 20 Start Date 14 10 SAT Tape Speed SP VPS PDC ON 0 erase correct MENU e...

Страница 16: ...wind tape PLAY FF REW it doesn t appear the tape remain time Reset the counter The video will wind to the position 0 00 00 and stop When you want the video to show the time remaining from the current...

Страница 17: ...ved for more than 5 minutes Use only good quality tape cassettes with the VHS logo Keep cassettes away from excessive moisture or dust magnetic and electrical fields loudspeakers and computer monitors...

Страница 18: ...ack and dubbed sound track VHS cassettes with Hi Fi stereo sound and VHS cassette with normal sound TV VCR SV V PR PR MENU EJECT PAL SEC A SEL A D AV SP LP Q S INDEX 1 2 3 4 5 6 7 8 9 0 30 A 16 During...

Страница 19: ...o left audio channel only right channel only the normal mono sound track of a Hi Fi cassette A SEL During broadcasting a bilingual performance Main language original sound track sub language dubbed bo...

Страница 20: ...the TV and video and confirm Tune in the station you want Press button to see the picture If it isn t the station you want or the picture is disturbed carry on tuning Once you see the station you want...

Страница 21: ...he MANUAL SET menu Call this menu just see the left page if it isn t displayed Select name correct Either select the name from the stored list MANUAL SET PR name change name create OK confirm MENU end...

Страница 22: ...ign Call the video s MAIN MENU choose PR Preset then PR Erase Select the programme to swap Confirm Move the station to the desired location number Confirm Select the station location number you want t...

Страница 23: ...TV to the test picture using the channel pre set functions of your TV as described in its manual When you have found the test picture store it under the button number on your TV for video input Press...

Страница 24: ...Set the other video machine to playback and your machine to record To connect a mono audio source use the front Audio In socket marked L To copy to another video machine from your video connect the tw...

Страница 25: ...a decoder for Pay TV Switch to Decoder connect the decoder left page and tune in the pay TV station see page 18 Store and exit Canal Setting For the Canal channel it must be set to Canal ON to recogni...

Страница 26: ...ording on the video tape Use PR buttons to adjust tracking if horizontal stripes appear Is the cassette of poor quality or worn out Test with another cassette If you are not using a SCART cable have y...

Страница 27: ...2 steps either forwards or backwards Press repeatedly PLAY switches back to normal playback Starting from playback you can control slow motion speed in 6 steps 1 15 1 10 1 5 1 30 1 25 1 20 1 15 Press...

Страница 28: ...s Move to the position you want to change using the button Change the setting using the or number buttons If all setting are ok press or till you see OK confirm in the last line Confirm Call the video...

Страница 29: ...18 21 Still frame adjustment 6 Test picture 21 TV VCR button 6 10 Tracking 6 VPS PDC 11 16 9 Set 8 Dimensions W x H x D 360 x 90 x 288 mm Weight 3 85 kg Power supply Voltage AC 230 V 50 Hz Power consu...

Страница 30: ...xit the basic installation function and enjoy your video recorder MANUAL SET PR01 ARD PR02 ZDF PR03 P 03 PR04 P 04 PR05 MTV PR select OK confirm MENU end sorts them in an order common for your country...

Страница 31: ......

Отзывы: