


WiFiBoX
8
•
Connect the supplied main cable to a socket (1), then the WIFIBOX will automatically turns on.
The WIFIBOX has a LCD display and buttons for access to the functions of the control panel; use control
panel (2) to set the WIFIBOX:
•
Set the
WIFI
data
Input Mode (
see chapter 3.6)
•
Set the
Manual Channel
for data wireless communication
(
see chapter 3.4)
Note:
•
The channel for data wireless communication must be the same set on the
projector.
MENU
UP
DOWN
ENTER
AUTO SYNC
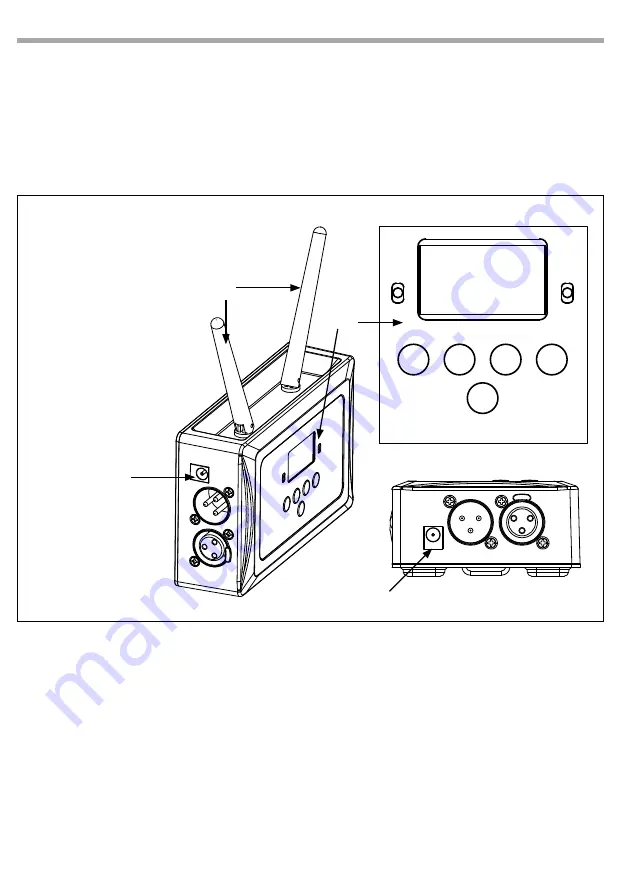
1
1
2
3
Fig.5
1. POWER IN: DC9V
2. CONTROL PANEL with
display and button
used to access the
control panel functions
and manage them
3. WIRELESS ANTENNA
“SmartColors” app configuration
Important: WIFIBOX hardware is required to use this app.
•
Turn on the WIFIBOX and set it as described in the previous chapter. When switch on the WIFIBOX, it will
generate a wifi network called “WIFI -TEST”.
•
Install “SmartColors” app on your Android/Apple device.
•
Connect your Android/Apple device to “WIFI-TEST”.
•
Launch the app “SmartColors”.
•
After SmartColors app has been open, you can see “Device WIFI-TEST connected” message. If this mes-
sage doesn’t appear, see the WIFIBOX configuration chapter.
Before using the application, check that all devices are properly configured with WIFIBOX.
Now we try to add an example of projector: the MOBIBLAST.
Содержание WIFIBox
Страница 1: ...MANUALE UTENTE USER MANUAL WIFIBOX IT EN light control system Trasmettitore DMX Wireless...
Страница 26: ......
Страница 29: ......
Страница 30: ......
Страница 31: ......


