background image

7

ECLJRG2

- 3 -  FUNCTIONS  AND SETTINGS

3.1 OPERATION

Connect the supplied main cable to a socket (100-240 VAC-50/60 Hz). Then the unit is ready for operation 

and can be operated via a DMX controller. To switch off, disconnect the mains plug from the socket. For a 

more convenient operation it is recommended to connect the unit to a socket which can be switched on 

and off via a light switch.


3.2 BASIC

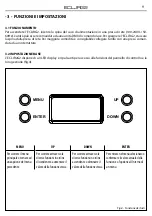
Access control panel functions using the four panel buttons located directly underneath the LCD Display 

(fig.4).

MENU

UP

DOWN

ENTER

Used to access the menu or 
to return a previous menu 
option

Navigates downwards through 
the menu list and increases 
the numeric value when in a 
function

Navigates upwards through 
the menu list and decreases 
the numeric value when in 
a function

Used to select and store the 
current menu or confirm the 
current function value or 
option within a menu

Fig.4 - Functions of the buttons

MENU

UP

DOWN

ENTER

Содержание ECLJRG2

Страница 1: ...USER MANUAL MANUALE UTENTE EN IT LED PROFILER ECLJRG2 ...

Страница 2: ...y means for any commercial use In order to improve the quality of products Music Lights S r l reserves the right to modify the characteristics stated in this instruction manual at any time and without prior notice All revisions and updates are available in the manuals section on site www musiclights it REV 02 02 19 ...

Страница 3: ... Mounting 3 Functions and settings 3 1 Operation 3 1 Operation 3 2 Basic 3 2 Basic 3 3 Menu structure 3 3 Menu structure 3 4 Static mode 3 4 Static mode 3 5 Linking 3 5 Linking 3 6 DMX configuration 3 6 DMX configuration 3 7 DMX mode 3 7 DMX mode 3 8 Connection of the DMX line 3 8 Connection of the DMX line 3 9 Construction of the DMX termination 3 9 Construction of the DMX termination 3 10 DMX co...

Страница 4: ...l to the environment Warnings and installation precautions If this device will be operated in any way different to the one described in this manual it may suffer damage and the guarantee becomes void Furthermore any other operation may lead to dangers like short circuit burns electric shock etc Before starting any maintenance work or cleaning the projector cut off power from the main supply Always...

Страница 5: ... 80 97 TLCI TU 71 DY 66 OPTICS Zoom 25 50 manual zoom lens Lens type high quality glass lens optics Other 25 50 zoom lens included DYNAMIC EFFECTS Gobo size M outer 66 mm image 45 mm thickness 1 1 mm Manual colour mode manual adjustment of dimmer and strobe BODY Body sturdy die cast aluminium body conceived for long time durability Body colour black white finishing available CONTROL Protocols DMX5...

Страница 6: ...power line Output at 120 V 19 units on a single power line PHYSICAL Cooling forced air with low noise fan Sospension and fixing hanging bracket suitable for safe hanging and positioning Signal connection DMX 5p IN OUT Power connection Seetronic powerCON IN OUT connectors IP rating 20 Dimensions WxHxD 259x430x529mm Weight 5 76kg 430 259 529 ...

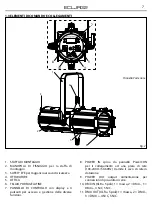
Страница 7: ...R FRAME 7 CONTROL PANEL with display and 4 button used to access the control panel functions and manage them 8 POWER IN mains plug for connection to a socket 100 240V 50 60Hz via the supplied mains cable 9 POWER OUT connect to supply power to the next unit 10 DMX IN 5 pole XLR 1 ground 2 DMX 3 DMX 4 N C 5 N C 11 DMX OUT 5 pole XLR 1 ground 2 DMX 3 DMX 4 N C 5 N C 4 1 3 6 5 2 7 11 9 10 8 ...

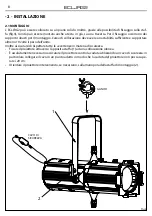
Страница 8: ...on always comply scrupulously with all the regulations particularly re garding safety currently in force in the country in which the fixture s being used Install the projector at a suitable location by means of the mounting bracket 1 Always additionally secure the projector with the safety rope from falling down For this purpose fas ten the safety rope at a suitable position so that the maximum fa...

Страница 9: ... off via a light switch 3 2 BASIC Access control panel functions using the four panel buttons located directly underneath the LCD Display fig 4 MENU UP DOWN ENTER Used to access the menu or to return a previous menu option Navigates downwards through the menu list and increases the numeric value when in a function Navigates upwards through the menu list and decreases the numeric value when in a fu...

Страница 10: ... IN of the first slave unit 2 Connect the DMX OUT of the first slave unit to the DMX IN of the second slave unit etc until all units are connected in a chain 3 6 DMX CONFIGURATION ECLJRG2 is equipped with different DMX configuration Press the button MENU so many times until shows 1CH 3CH and press the button ENTER to select the desired DMX configuration Select the desired DMX start address 001 512...

Страница 11: ...ed for controlling the function of the first DMX channel adjust the start address 33 on the ECLJRG2 The other functions of the light effect panel are then automatically assigned to the following addresses An example with the start address 33 is shown below Number of DMX channels Start address example DMX Address occupied Next possible start address for unit No 1 Next possible start address for uni...

Страница 12: ...X output of the first unit Connect the DMX output to the DMX input of the following unit Connect again the output to the input of the following unit until all the units are connected in chain When the signal cable has to run longer distance is recommended to insert a DMX termination on the last unit 3 9 CONSTRUCTION OF THE DMX TERMINATION The termination avoids the risk of DMX 512 signals being re...

Страница 13: ...ION DMX Value 3 Ch 1 DIMMER 0 100 000 255 2 STROBE No Function Strobe Slow to Fast 000 010 011 255 3 Dimmer Speed Mode Preset dimmer speed from display menu Dimmer speed mode off Dimmer speed mode 1 fast speed Dimmer speed mode 2 middle speed Dimmer speed mode 3 slow speed 000 051 052 101 102 152 153 203 204 255 ...

Страница 14: ...tton MENU so many times until shows dIM and press the button ENTER to confirm Press the button UP DOWN to select OFF dIM1 dIM2 dIM3 Press ENTER button to store Fan Mode To set the Fan Mode press the button MENU so many times until shows FAN and press the button ENTER to confirm Press the button UP DOWN to select AUTO ON OFF SLnt Press ENTER button to confirm the selection ...

Страница 15: ...tion and should be replaced immediately even when a small problem is detected It is recommended to clean the front at regular intervals from impurities caused by dust smoke or other particles to ensure that the light is radiated at maximum brightness For cleaning disconnect the main plug from the socket Use a soft clean cloth moistened with a mild detergent Then carefully wipe the part dry For cle...

Страница 16: ...pri scopi commerciali è vietata Al fine di migliorare la qualità dei prodotti la Music Lights S r l si riserva la facoltà di modificare in qualunque momento e senza preavviso le specifiche menzionate nel presente manuale di istruzioni Tutte le revisioni e gli aggiornamenti sono disponibili nella sezione Manuali sul sito www musiclights it REV 02 02 19 ...

Страница 17: ... Funzionamento 3 1 Funzionamento 3 2 Impostazione base 3 2 Impostazione base 3 3 Struttura menu 3 3 Struttura menu 3 4 Modalità Static 3 4 Modalità Static 3 5 Collegamento 3 5 Collegamento 3 6 Configurazione canali DMX 3 6 Configurazione canali DMX 3 7 Modalità DMX 3 7 Modalità DMX 3 8 Collegamenti della linea DMX 3 8 Collegamenti della linea DMX 3 9 Costruzione del terminatore DMX 3 9 Costruzione...

Страница 18: ...terventi devono essere sempre e solo effettuati da personale tecnico qualificato Rivolgersi al più vicino centro di assistenza tecnica autorizzato Se si desidera eliminare il dispositivo definitivamente consegnarlo per lo smaltimento ad un istituzione locale per il riciclaggio Attenzioni e precauzioni per l installazione Se il dispositivo dovesse trovarsi ad operare in condizioni differenti da que...

Страница 19: ...Altro TM30 15RF RG TU 83 96 DY 80 97 TLCI TU 71 DY 66 OTTICA Zoom 25 50 lente zoom manuale Tipo lente gruppo ottico composto da lente in vetro HQ Altro 25 50 zoom lens included EFFETTI DINAMICI Dimensioni gobos M outer 66 mm image 45 mm thickness 1 1 mm Modalità colore manuale regolazione manuale dimmer e strobo CORPO Corpo corpo in alluminio pressofuso ad alta resistenza Colore nero variante con ...

Страница 20: ...utput a 120 V 19 unità connesse in serie CARATTERISTICHE FISICHE Raffreddamento aria filtrata forzata con ventole silenziate Sospensione e fissaggio staffa per il fissaggio in sospensione e per il posizionamento del proiettore con qualsiasi orientamento Connessione di segnale DMX 5p IN OUT Connessione di alimentazione Seetronic powerKon IN OUT connectors Grado IP 20 Dimensioni LxAxP 259x430x529mm ...

Страница 21: ...accesso e gestione delle diverse funzioni 8 POWER IN spina da pannello PowerCON per il collegamento ad una presa di rete 100 240V 50 60Hz tramite il cavo di rete in dotazione 9 POWER OUT output alimentazione per connessioni di più unità in serie 10 DMX IN XLR a 5 poli 1 massa 2 DMX 3 DMX 4 N C 5 N C 11 DMX OUT XLR a 5 poli 1 massa 2 DMX 3 DMX 4 N C 5 N C Pannello Posteriore 1 3 ELEMENTI DI COMANDO...

Страница 22: ...na stabilità sufficiente e supportare almeno 10 volte il peso dell unità Inoltre assicurarsi di rispettare tutte le avvertenze in materia di sicurezza Fissare il proiettore attraverso l apposita staffa 1 ad una collocazione idonea È assolutamente necessario assicurare il proiettore contro la caduta utilizzando un cavo di sicurezza in particolare collegare il cavo in un punto adatto in modo che la ...

Страница 23: ...ASE L ECLJR2G2 dispone di un LED display e 4 pulsanti per accesso alle funzioni del pannello di controllo e la loro gestione fig 4 Fig 4 Funzione dei tasti MENU UP DOWN ENTER Per scorrere il menu principale o tornare ad una opzione del menu precedente Per scorrere attraverso le diverse funzioni in ordine discendente o aumentare il valore della funzione stessa Per scorrere attraverso le diverse fun...

Страница 24: ...servendosi di un cavo XLR a 3 poli 2 Collegare l uscita DMX OUT della prima unità secondaria con l ingresso DMX IN della seconda unità secondaria ecc 3 6 CONFIGURAZIONE CANALI DMX ECLJRG2 dispone di diverse configurazioni dei canali DMX a cui si può accedere dal pannello di controllo Premere il tasto MENU fino a quando sul display non appare 1CH 3CH quindi premere il tasto ENTER per selezionare la...

Страница 25: ...U fino a quando sul display non appare 1 CH 3 CH quindi premere il tasto ENTER Premere il tasto UP DOWN per selezionare il valore desiderato 001 512 tenere premuto invece il tasto UP DOWN per lo scorrimento veloce Premere il tasto ENTER per confermare l impostazione Per poter comandare l ECLJRG2 con un unità di comando luce occorre impostare l indirizzo di start DMX per il primo canale DMX Se per ...

Страница 26: ...asmettere in modo affidabile i dati di controllo DMX Collegare l uscita DMX del controller con l ingresso DMX della prima unità Collegare quindi l uscita DMX con l ingresso DMX della successiva unità l uscita di quest ultima con l ingresso di quella successiva e via dicendo finchè tutte le unità sono collegate formando una catena Per installazioni in cui il cavo di segnale deve percorrere lunghe d...

Страница 27: ...N DMX Value 3 Ch 1 DIMMER 0 100 000 255 2 STROBE No Function Strobe Slow to Fast 000 010 011 255 3 Dimmer Speed Mode Preset dimmer speed from display menu Dimmer speed mode off Dimmer speed mode 1 fast speed Dimmer speed mode 2 middle speed Dimmer speed mode 3 slow speed 000 051 052 101 102 152 153 203 204 255 ...

Страница 28: ...sul display non compare dIM quindi premere il tasto ENTER Premere il tasto UP DOWN per selezionare OFF dIM1 dIM2 dIM3 Premere il tasto ENTER per confermare la scelta Fan Mode Per impostare la modalità di funzionamento delle ventole premere il tasto MENU ripetutamente fino a quando sul display non compare FAN quindi premere il tasto ENTER Premere il tasto UP DOWN per selezionare AUTO ON OFF SLnt Pr...

Страница 29: ... essere sostituiti immediata mente nel momento in cui anche un piccolo problema viene rilevato Si dovrebbe procedere ad intervalli regolari alla pulizia della parte frontale per asportare polvere fumo e altre particelle Solo così la luce può essere irradiata con la luminosità massima Per la pulizia usare un panno morbido pulito e un detergente per vetri come si trovano in commercio Quindi asciu ga...

Страница 30: ......

Страница 31: ......

Страница 32: ... 2020 Music Lights S r l PROLIGHTS è un brand di proprietà della Music Lights S r l PROLIGHTS is a brand of Music Lights S r l company MUSIC LIGHTS S r l Phone 39 0771 72190 www musiclights it ...

Отзывы: