background image

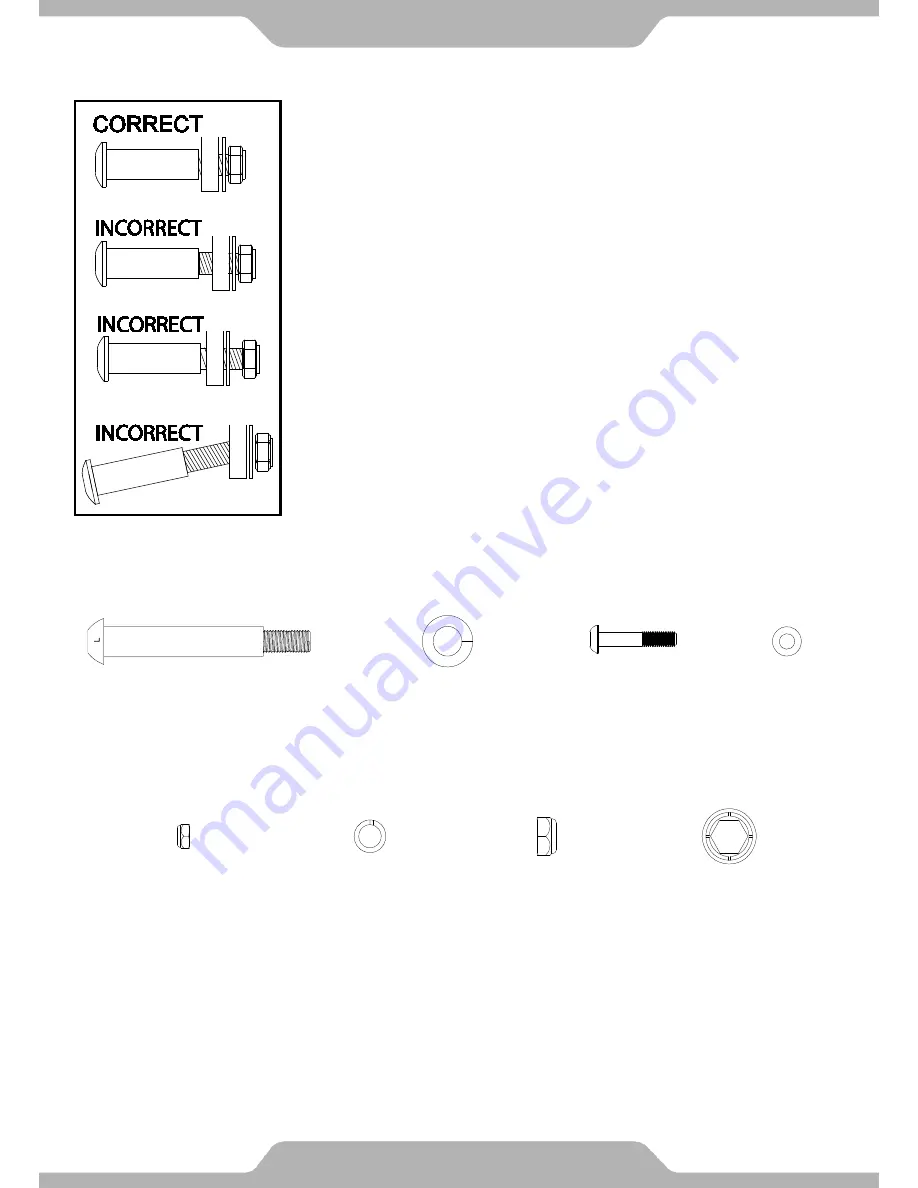
Hardware: 


ASSEMBLY

(64) Left Crank Bolt

1PC


(22) Wave Washer

1PC


(23) Bolt

2PCS

(24) Washer

2PCS

(25) Nylon Nut

2PCS

(27) Spring Washer

1PC


(87) Left Nylon Nut

1PC


(97) Nut Cap

1PC

15 

Figure F. 

Note: Figure F 

shows the correct installation of the 

Left Crank Bolt 

(64)

. Keep the bolt perfectly straight when the bolt goes through the 

Left 

Foot Bar (76),

 and is being screwed into the 

Left Crank (75)

. If the bolt 

is screwed into the crank at an angle, this may damage the equipment. 

Please make sure the right bolt is for the right crank only and the 
left bolt is for the left crank only. If secured incorrectly, the bolts 
and/or cranks may be damaged or stripped.   

Содержание 300LS

Страница 1: ...instructions carefully before using this product Retain this owner s manual for future reference The specifications of this product may vary from this photo and subject to change without notice Air El...

Страница 2: ...PRODUCT TO THE STORE If you need help with Product information assembly or replacement parts Please contact Customer Service Email us at Service paradigmhw com Hours 8 00 AM to 5 00 PM PST Daily Or c...

Страница 3: ...SAFETY GUIDELINES 4 OVERVIEW DRAWING 5 PARTS LIST 6 HARDWARE TOOLS PACK 8 ASSEMBLY 10 COMPUTER CONSOLE 22 TENSION ADJUSTMENT 23 LEVEL ADJUSTMENTS 24 MOVING THE ELLIPTICAL EQUIPMENT 25 MAINTENANCE 26...

Страница 4: ...m Toll Free 1 844 641 7920 Response time may vary via calling Please have the following information ready when requesting for service Your name Phone number Model number Serial number Part number Proo...

Страница 5: ...LABEL PLACEMENT 3...

Страница 6: ...run smoothly push or pull on the handlebars first before testing the leg motions To dismount reduce pedaling speed gradually before you stop When stepping off the machine make sure you step off one l...

Страница 7: ...5 OVERVIEW DRAWING...

Страница 8: ...ebar Foam Grip 24x 30x240 2 011 Bolt M10x55 2 033 Hand Pulse Handlebar 1 012 Handrail End Cap 32x1 5 2 034 Wire Grommet 12 1 2 013 Serrated Lock Washer External Teeth 10 2 035 Hand Pulse Sensor Wire L...

Страница 9: ...1 058 Nut M8 2 086 Screw ST4 2x20 2 059 Mainframe 1 087 Nylon Nut for Left Crank 1 2 1 060 Rotation Rod 15 8x376 1 088 Nut Cap S16 4 061 Rear Stabilizer End Cap 50 2 089 Small Magnet 15x7 1 062 Rear S...

Страница 10: ...HARDWARE TOOLS PACK 8...

Страница 11: ...THIS PAGE IS INTENTIONALLY LEFT BLANK 9...

Страница 12: ...hrough the Front Stabilizer 54 and secure with two Curve Washers 55 and two Cap Nuts 56 Using the Open Ended Flat Wrench tighten the Cap Nuts 56 until they are secure Align and attach the Rear Stabili...

Страница 13: ...ided Insert the Rotation Rod 60 into the tube on the top of the Mainframe 59 above the flywheel Slide the Right Handrail 9 onto the right end of the Rotation Rod 60 and insert a Bolt 5 Spring Washer 6...

Страница 14: ...insert it through the hole of the Right Crank 26 Turn the Right Crank Bolt 21 clockwise by hand until it is firm After hand tightening completely tighten the Right Crank Bolt 21 with the 8mm Allen Wre...

Страница 15: ...If the bolt is screwed into the crank at an angle this may damage the equipment Please make sure the right bolt is for the right crank only and the left bolt is for the left crank only If done incorr...

Страница 16: ...h the threaded hole of the Left Crank 75 Turn the Left Crank Bolt 64 counter clockwise by hand until it is firm After hand tightening completely tighten the Left Crank Bolt 64 with the 8mm Allen Wrenc...

Страница 17: ...ation of the Left Crank Bolt 64 Keep the bolt perfectly straight when the bolt goes through the Left Foot Bar 76 and is being screwed into the Left Crank 75 If the bolt is screwed into the crank at an...

Страница 18: ...Nylon Nuts 14 Tighten the Nylon Nuts 14 using the Open Ended Flat Wrench provided Attach the Left Foot Pedal 19L onto the top of the left side Foot Pedal Support Bracket 18 located on the Left Foot Ba...

Страница 19: ...e 6mm Allen Wrench and Open Ended Flat Wrench simultaneously Insert the Left Handrail Arm 90 with the handlebar grip facing outwards into the Left Lower Handrail 77 and align the holes Secure the Left...

Страница 20: ...the Hand Pulse Handlebar Support Frame 41 onto the Mainframe 59 with four Bolts 47 four Spring Washers 36 and four Washers 24 Use the 6mm Allen Wrench with Phillips Screwdriver to tighten the bolts u...

Страница 21: ...afely dispose of the Clip 101 Mount the Tension Control Knob 37 to the Hand Pulse Support Frame 41 as shown in Figure D Secure the Tension Control Knob 37 to the Hand Pulse Support Frame 41 with the C...

Страница 22: ...and Pulse Handlebar Support Frame 41 with two Carriage Bolts 39 two Cap Nuts 80 and two Big Curve Washers 81 Using the Open Ended Flat Wrench tighten the cap nuts until they are firm and secure 20 Too...

Страница 23: ...ake sure the connectors click when connected Attach the Computer Console 29 firmly by sliding the back of the console onto the Tab located on the top of the Hand Pulse Handlebar 33 then slide it down...

Страница 24: ...w points to DISTANCE the computer console will display the cumulative distance traveled during the workout CALORIE Press the MODE button until the arrow points to CALORIE the computer console will dis...

Страница 25: ...unter clockwise direction until it is at its lowest setting Do not continue to turn the knob after reaching its lowest or highest setting for it may damage the knob 2 To tighten the strap undo the buc...

Страница 26: ...designed with different angled surfaces to level the equipment during usage Please rotate the Rear Stabilizer End Cap 61 until there is a flat surface that is in contact and parallel to the ground Fig...

Страница 27: ...il the wheels on the Front Stabilizer 93 make contact with the floor Push or pull the unit to the desired location while balancing on the wheels Then gently lower the Rear Stabilizer 62 to the ground...

Страница 28: ...ff the elliptical equipment after each use and to keep it clean for the next use Lubrication Make sure to lubricate the moving parts of the elliptical equipment to prevent it from squeaking and help t...

Страница 29: ...ely connected to the wire with a male connector coming out from the Computer Console 29 See Step 10 page 21 3 Check that the two Hand Pulse Sensor Wires 35 from the hand pulse handlebar are connected...

Страница 30: ...nt of the unit away downward to re tighten the tension belt See page 23 The pedal assembly is coming loose 1 Make sure the bolt is secured to the foot bar and into the crank with the nylon nut When ti...

Страница 31: ...aused by normal wear and tear vandalism accidental or by animals 5 Any act of Nature such as fire flooding snow ice hurricane earthquake lightning or other natural disaster environmental condition suc...

Страница 32: ...ELEPHONE Day _____________________________________________ Night ____________________________________________ SERIAL _____________________________________________________ MODEL _______________________...

Отзывы: